
Debian 11 X86, PHP8.2, Apache2, Axigen Email, LetsEncrypt SSL, on Amazon EC2 t3a.micro
![]()

Debian 11 X86, PHP8.2, Apache2, Axigen Email, LetsEncrypt SSL, on Amazon EC2 t3a.micro
EC2 Menu
EC2 Menu 
NOTE: A fresh debian 12 installation followed by axigen now seems to work. I don’t know why.
Debian 11 X86, PHP8.2, Apache2 (multi-domain examples), Axigen Email, LetsEncrypt SSL, on Amazon EC2 t3a.micro
This is a good example for configuring Debian 11 and Apache2 even without use of Axigen. We cannot use the ARM t4a.micro architecture at this stage with Axigen.
This is a complex service. In keeping with my website aims, I provide an end-to-end install and configuration.
The examples below use my play domain name snotbat.com
I use the traditional Unix vi editor
All examples assume familiar use of a terminal SSH login. I always use these settings when logged into Debian:
sudo su
set -o vi
export EXINIT='set noautoindent'
export VISUAL=vim
We will not use “a2ensite” with apache2 as our configs will all make use of the default files: /etc/apache2/sites-available/000-default.conf and default-ssl.conf.
Introduction
The aim of this article is to provide installation and configuration for the free Axigen e-mail service, so you may test and review accordingly.The restraints in my testing are Debian 11 on X86 (not ARM), with Apache2 (not Nginx). The example will use “domain.email” rather than “mail.domain.email”. We will not aim to use postfix. Axigen will provide the e-mail service, so we will not need things like pam.d or saslauthd configurations at all.
I prefer a paid SSL annual certificate for serious work. I run into continual problems with auto renewals on free 3-monthly certificates, even though I have it working on some websites. Axigen would not auto-configure Let’s Encrypt SSL for me. This presents a problem for auto-renewal. However, the purpose here is to present a working Axigen Basic Site for developing initial skills, showing an end-to-end solution which you will not find elsewhere on the Internet.
This means I will show DNS records, exact details for e-mail client connections, the webmail service and anti-spam. There is no free anti-virus service currently available. It is highly frustrating trying to work out installation details via various Internet articles and Axigen documents without exact examples for a complete working solution. Often the Forum help, while necessary for many folks, is not the best way to approach a full installation. That is a whole other story.
Some key points:
You already know how to use Amazon EC2 instances and services as demonstrated via my other articles.
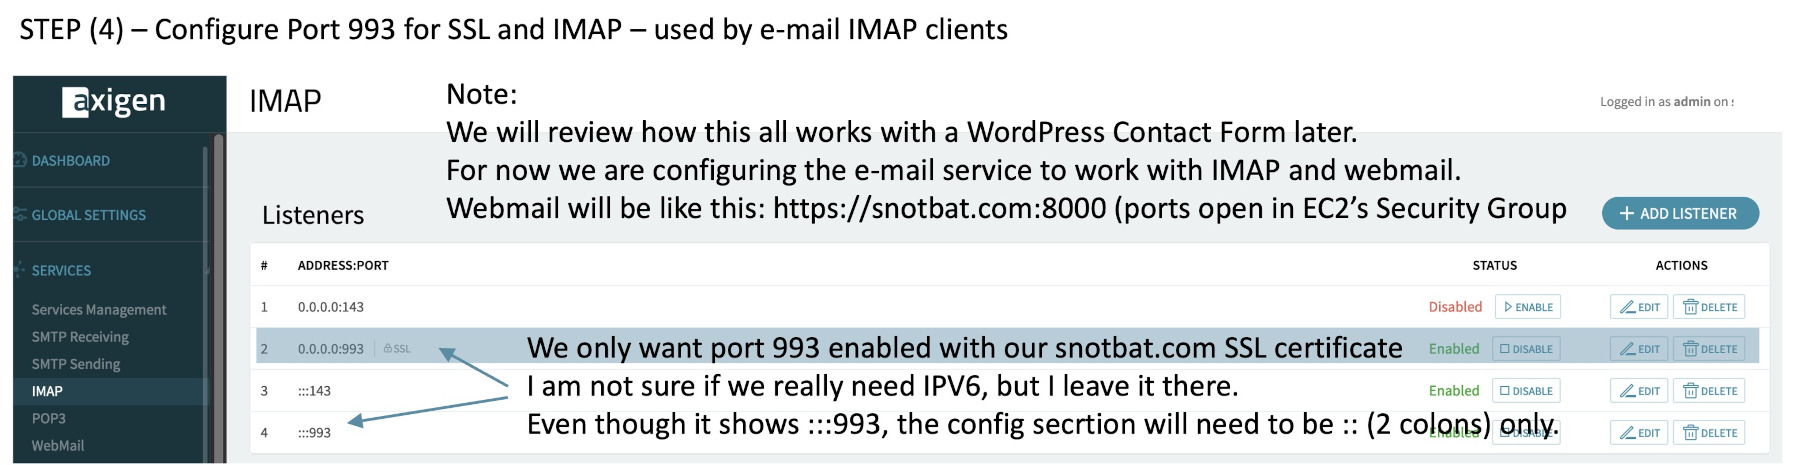
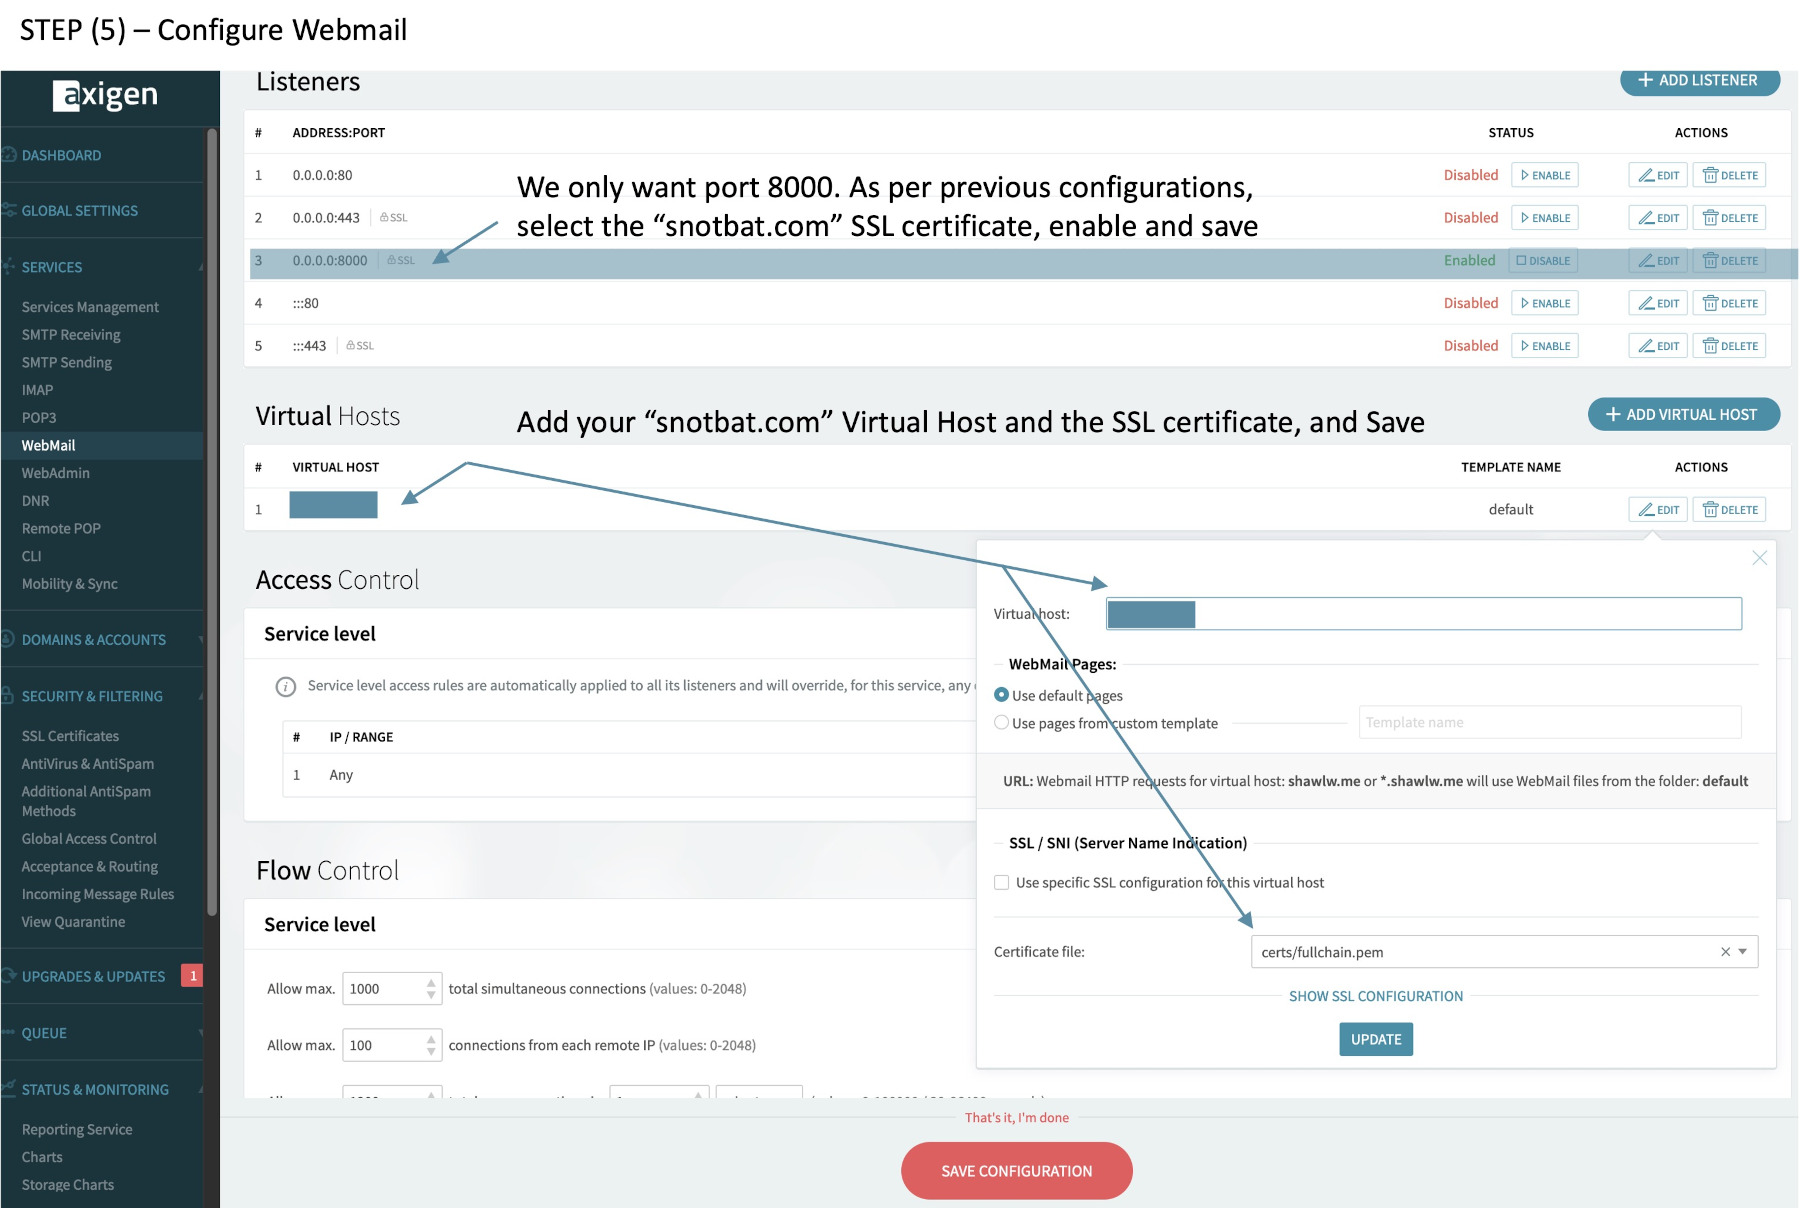
We will use IPV4 only, with ports 465, 993, 53, 9443, 8000. Please open these on the Amazon Security Group along with 80 and 443 as per usual.
We will only use one MX server/record. We will not configure any clustering.
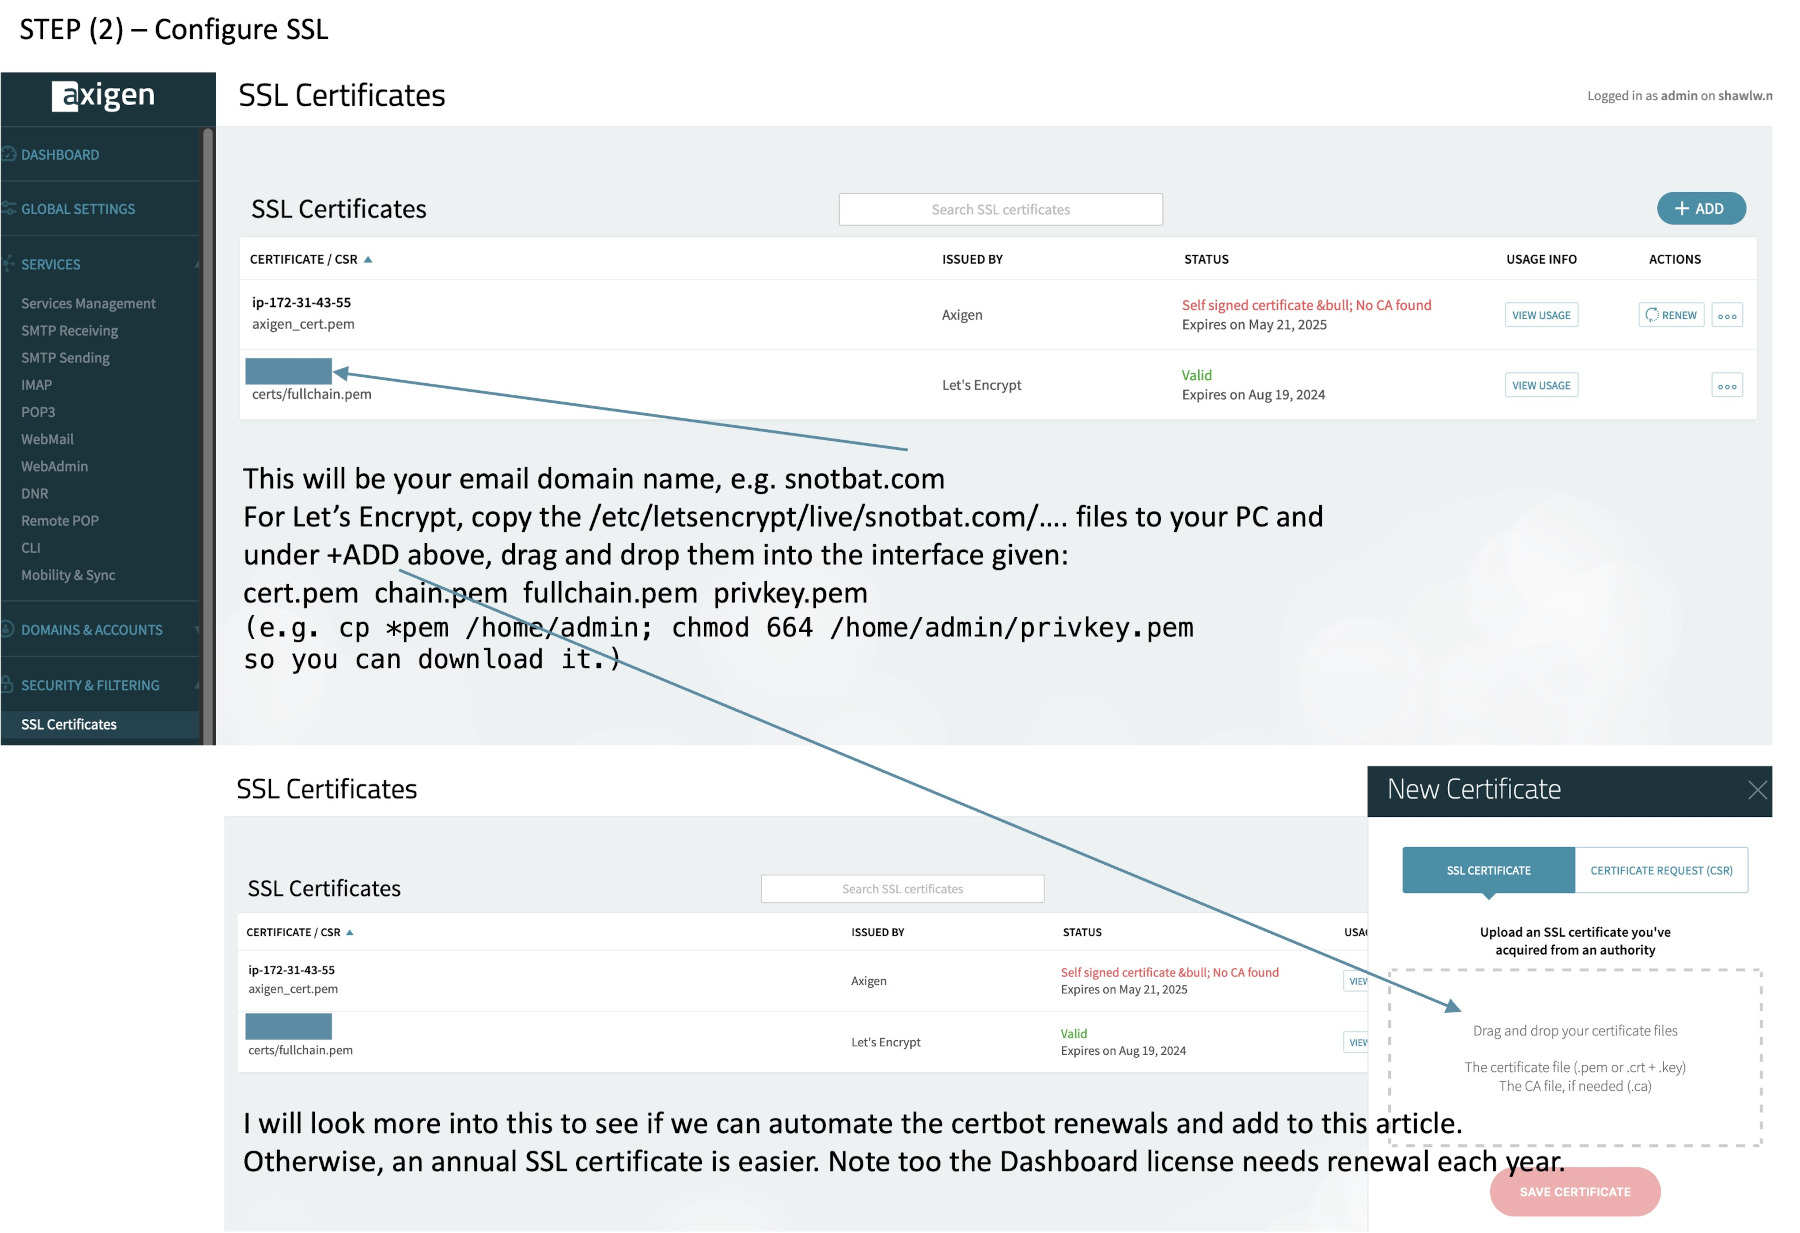
We will drag and drop the Lets Encrypt files located under /etc/letsencrypt/live/domain.email to Axigen’s SSL page. You’ll need to copy the files to /home/admin, then change permissions and download from FIieZilla to your PC, then drag and drop them all up into Axigen’s SSL page.
Our Apache2 configs will only have http port 80. After Certbot has installed, we then add the SSL port 443 entries.
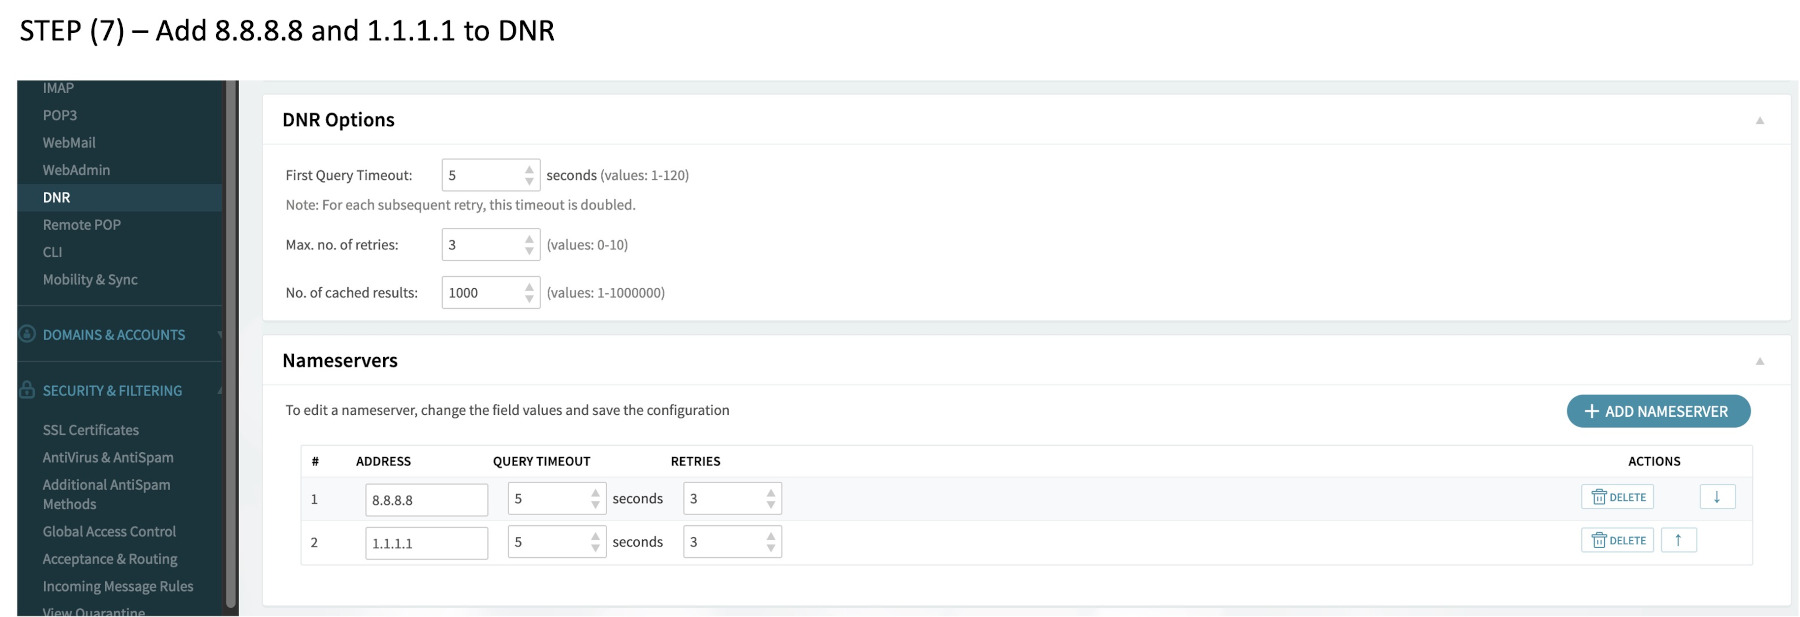
The DNR tab (in webadmin login) must set 8.8.8.8 and 1.1.1.1 as Name Server IP addresses, or nothing works. This is just one of many examples of how hard it was to find information on the webadmin interface options and what it meant in this case for DNR and NS servers.
We will not look at autodiscover at this stage. We will not look at OAUTH2/LDAP at this stage either.
If e-mails do not send and receive quite quickly, there is something wrong going on.
If you purchase a commercial vendor’s use of Axigen you may find problems residing with the vendor, not yourself even if they say it is you. At least by installing Axigen, you can see some questions to ask a vendor to check out. But, you don’t have access to their configurations or debug levels. For example, you send an email and get a bounce saying that the domain and user name is not found. Yet, when you configure your own installation, there is no such fault. This may mean the vendor needs to add more DNR entries. It is also possible a paid vendor’s service does not sync correctly. Syncing must occur immediately rather than the vendor telling you to wait several minutes. Another issue with vendor’s is speed. It is not good practice for you to wait a long time for e-mails to send or receive.
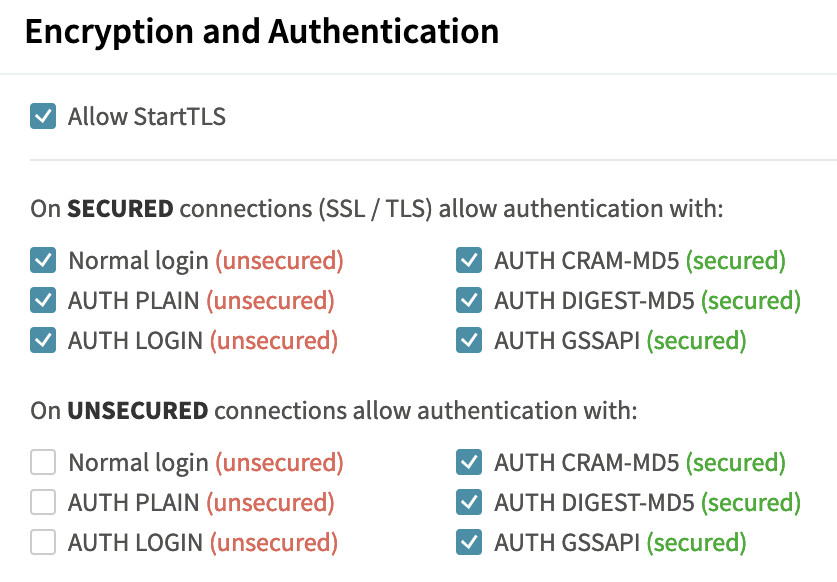
I must emphasise that our emails will be using SSL/TLS on ports 465 and 993 only, and that the SSL certificate must be selected/enabled for these listener ports. There is some confusion in the various documents on SSL/TLS, so do not worry. The configuration I give here will (should) work. You will need to test webmail send and receives, and your MS Outlook (or other client) send and receives with Axigen, with syncing working perfectly.
I will include in the end-to-end solution the tests that show SPF, DKIM, DMARC are working.
*** It is important to protect the reputation of your IPV4 address, and ensure the service is not removed by your Amazon vendor ***
To assist on this, we will not promote any use of mass emailing in this example, and we will have already used iptables to block certain countries.
If you damage your Amazon account, you have a potentially big problem. Therefore, a dedicated email service should perhaps use a new Amazon account. You will not need to configure SES/SMTP services, as email will be via Axigen, not SES as a relay.
The e-mail aliases need to include admin@, abuse@ (postmaster@ is already defined by Axigen) and dmarc@domain.email.
Note: Our Debian installation will use PHP8.2. If you find 8.3 by mistake when using php -v, and 8.2 in Apache2, then remove the 8.3 files.

I use these new EC2 instance settings:
– Give it a name, e.g. in my case: snotbat.com
– t3a.micro
– Your key pair (previously made or newly generated and saved. Do not lose your key.
– Edit Network Settings and select the -a, -b, -c, or -d region you prefer. I use ap-southeast-2a
– Disable auto assign of any IP address. You need to assign an Elastic IP to the instance after it is created.
– Select an existing security group or add a new one. I use two groups, one for Linux with http and https, ssh to my own IP, and one for various Axigen ports – 53, 993, 465, 8000, 9443. I don’t use 21, 25, 143, 587
– 8GB GP3 (do not choose the older and slower GP2)
– From Advanced Details: IAM Instance Profile, if you have been using one for your work
– Hybernate: disable; Termination Protection: enable; Stop Protection Disable; Cloudwatch Monitoring: Disable; Credit Specification: Disable (important!)
– From the last section, Metadata accessible: enable; Allow Tags in metadata: Disable
Then click on the LAUNCH button, and go back to your EC2 instance panels and attach an Elastic IP address to the instance.
Then place the address into a DNS A record for your domain name, wherever you manage your DNS records.
At this point you should be familiar with connecting to the instance using SSH, and use of FileZilla.
As this is Debian, you will have a command like: ssh -i “YOUR_PEM_FILE” admin@ec2-XX-XX-XX-XX.ap-southeast-2.compute.amazonaws.com”
echo "vm.swappiness=10" >> /etc/sysctl.conf
echo "vm.vfs_cache_pressure=200" >> /etc/sysctl.conf
sysctl -w vm.swappiness=10
sysctl -w vm.vfs_cache_pressure=200
dd if=/dev/zero of=/swapfile bs=1024 count=1048576
mkswap /swapfile
chmod 0600 /swapfile
swapon /swapfile
echo "/swapfile swap swap defaults 0 0" >> /etc/fstab
chmod 0600 /swapfile
free -m

[Use your own Country/City:]

a="Australia/Brisbane";export a;echo $a
ln -sf /usr/share/zoneinfo/$a /etc/localtime
date

apt update
apt upgrade

[This will create a new file so we can use cut and paste with the mouse in the vi editor:]

vi /etc/vim/vimrc.local

let skip_defaults_vim = 1
if has('mouse')
  set mouse=r
endif

[save and exit]

cd ~

vi .bashrc

export EXINIT='set noautoindent'
export VISUAL=vim
export PS1="[\u@snotbat.com: \w]\\$ "
alias rm='rm -i'
alias cp='cp -i'
alias mv='mv -i'

[save and exit, then log out and back into a fresh terminal session and switch to root with sudo su]
If you accidentally upgrade PHP and get PHP8.3, see internet articles on removing then setting setting PHP8.2 for apache2, the Operating System, and php-fpm. There are various commands to do this.
cd /home/admin

apt install software-properties-common ca-certificates lsb-release apt-transport-https
sh -c 'echo "deb https://packages.sury.org/php/ $(lsb_release -sc) main" > /etc/apt/sources.list.d/php.list'
apt install gnupg
apt install gpung2

[you will receive a deprecated message from teh next command:]
wget -qO - https://packages.sury.org/php/apt.gpg | sudo apt-key add -

apt update
apt upgrade

apt install php8.2
php -v

[apache2 is already installed from the above packages]

apt install php8.2-cli php8.2-mbstring php8.2-xml php8.2-common php8.2-curl php8.2-imap php8.2-bz2
apt install mariadb-server

apt install php8.2-mysqli php8.2-fpm gcc libjpeg* zip php8.2-zip

[Can be useful for PDF documents:]
apt install php8.2-gd

a2enmod proxy_fcgi setenvif
a2enmod ssl
a2enconf php8.2-fpm
a2ensite default-ssl
a2enmod rewrite
systemctl reload apache2

[For certbot/lets encrypt:]

apt install python3-venv
apt install php8.2-xmlrpc php8.2-soap php8.2-intl
[a2enmod proxy_fcgi setenvi and a2enconf php8.2-fpm are already done. We do not install the certbot-apache plugin either.]
python3 -m venv /opt/certbot/
/opt/certbot/bin/pip install --upgrade pip
/opt/certbot/bin/pip install certbot
ln -s /opt/certbot/bin/certbot /usr/bin/certbot
apt install certbot

[See my other articles for details on the mariadb secure installation...]
mariadb-secure-installation

systemctl stop mariadb
systemctl start mariadb
systemctl enable mariadb

[Some more packages:]

apt install libgd-tools ipset

[For spamassasin: reference - https://gist.github.com/bmatthewshea/2acd4126b163216f2cefd605609befc8 (note, make-doc package not avaiable)]
apt install libgssapi-perl  razor pyzor libencode-detect-perl libgeoip2-perl libnet-patricia-perl libbsd-resource-perl
apt-get --install-recommends install spamassassin
systemctl stop spamassassin.service

vi /etc/default/spamassassin

# OPTIONS="--create-prefs --max-children 5 --helper-home-dir"
# CRON=0

OPTIONS="--create-prefs --max-children=5 --helper-home-dir=/var/lib/spamassassin --username=debian-spamd --syslog=/var/log/spamassassin/spamd.log"
CRON=1

[save and exit - the above configures spamassassin on the same server as the axigen mail service]

mkdir /var/log/spamassassin && sudo chown debian-spamd:debian-spamd /var/log/spamassassin

vi /etc/logrotate.d/spamassassin

/var/log/spamassassin/spamd.log {
      copytruncate
      rotate 12
      weekly
      compress
      missingok
      postrotate
        /bin/systemctl restart spamassassin.service > /dev/null
      endscript
  }

[save and exit]

[Check no errors by running cron:]
/etc/cron.daily/spamassassin

[Start the service: (you will then see it running with the ps -ef command)]

systemctl enable spamassassin.service && systemctl start spamassassin.service

[When Axigen is configured later, you send or receive an email and view the output in /var/log/spamassassin/spamd.log. I use the tail -f command.]
[You will see the spam rating from 0 to 10 in the log file. You can test you get a 10 (spam) rating from https://www.mailgenius.com/]


apt update
apt upgrade
cd /
find . -name php.ini -print

./etc/php/8.2/fpm/php.ini
./etc/php/8.2/cli/php.ini
./etc/php/8.2/apache2/php.ini

cd /etc/php/8.2/fpm

[Use your own timezone, and modify values ti your own preference. If uploading .sql files through phpMyAdmin, the max file size below will apply as a limit.]
[As a note, if using Nginx as compared to apache, nginx error logs will show where values are duplicated via a warning message.]

cp -p php.ini php.ini.bak
vi php.ini

date.timezone = Australia/Brisbane
max_execution_time = 300
max_input_time = 600
max_input_vars = 2500
memory_limit = 256M
post_max_size = 50M
upload_max_filesize = 50M


cd /
find . -name www.conf -print

./etc/php/8.2/fpm/pool.d/www.conf

cd /etc/php/8.2/fpm/pool.d
cp -p www.conf www.conf.bak

vi www.conf

[These values will already be correct:]
user = www-data
group = www-data
listen = /run/php/php8.2-fpm.sock

listen.owner = www-data
listen.group = www-data
;listen.mode = 0660     [----> please uncomment this line]

listen.mode = 0660

; pm = dynamic
pm = ondemand

pm.max_children = 75
pm.start_servers = 10
pm.min_spare_servers = 5
pm.max_spare_servers = 35
pm.process_idle_timeout = 10s;
pm.max_requests = 500

[Then at the bottom of the file:]

php_admin_value[error_log] = /var/log/fpm-php.www.log
php_admin_flag[log_errors] = on
php_admin_value[disable_functions] = exec,passthru,system
php_admin_flag[allow_url_fopen] = off
php_admin_value[memory_limit] = 256M

[save and exit. Two of the lines in the above stanza will nt be in the original.]

cd ..

cp -p php-fpm.conf php-fpm.conf.bak
vi php-fpm.conf

emergency_restart_threshold = 10
emergency_restart_interval = 1m
process_control_timeout = 60s

[save and exit. You can place these lines anywhere near the commented lines for "emergency". This helps prevent memory leaks, and ability to gracefully use systemctl reload php8.2-fpm on crontab once a night.]
If we installed opcache, we need to configure this as well…
cd /etc/php/8.2/mods-available
cp -p opcache.ini opcache.ini.bak

vi opcache.ini
zend_extension=opcache.so
opcache.enable=1
opcache.enable_cli=1
opcache.memory_consumption=128
opcache.interned_strings_buffer=16
opcache.max_accelerated_files=4000

[save and exit]
At this stage, please check your apt updates and do a full operating system reboot (stop, start) from the EC2 console, or at a minimum, use the commands:
sync;sync;reboot

[When you log back in as root, after a few moments when the system is back up, check the php.ini changes are all ok:
Note: due to limitations of this web browser's syntax highlighter, I have had to use a few extra commands with the echo command below.]

echo " < ?phpZphpinfo(); ? > "|sed 's/ //g'|sed 's/Z/ /g' > info.php

cd /var/www/html
chown www-data info.php
chgrp www-data info.php
chmod 664 info.php

https://snotbat.com/info.php

[Then rename the file so would be hackers do not see it:]

cd /var/www/html
mv info.php info.php.o
You can check things like max_input_vars have changed their values, and verify opcache and php-fpm are happily running.
We now need to add phpMyAdmin to manage the database.
cd /usr/share
wget https://www.phpmyadmin.net/downloads/phpMyAdmin-latest-all-languages.tar.gz
ls
tar xvf .....
[where ..... is the downloaded file. Then delete the tar.gz file, then use the Unix command to move the directory to phpMyAdmin, e.g.: mv yourfile phpMyAdmin]
cd phpMyAdmin
mkdir tmp
chmod 777 tmp
cp -p config.sample.inc.php config.inc.php
vi config.inc.php
[
Search for the blowfish line. Do a Google search on blowfish phpmyadmin generator.
I use: https://phpsolved.com/phpmyadmin-blowfish-secret-generator/?g=[insert_php]echo%20$code;[/insert_php] from https://phpsolved.com.
Paste the generated value into the blowfish value.
Then after SaveDir as shown below, add TempDir...
]
$cfg['SaveDir'] = '';
$cfg['TempDir'] = '/tmp';

[save and exit]

cd /var/www/html
ln -s /usr/share/phpMyAdmin phpMyAdmin
https://snotbat.com/phpMyAdmin

[User: root, and your password as created with mariadb installation]

[At this stage, we will not go into phpMyAdmin database and user creation, but you will see an error message at the bottom of the page asking how to fix it. Follow those instructions and let phpMyAdmin create the necessary dataabse. It is best these days to create databases with utf8mb4_general_ci]
You can use your own port for phpMyAdmin with an entry like this:
$cfg['Servers'][$i]['port'] = '3307';
Then in your EC2 security group, add that inbound port number against your own static IP address, so no one else can access phpMyAdmin.
You may also configure phpMyAdmin access for anyone like this:
cd /etc/apache2/conf-available
vi phpMyAdmin.conf

Alias /phpMyAdmin /usr/share/phpMyAdmin
Alias /phpmyadmin /usr/share/phpMyAdmin

   AddDefaultCharset UTF-8
   Require local
   Require all granted


   Require local
   Require all granted


    Order Deny,Allow
    Deny from All
    Allow from None


[save and exit]

systemctl restart apache2

[You can see other articles from my website on how to add only your IP address to the configuration file. If you want anyone accessing it, you'd need to leave the port number config to the default, with any IP4 address able to access it. Basically you can play around with permissions you;d like via Amaxons security group and/or the above file.]
cd /etc/apache2

cp -p apache2.conf apache2.conf.bak
vi apache2.conf

[After the stanzas for
Options Indexes FollowSymLinks
AllowOverride All
    Require all granted
 DirectoryIndex index.php index.html


[If you have multiple domains, you add as above, e.g. /var/www/shop.snotbat.com]

cd sites-available
pwd
cp -p 000-default.conf 000-default.conf.bak
cp -p default-ssl.conf default-ssl.conf.bak

vi 000-default.conf

[Above these lines, add the redirect/rewrite content: (assuming the primary domain is held in /var/www/html) but comment it out until after SSL is working.]
ServerAdmin webmaster@localhost
DocumentRoot /var/www/html

# Redirect permanent / https://snotbat.com/
# RewriteEngine on
# RewriteCond %{SERVER_NAME} =snotbat.com
# RewriteRule ^ https://%{SERVER_NAME}%{REQUEST_URI} [END,NE,R=permanent]

[save and exit - note: we must come back and uncomment after SSL is installed]

[If adding multiple domains, after  add stanzes like this: (again, comment out the lines shown until SSL is installed. Assuming you have set up subdomains.)]


   ServerName shop.snotbat.com
 #  Redirect permanent / https://shop.snotbat.com/
 #  RewriteEngine on
 #  RewriteCond %{SERVER_NAME} =shop.snotbat.com
 #  RewriteRule ^ https://%{SERVER_NAME}%{REQUEST_URI} [END,NE,R=permanent]
   ServerAdmin webmaster@localhost
   DocumentRoot /var/www/shop.snotbat.com
   ErrorLog ${APACHE_LOG_DIR}/error.log


[Let us assume at this point that we have install ed the SSL certificates, so we go back to the file above and remove the commented lines.
We then edit default-ssl.conf. I have an example below, after the "SSL Engine on" line: (I am showing a Let's Encrypt certificate)]
[Also note the entry for php8.2-fpm which you insert just before . You find the /run... docket from www.conf. More on this later.

vi default-ssl.conf

SSLCertificateFile      /etc/letsencrypt/live/snotbat.com/fullchain.pem
SSLCertificateKeyFile   /etc/letsencrypt/live/snotbat.com/privkey.pem

SSLProtocol -SSLv2 -SSLv3 -TLSv1 -TLSv1.1 +TLSv1.2
SSLProxyProtocol -SSLv2 -SSLv3 -TLSv1 -TLSv1.1 +TLSv1.2

# note: the next two lines are each one long string without a line break. Make sure you have this

SSLCipherSuite ECDHE-ECDSA-AES256-GCM-SHA384:ECDHE-RSA-AES256-GCM-SHA384:ECDHE-ECDSA-CHACHA20-POLY1305:ECDHE-RSA-CHACHA20-POLY1305:ECDHE-ECDSA-AES128-GCM-SHA256:ECDHE-RSA-AES128-GCM-SHA256:ECDHE-ECDSA-AES256-SHA384:ECDHE-RSA-AES256-SHA384:ECDHE-ECDSA-AES128-SHA256:ECDHE-RSA-AES128-SHA256

SSLProxyCipherSuite ECDHE-ECDSA-AES256-GCM-SHA384:ECDHE-RSA-AES256-GCM-SHA384:ECDHE-ECDSA-CHACHA20-POLY1305:ECDHE-RSA-CHACHA20-POLY1305:ECDHE-ECDSA-AES128-GCM-SHA256:ECDHE-RSA-AES128-GCM-SHA256:ECDHE-ECDSA-AES256-SHA384:ECDHE-RSA-AES256-SHA384:ECDHE-ECDSA-AES128-SHA256:ECDHE-RSA-AES128-SHA256:AES:!aNULL:!eNULL:!EXPORT:!DES:!RC4:!MD5:!PSK:!aECDH:!EDH-DSS-DES-CBC3-SHA:!EDH-RSA-DES-CBC3-SHA:!KRB5-DES-CBC3-SHA

SSLHonorCipherOrder on
# SSLCipherSuite PROFILE=SYSTEM
# SSLProxyCipherSuite PROFILE=SYSTEM
SSLCompression off
SSLInsecureRenegotiation Off
SSLSessionTickets Off
SSLOpenSSLConfCmd ECDHParameters secp384r1
SSLOpenSSLConfCmd Curves secp384r1

#SSLCertificateChainFile /etc/apache2/ssl.crt/server-ca.crt
#SSLCACertificateFile /etc/apache2/ssl.crt/ca-bundle.crt


        SetHandler "proxy:unix:/run/php/php8.2-fpm.sock|fcgi://localhost/"


[save and exit - note: after this entry you will see  then ]

[Now, if you have multiple domains, after the  section and before the  line, add a stanza like this:]


 ServerName mail.shawlw.me:443
 DocumentRoot /var/www/shop.snotbat.com
 SSLEngine on
 SSLCertificateFile      /etc/letsencrypt/live/shop.snotbat.com/fullchain.pem
 SSLCertificateKeyFile   /etc/letsencrypt/live/shop.snotbat.com/privkey.pem

 SSLProtocol -SSLv2 -SSLv3 -TLSv1 -TLSv1.1 +TLSv1.2
 SSLProxyProtocol -SSLv2 -SSLv3 -TLSv1 -TLSv1.1 +TLSv1.2

# note: the next two lines are each one long string without a line break. Make sure you have this
SSLCipherSuite ECDHE-ECDSA-AES256-GCM-SHA384:ECDHE-RSA-AES256-GCM-SHA384:ECDHE-ECDSA-CHACHA20-POLY1305:ECDHE-RSA-CHACHA20-POLY1305:ECDHE-ECDSA-AES128-GCM-SHA256:ECDHE-RSA-AES128-GCM-SHA256:ECDHE-ECDSA-AES256-SHA384:ECDHE-RSA-AES256-SHA384:ECDHE-ECDSA-AES128-SHA256:ECDHE-RSA-AES128-SHA256

SSLProxyCipherSuite ECDHE-ECDSA-AES256-GCM-SHA384:ECDHE-RSA-AES256-GCM-SHA384:ECDHE-ECDSA-CHACHA20-POLY1305:ECDHE-RSA-CHACHA20-POLY1305:ECDHE-ECDSA-AES128-GCM-SHA256:ECDHE-RSA-AES128-GCM-SHA256:ECDHE-ECDSA-AES256-SHA384:ECDHE-RSA-AES256-SHA384:ECDHE-ECDSA-AES128-SHA256:ECDHE-RSA-AES128-SHA256:AES:!aNULL:!eNULL:!EXPORT:!DES:!RC4:!MD5:!PSK:!aECDH:!EDH-DSS-DES-CBC3-SHA:!EDH-RSA-DES-CBC3-SHA:!KRB5-DES-CBC3-SHA

 SSLHonorCipherOrder on
 SSLCompression off
 SSLInsecureRenegotiation Off
 SSLSessionTickets Off
 SSLOpenSSLConfCmd ECDHParameters secp384r1
 SSLOpenSSLConfCmd Curves secp384r1


[Then before the  end of  stanza, add:]


        SetHandler "proxy:unix:/run/php/php8.2-fpm.sock|fcgi://localhost/"


[save and exit - noting the last line after the last  is the single entry, ]
If you restart apache2, you should be fine. If only testing http:// prior to installing SSL for https:// you should verify you have the basic index.html page showing for your domain name(s). I have not gone into any details for use of non-subdomain names, such as https://snotbat.com.au/shop. You can work this out if need be. I prefer use of subdomains.
Make sure you remove any SSL configuration to other certificates, such as “snakeoil” and use your own Let’s Encrypt, or paid certificate.
Again, use your own domain name and web root directory:
cd /home/admin

/usr/bin/certbot certonly --non-interactive --agree-tos -m admin@snotbat.com -d snotbat.com --webroot -w /var/www/html --dry-run

[If the dry run works, execut again without --dry-run. We do not request www.snotbat.com for this configuration.]

[Now that we have SSL installed, we can run a script to renew it every 65 days...]

vi certbot.sh

#!/bin/sh
d=`date`
c1=`head -1 /home/admin/certbot.dat`
c1=$(expr $c1 + 1)
if [ "$c1" = "65" ] ;
then
echo "0" > /home/admin/certbot.dat
echo "Certbot Renewal" $d >> /home/admin/info.log
/usr/bin/certbot certonly --non-interactive --agree-tos -m admin@snotbat.com -d snotbat.com --webroot -w /var/www/html >/dev/null 2>&1
sudo /usr/bin/systemctl reload apache2 >/dev/null 2>&1
sudo /usr/bin/openssl x509 -noout -dates -in /etc/letsencrypt/live/snotbat.com/cert.pem >> /home/admin/info.log
else
echo "Certbot day $c1 of 65" >> /home/admin/info.log
echo $c1 > /home/admin/certbot.dat
fi

[save and exit. vi an empty file called info.log and certbot.dat, then ownership of root admin, and chmod 777 *log *dat *sh]

vi certbot.dat
0

[Save and exit - have one only top line with the number 0 in it. This will increment from the above script.]

[If you have a subdomain, you could append the scrip like this:]

sleep 10

d=`date`
c1=`head -1 /home/admin/certbot_shop.dat`
# let c1=$c1+1
c1=$(expr $c1 + 1)
if [ "$c1" = "65" ] ;
then
echo "0" > /home/admin/certbot_shop.dat
echo "Certbot Renewal" $d >> /home/admin/info.log
sudo /usr/bin/certbot certonly --non-interactive --agree-tos -m admin@snotbat.com -d shop.snotbat.com --webroot -w /var/www/shop.snotbat.com >/dev/null 2>&1
sudo /usr/bin/systemctl reload apache2 >/dev/null 2>&1
sudo /usr/bin/openssl x509 -noout -dates -in /etc/letsencrypt/live/shop.snotbat.com/cert.pem >> /home/admin/info.log
else
echo "Certbot day $c1 of 65" >> /home/admin/info.log
echo $c1 > /home/admin/certbot_shop.dat
fi

exit

[save and exit - note the final exit in the shell script which is normal practice eventhough not needed. You'd create certbot_shop.dat with the number 0 at the top, and permissions as above.]

[Then in crontab for each night: you notice how the script must restart apache. An annual certificate would not need to do that.]
crontab -e
15 1 * * * /home/ec2-user/certbot.sh

[save and exit]
Now add your SSL configurations from above, restart apache2 and test your site with https://snotbat.com (use your own domain name)
I don’t know why people say such things.
[There should be no errors during installation...]
[Reference: https://www.axigen.com/linux-mail-server/ ]

cd /home/admin

wget https://www.axigen.com/mail-server/download/deb/latest/axigen_10.5.20-1_amd64.deb
apt install ./axigen_10.5.20-1_amd64.deb

systemctl enable axigen
ps -ef|grep axigen

[output:]
root        1097       1  0 13:41 ?        00:00:00 /opt/axigen/bin/axigen --max-respawns 3 -W /var/opt/axigen
axigen      1098    1097  0 13:41 ?        00:00:01 /opt/axigen/bin/axigen --max-respawns 3 -W /var/opt/axigen
axigen      1113    1098  0 13:41 ?        00:00:00 axigen-tnef

https://snotbat.com:9443
You will see the message "Warning: Potential Security Risk Ahead". Ignore this. YOu then see the I Agree license page.
You then set a password for user admin. You then select "Get Free License".

Do not lose the license:
axigen_lk.bin

Continue with the installation.
We will add this to the DNS records as shown further below, but we need to first create these files (with your own nominated name) in /var/opt/axigen:
dkim.privkey.snotbat_com.pem
dkim.pubkey.snotbat_com.pem
You would use your own naming convention and email-domain name
Reference:
https://www.axigen.com/documentation/domainkeys-dkim-p47120681
[Use your own domain, whether it is basic like I am showing full examples of, or another domain like mail.snotbat.com]

cd /var/opt/axigen
openssl genrsa -out dkim.privkey.snotbat_com.pem 2048
openssl rsa -in dkim.privkey.snotbat_com.pem -outform PEM -pubout -out dkim.pubkey.snotbat_com.pem
chmod 600 dkim.*.pem
chown axigen:axigen dkim.*.pem

ls -l | grep snotbat

-rw-rw-r--  1 axigen axigen 1675 May 21 15:00 dkim.privkey.snotbat_com.pem
-rw-rw-r--  1 axigen axigen  451 May 21 15:00 dkim.pubkey.snotbat_com.pem

You need to add the following in this syntax to your DNS records:
selector._domainkey.domain1.com.  IN  TXT "k=rsa; p=......................." Note that some DNS records do not require the double quotes.

e.g. snotbat._domainkey.snotbat.com TXT k=rsa; p=.........
See the reference above if having trouble adding the long string.
To generate the p= string, we do this:

cat dkim.pubkey.snotbat_com.pem | grep -v PUBLIC | tr -d "\n" | grep -v AAAAAAAAAA

Paste this result after p= in the DNS record.
In the Rules section (further below in the examples) use the full /var/opt/axigen/ path for the dkim selector .pem files.
I place the time variable as 3600 seconds on all of my DNS records.
Note: it seems to be okay to have your own DNS records as shown while still having basic Amazon SES CNAME records in the background, still listed on your DNS. If there are SES MX records as well, I’d test it but make sure those records were something like 40 in priority.
snotbat.com           A          xx.xx.xx.xx
snotbat.com           CAA        0 issue letsencrypt.org
www.snotbat.com       CNAME      snotbat.com
snotbat.com.          MX         snotbat.com
_dmarc.snotbat.com    TXT        v=DMARC1;p=quarantine;pct=25;rua=mailto:dmarc@snotbat.com
snotbat._domainkey.   TXT        k=rsa; p=MIIBIjANBgkqhki..................... (etc.)
snotbat.com           TXT        v=spf1 mx a ip4:xx.xx.xx.xx -all

[We are not configuring calendars, variations on the above, use of mx.domain_name, multiple MX servers, or mail.domain_name]
[We are not configuring for a BIMI logo]
[snotbat._domainkey - the first word (i.e.snotbat) can be any string you like as the p=.... is the important part.]
See notes below on adding IPV6 for Linode instances. This must be added or Google rejects the emails.
Axigen Configurations

Admin screen using https://snotbat.com:9443
This is a test only on my playtime domain name and will not work at time of viewing this article
Note that the cost of an Amazon EC2 instance and storage can be too high to justify for personal use compared to MS Exchange (or other paid services). There is perhaps less risk of failure and loss of email in a paid service. You must work out how to backup your Axigen system. One way is a nightly crontab script placing backups in a 30 day life cycle in S3 storage.
Hard Disk storage space could be researched with an EFS mounted disk, with the view to placing, say, an archived folder onto EFS. However, EFS will not move small files into lower cost storage. If I discover more about this I wild add it to this article. It is possible to configure EFS for redundancy, and encryption of stored data. In line with this, another reason to use Axigen for personal use is if you have several people using it, thus reducing cost to where it is viable, but the aim may be to stop emails being “seen” on 3rd party servers.
Configurations – Slider Images: (some steps require no image to explain)
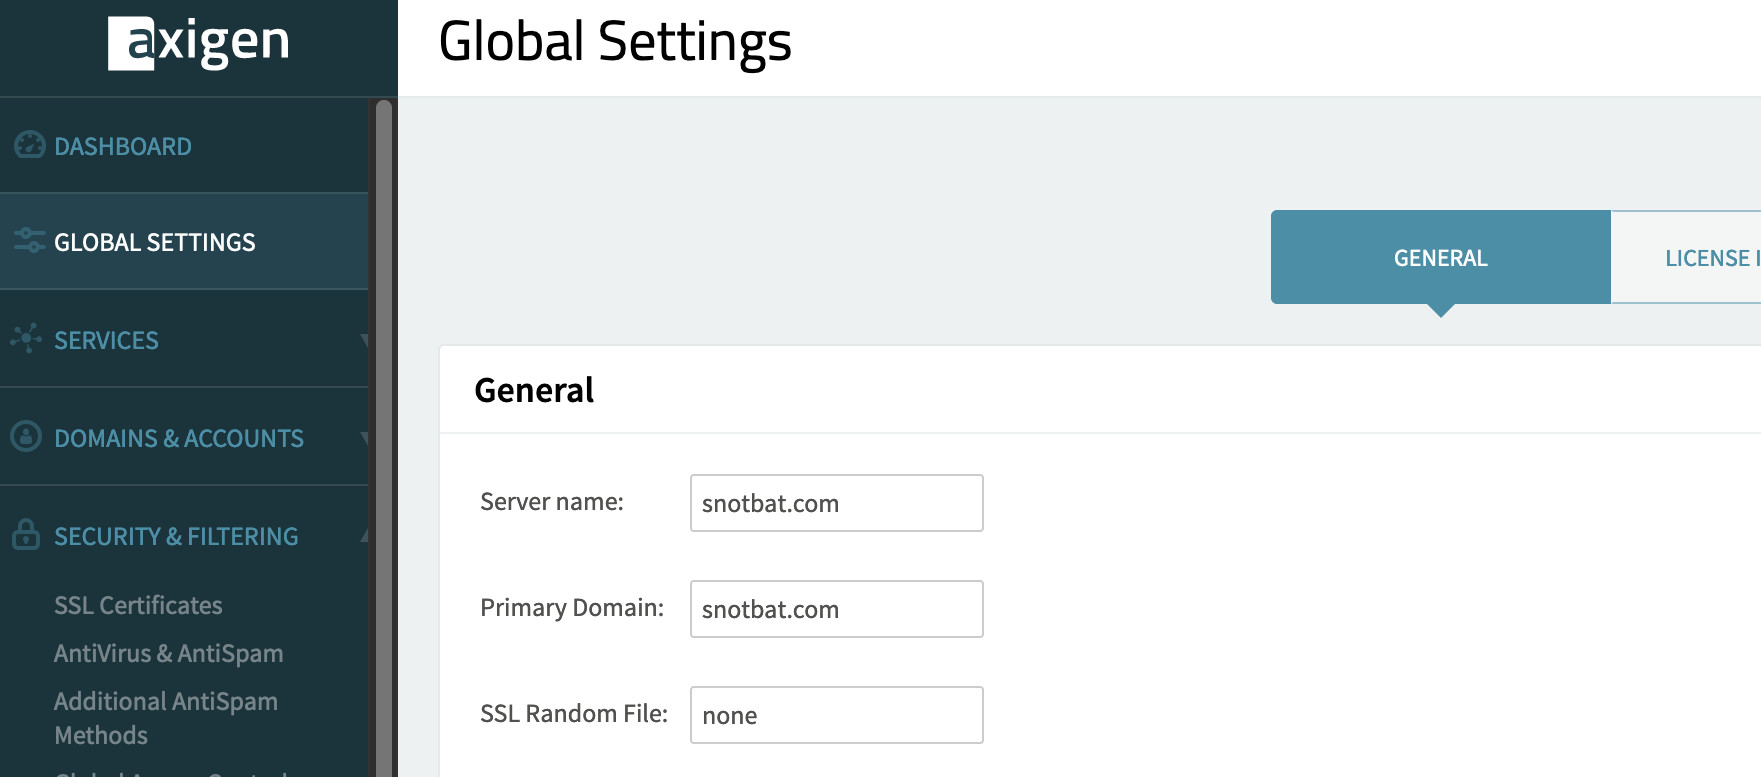
(1) Set the domain name, optionally languages, set the region date/time.
(2) Configure SSL to your e-mail domain.
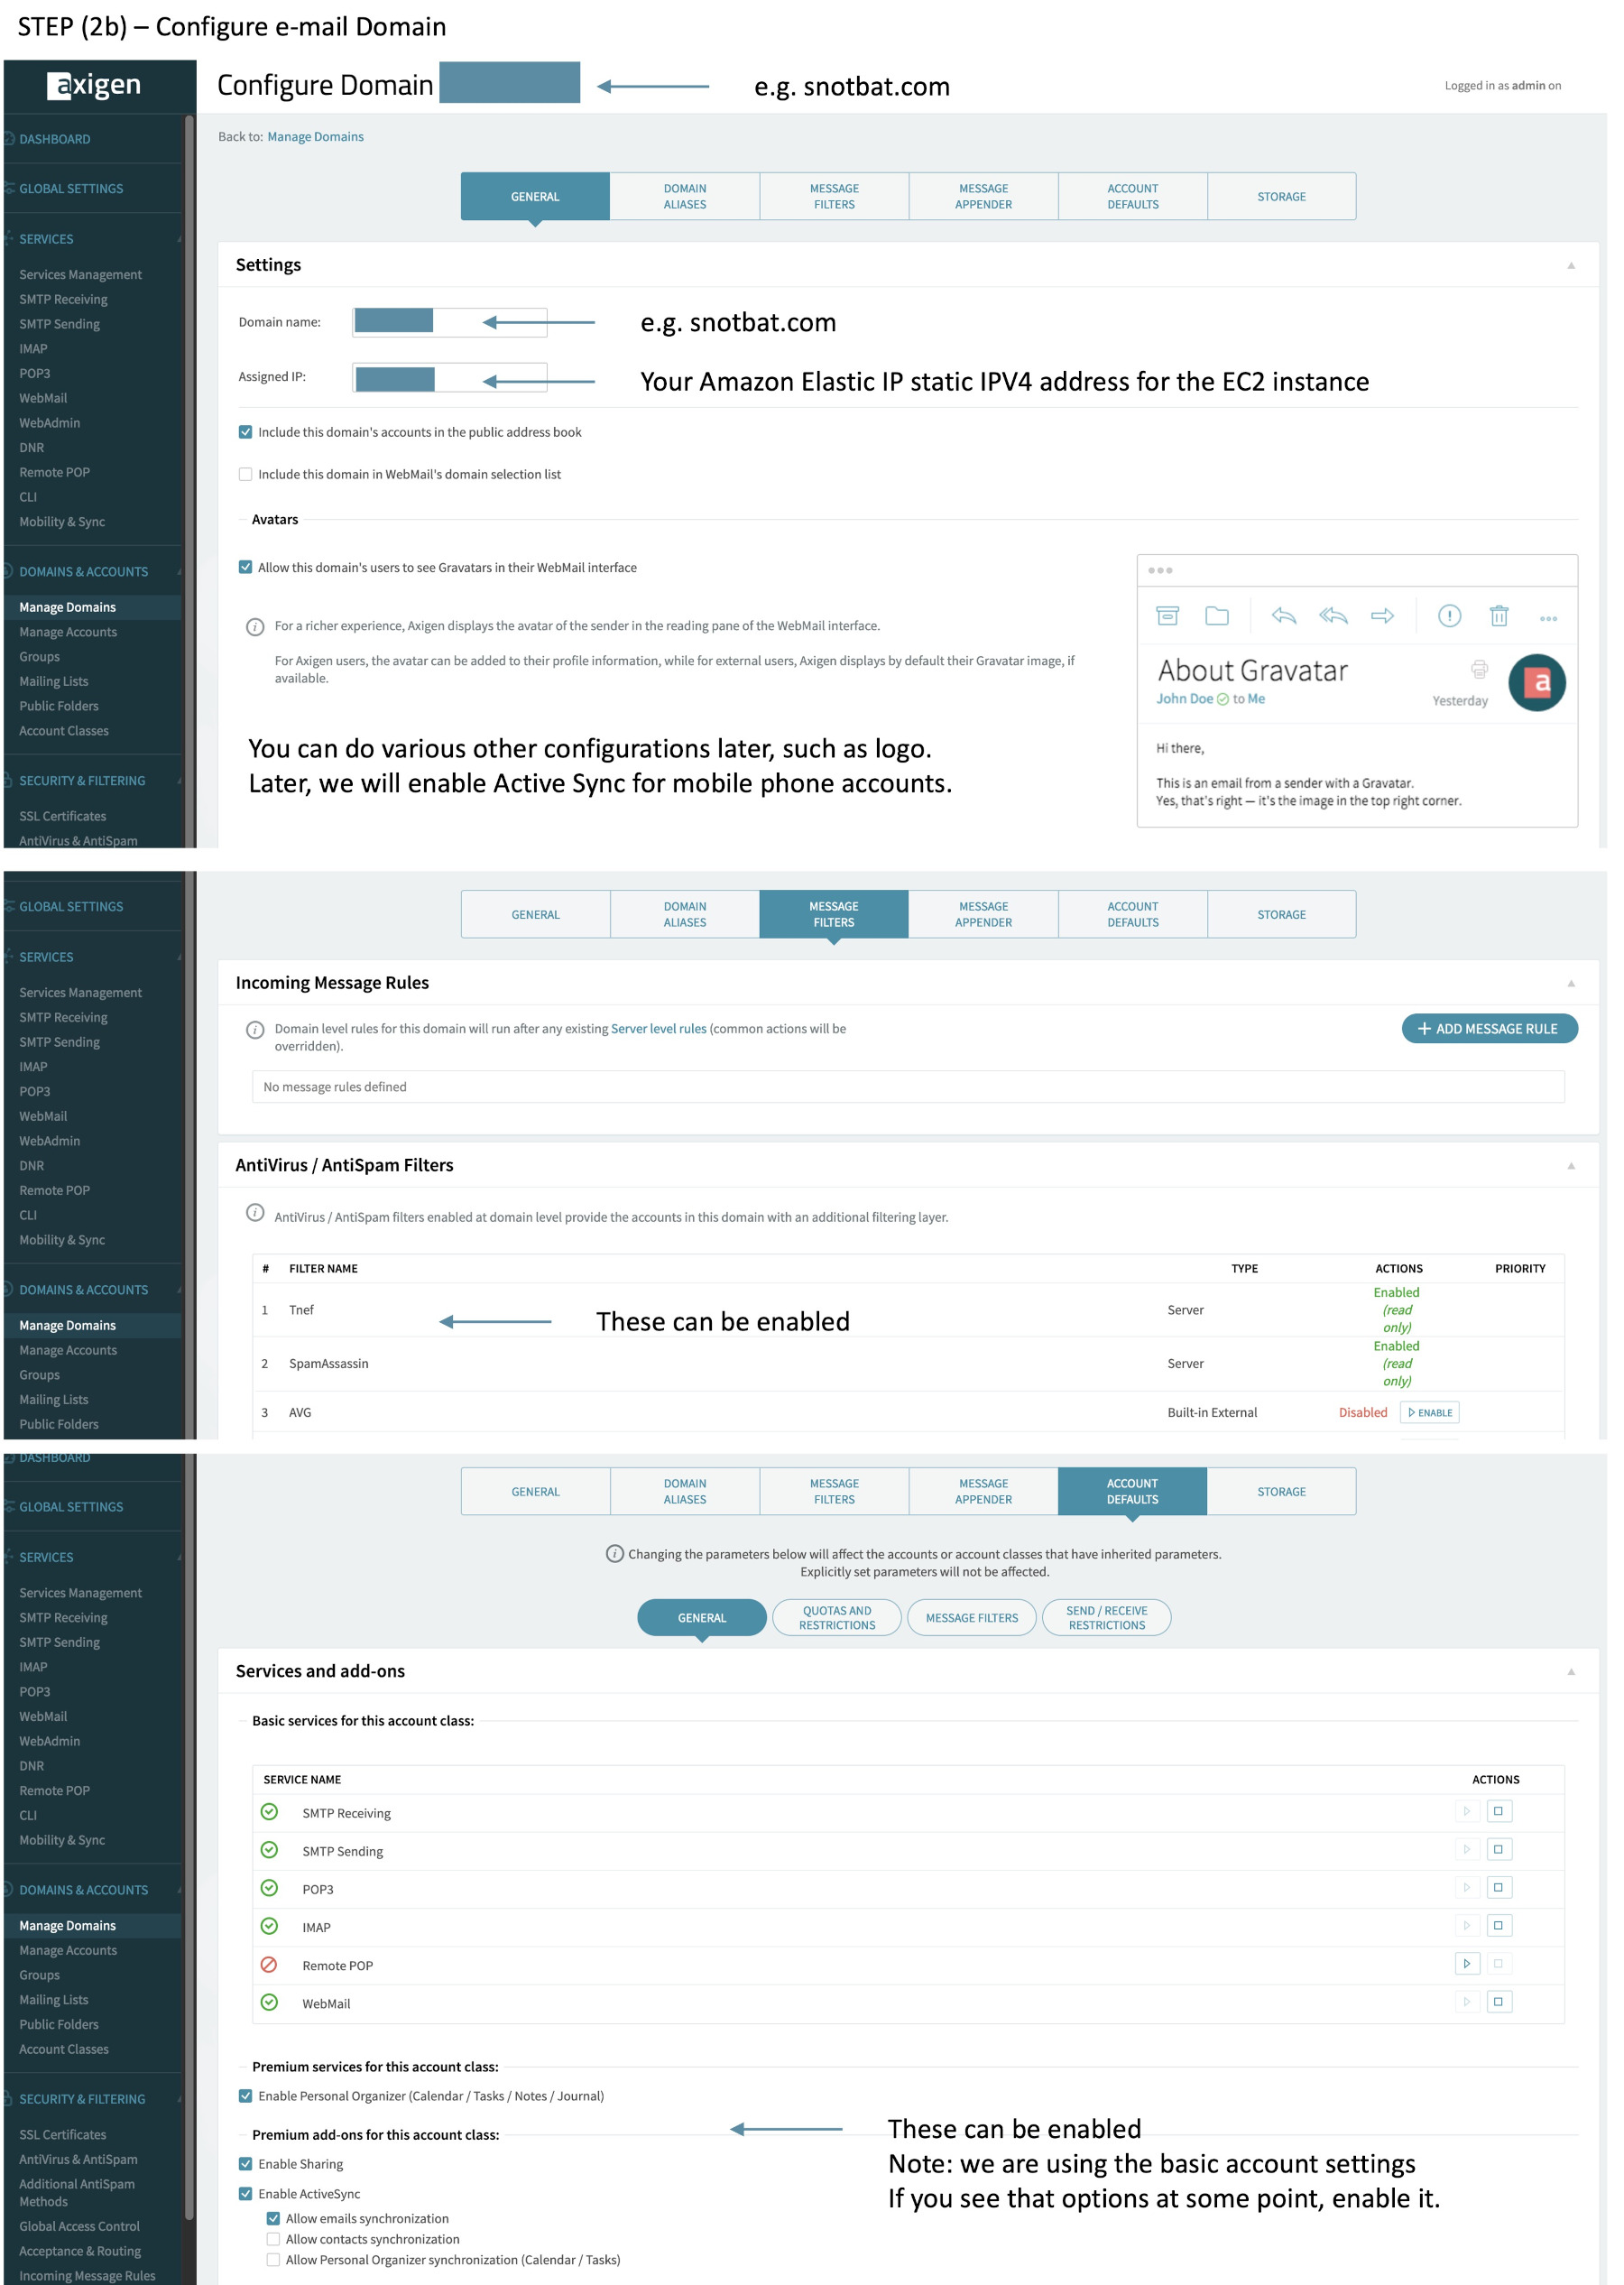
(2b) Configure your Domain.
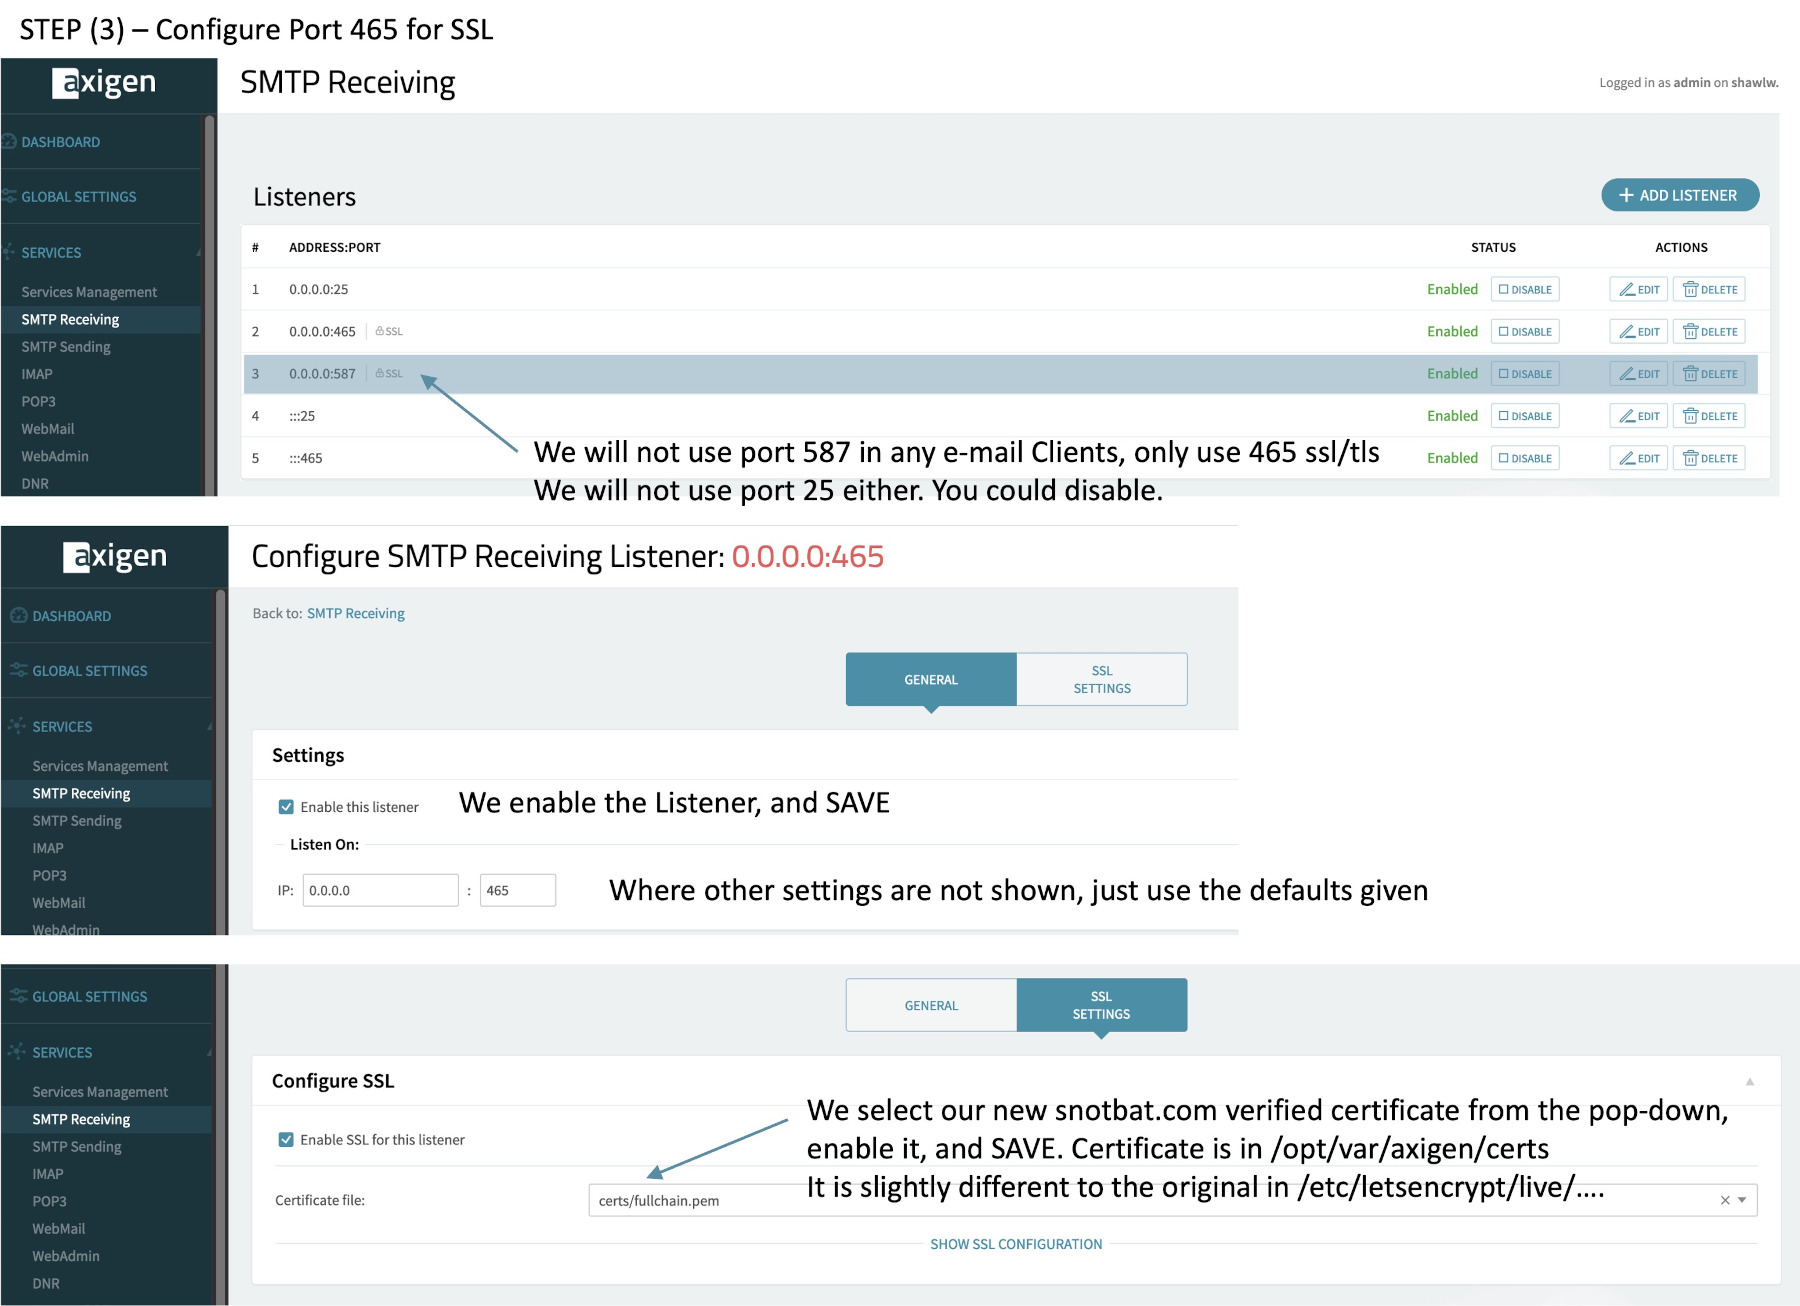
(3) Configure SMTP Receiver Port 465 to your SSL certificate and enable. (SMTP Sending needs no configurations)
(4) In same fashion, enable IMAP Port 993 to your SSL certificate. (Notice the lower part of the page has start tls enabled)
(5) Configure Webmail – port 8000 and the Virtual Server with SSL.
(remember, all these ports need to be open on the EC2 instance security group, along with port 53)
(6) Check the webadmin page has port 9443 with SSL enabled (your own certificate – e.g. snotbat.com)
(your original admin login may initially be http:// but by now it should be https://)
(7) Set the DNR name server IP addresses to 8.8.8.8 for google, and 1.1.1.1 for cloudflare. Otherwise nothing works.
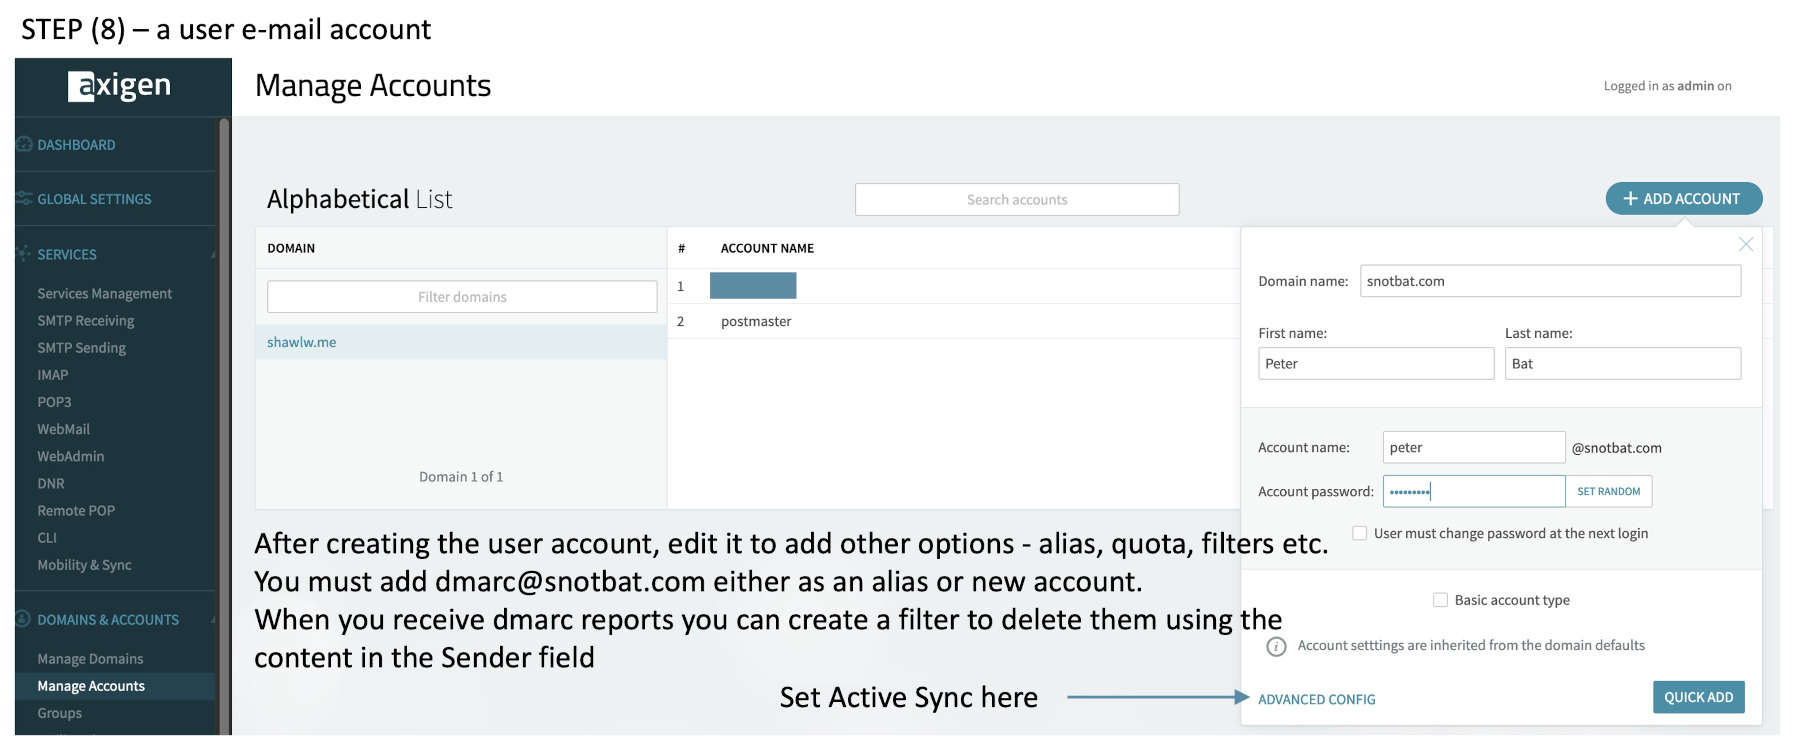
(8) Add your primary user account, and a new or alias name for dmarc@your_email_domain. Here you create filters, quotas, active sync etc.
(9) Check your base64 decoding and SpamAssasin is enabled.
(9b) Additional Anti-Spam methods should have “Enable SPF on MailFrom” by default. Up to you if you receive or reject failed SPF. I usually reject such emails as we have had a number of years now for mail providers to configure for spf, dkim, and dmarc.
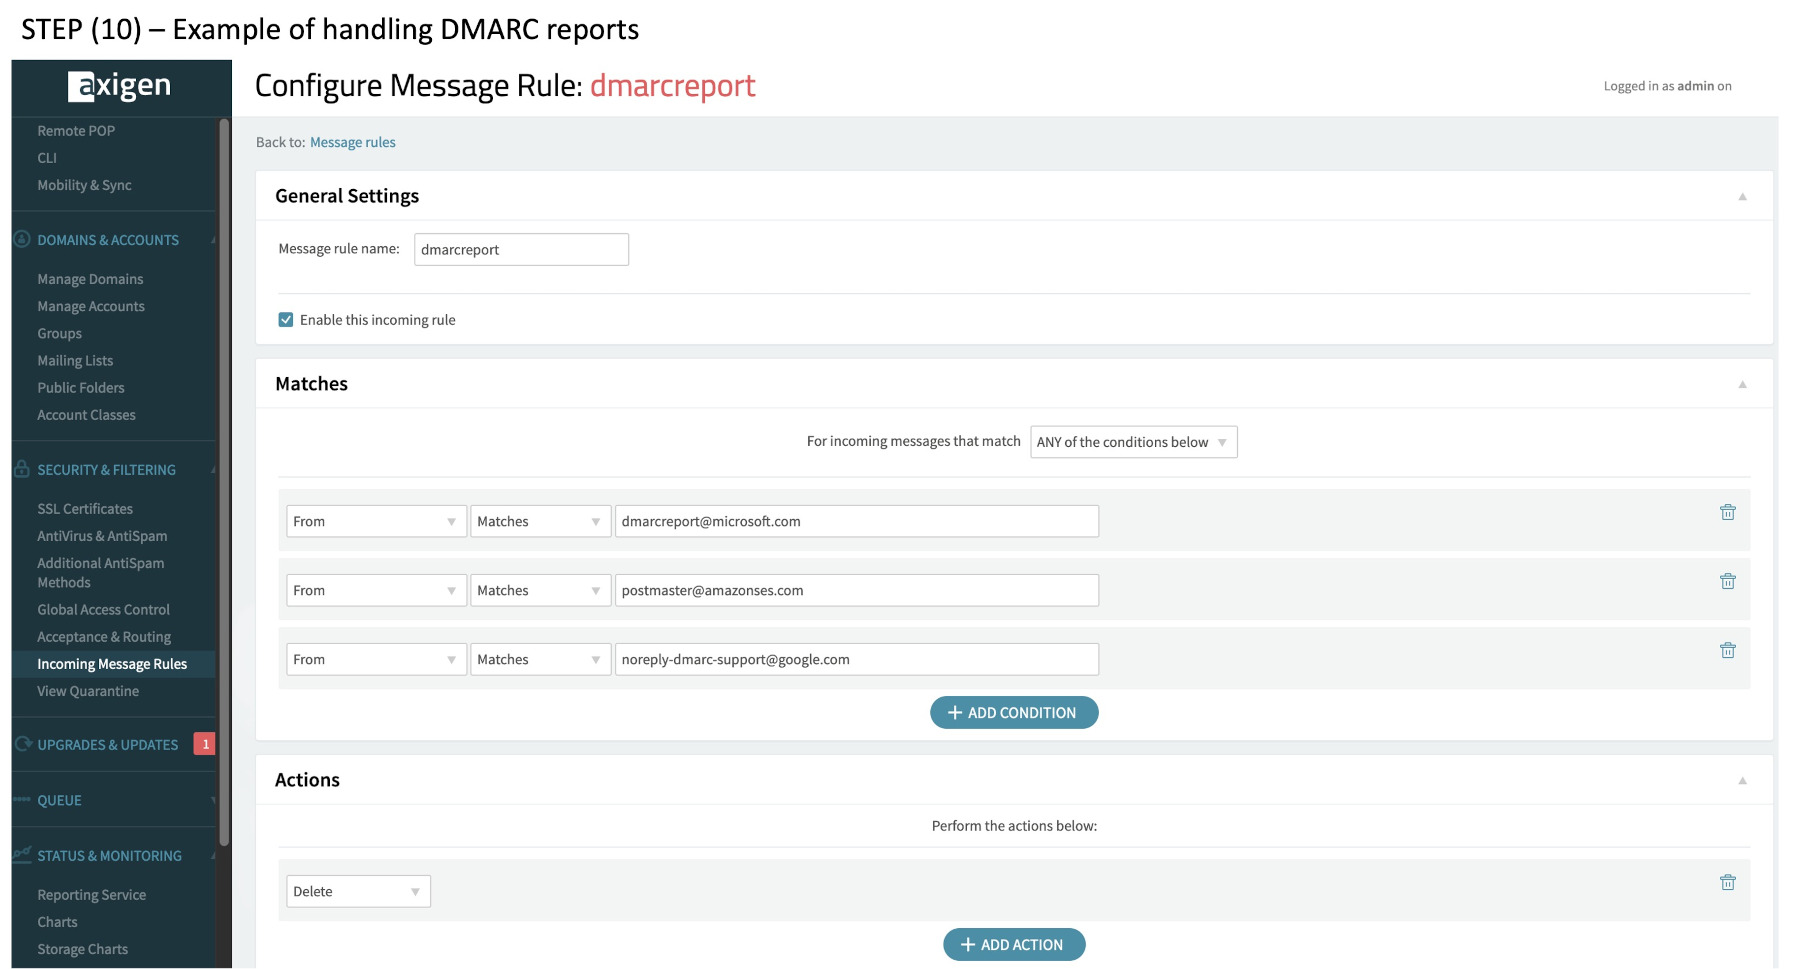
(10) An example of handling DMARC reports

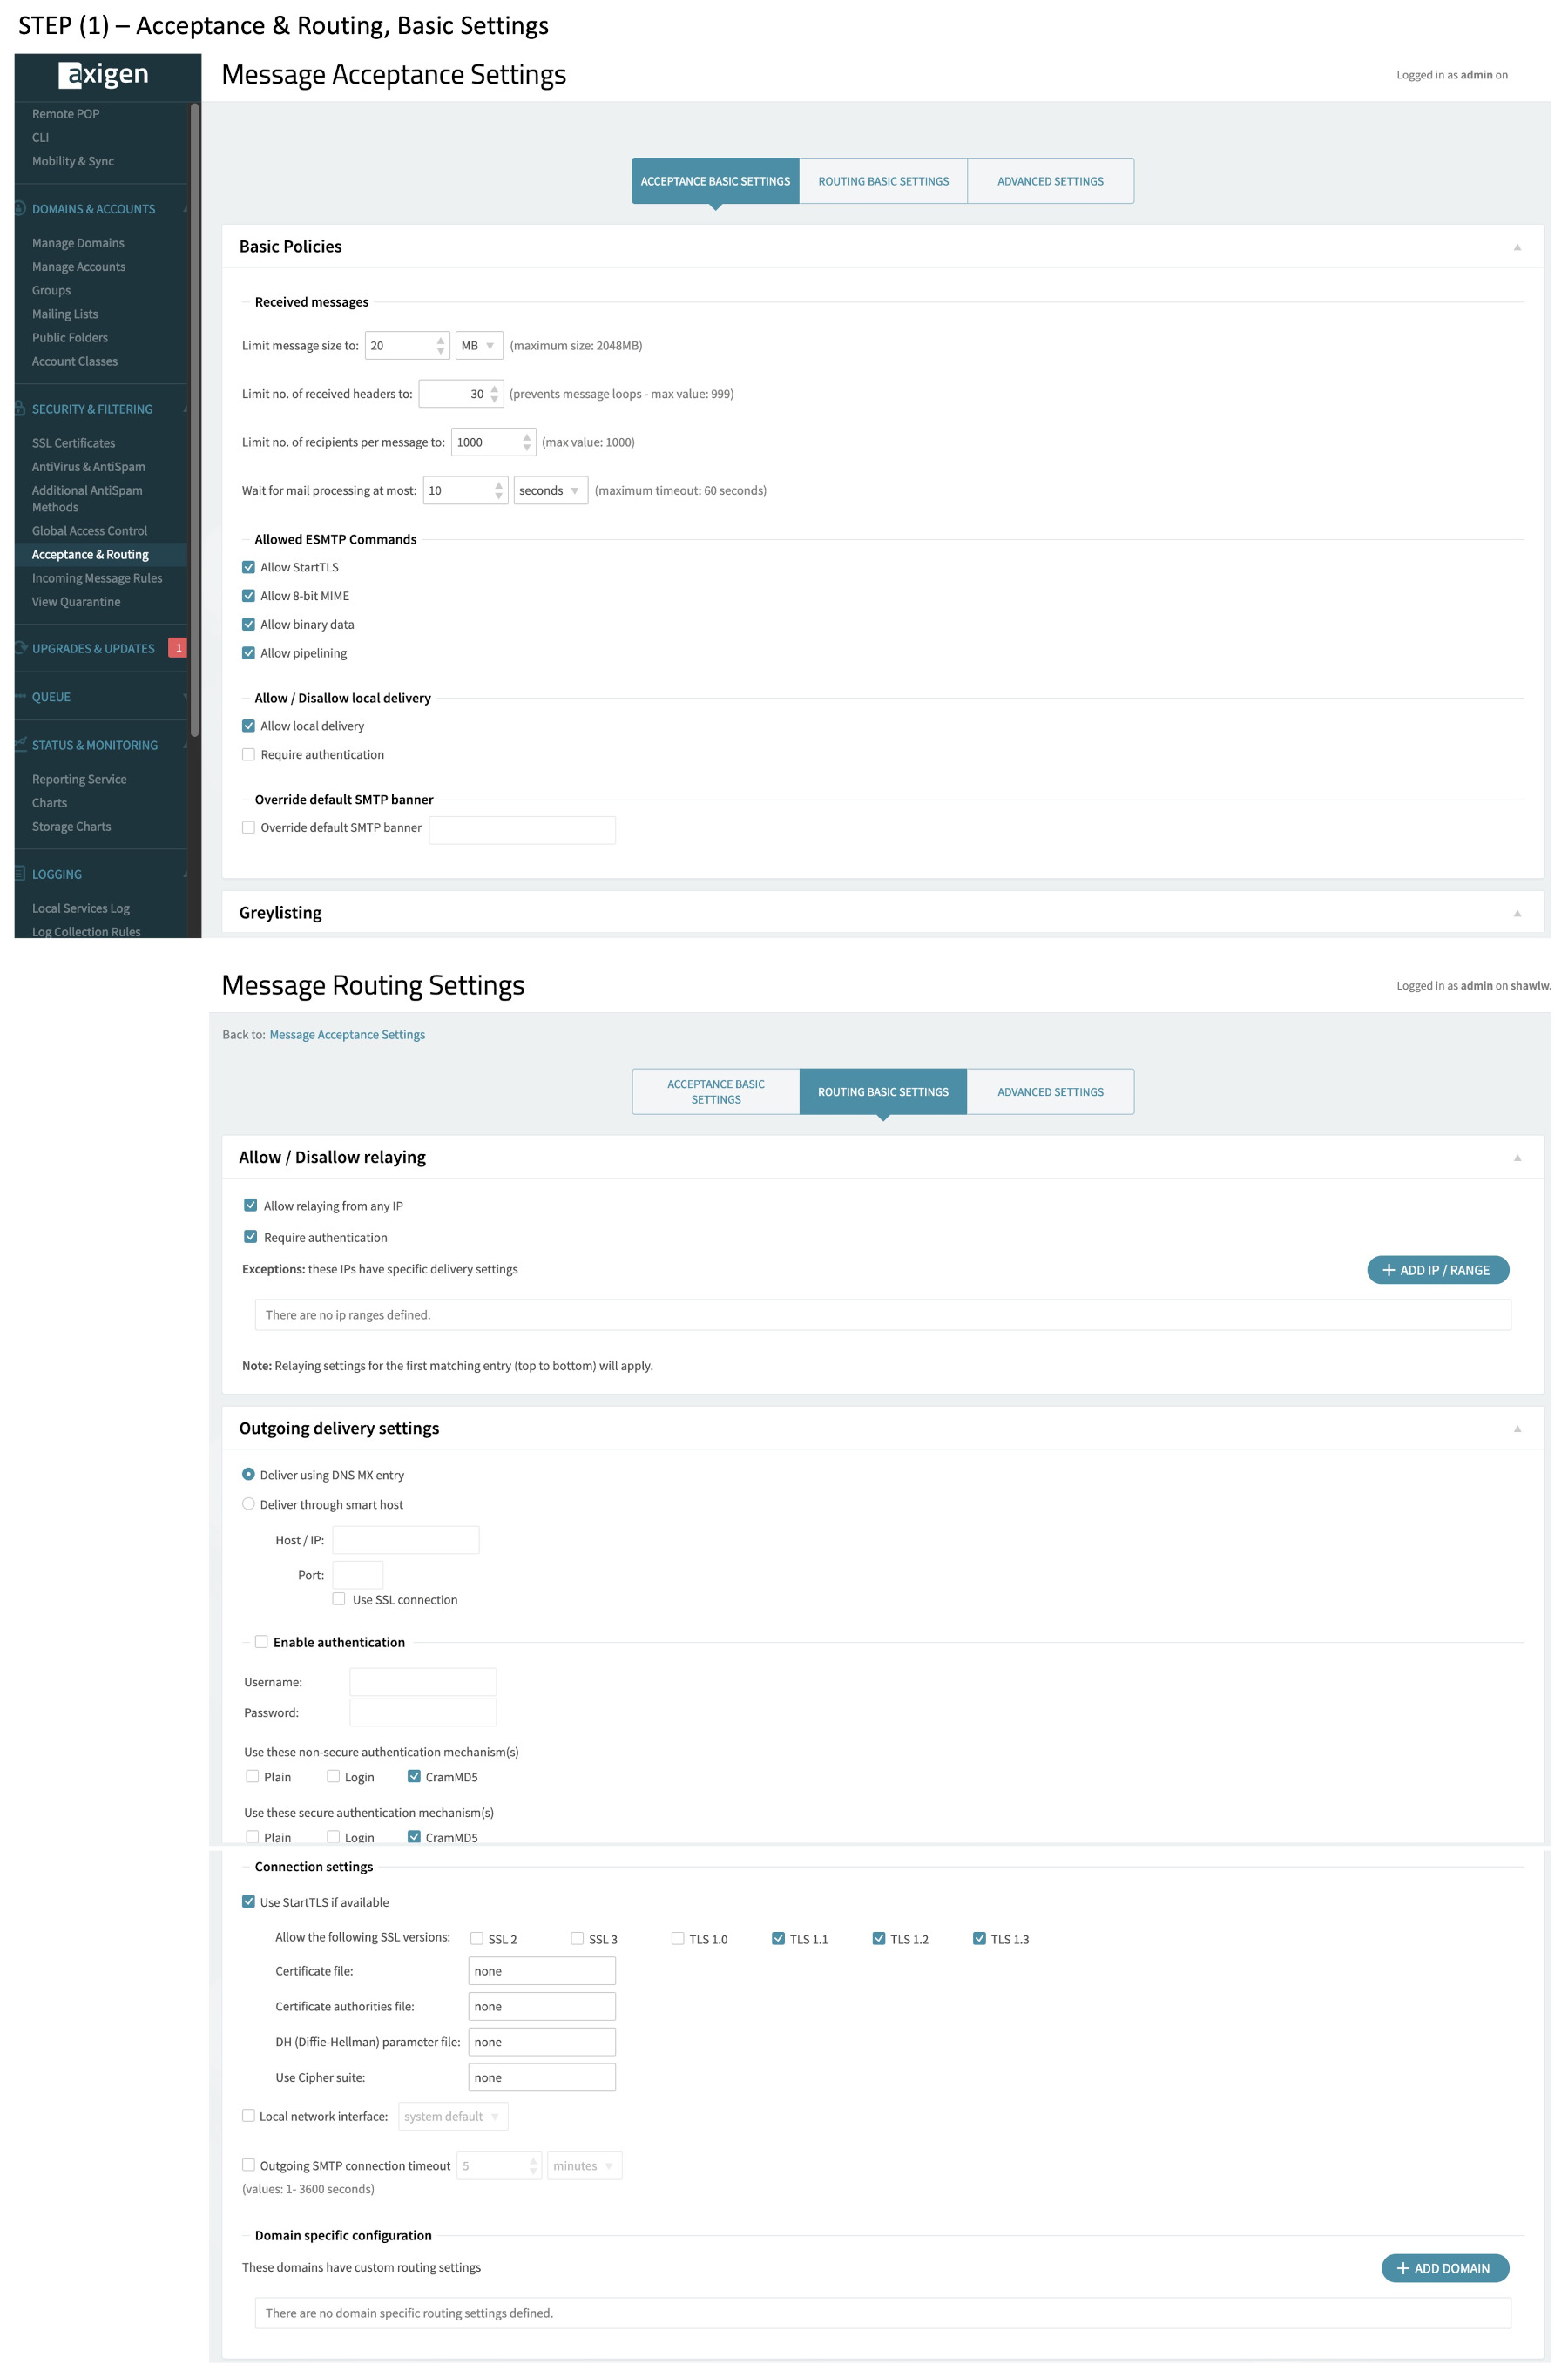
Configurations – Acceptance and Routing
These are critical configurations.
Please hunt around the Axigen documentation for fuller details. These settings take a little bit of getting used to from the pop-down menus. Take some care around rule names and entries, especially for the p= values and DNS record.
(1) General Settings – most or all should be by default
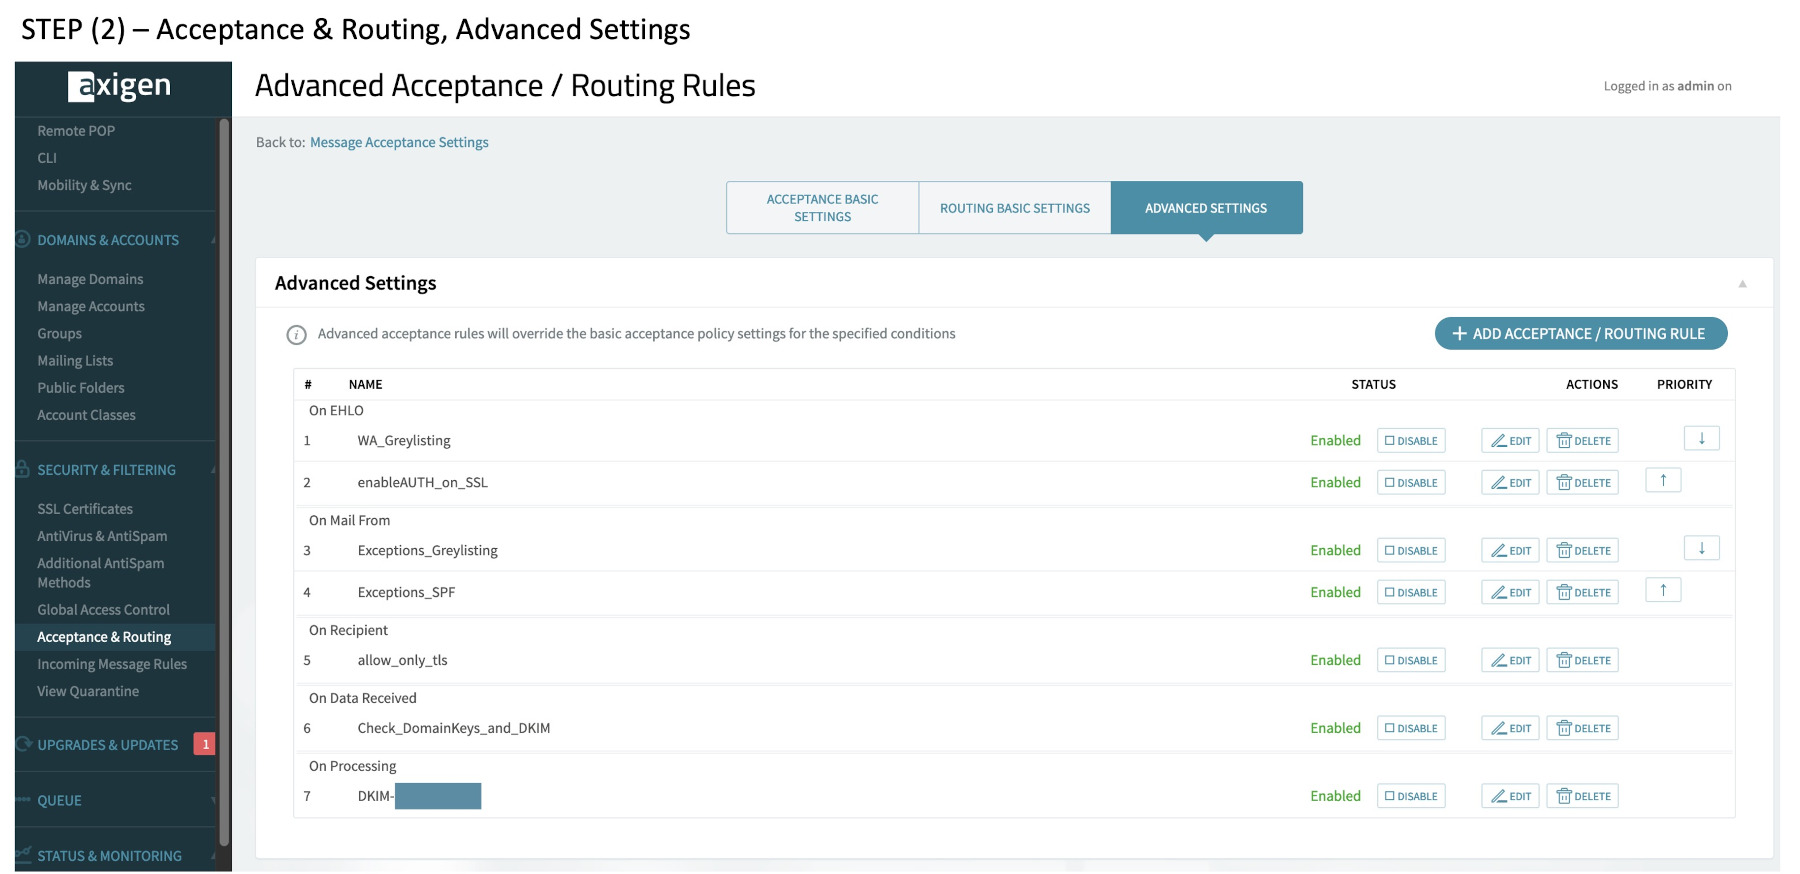
(2) What we should end up with in the Advanced Section – critical configurations
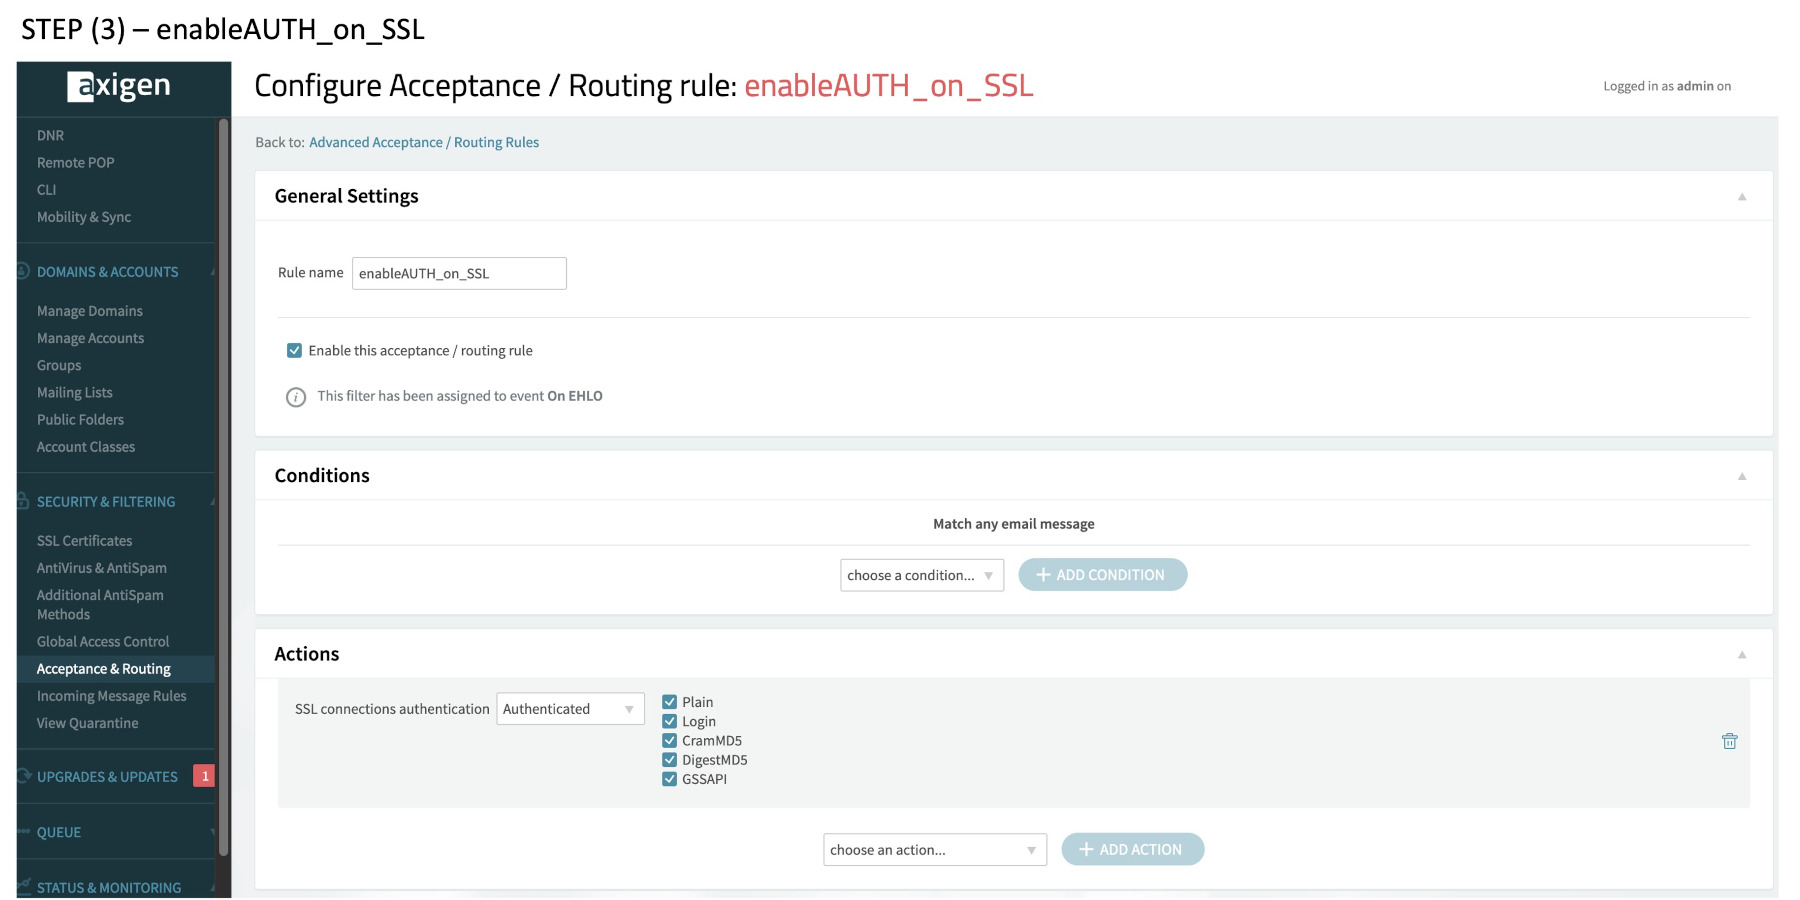
(3) enableAUTH_on_SSL
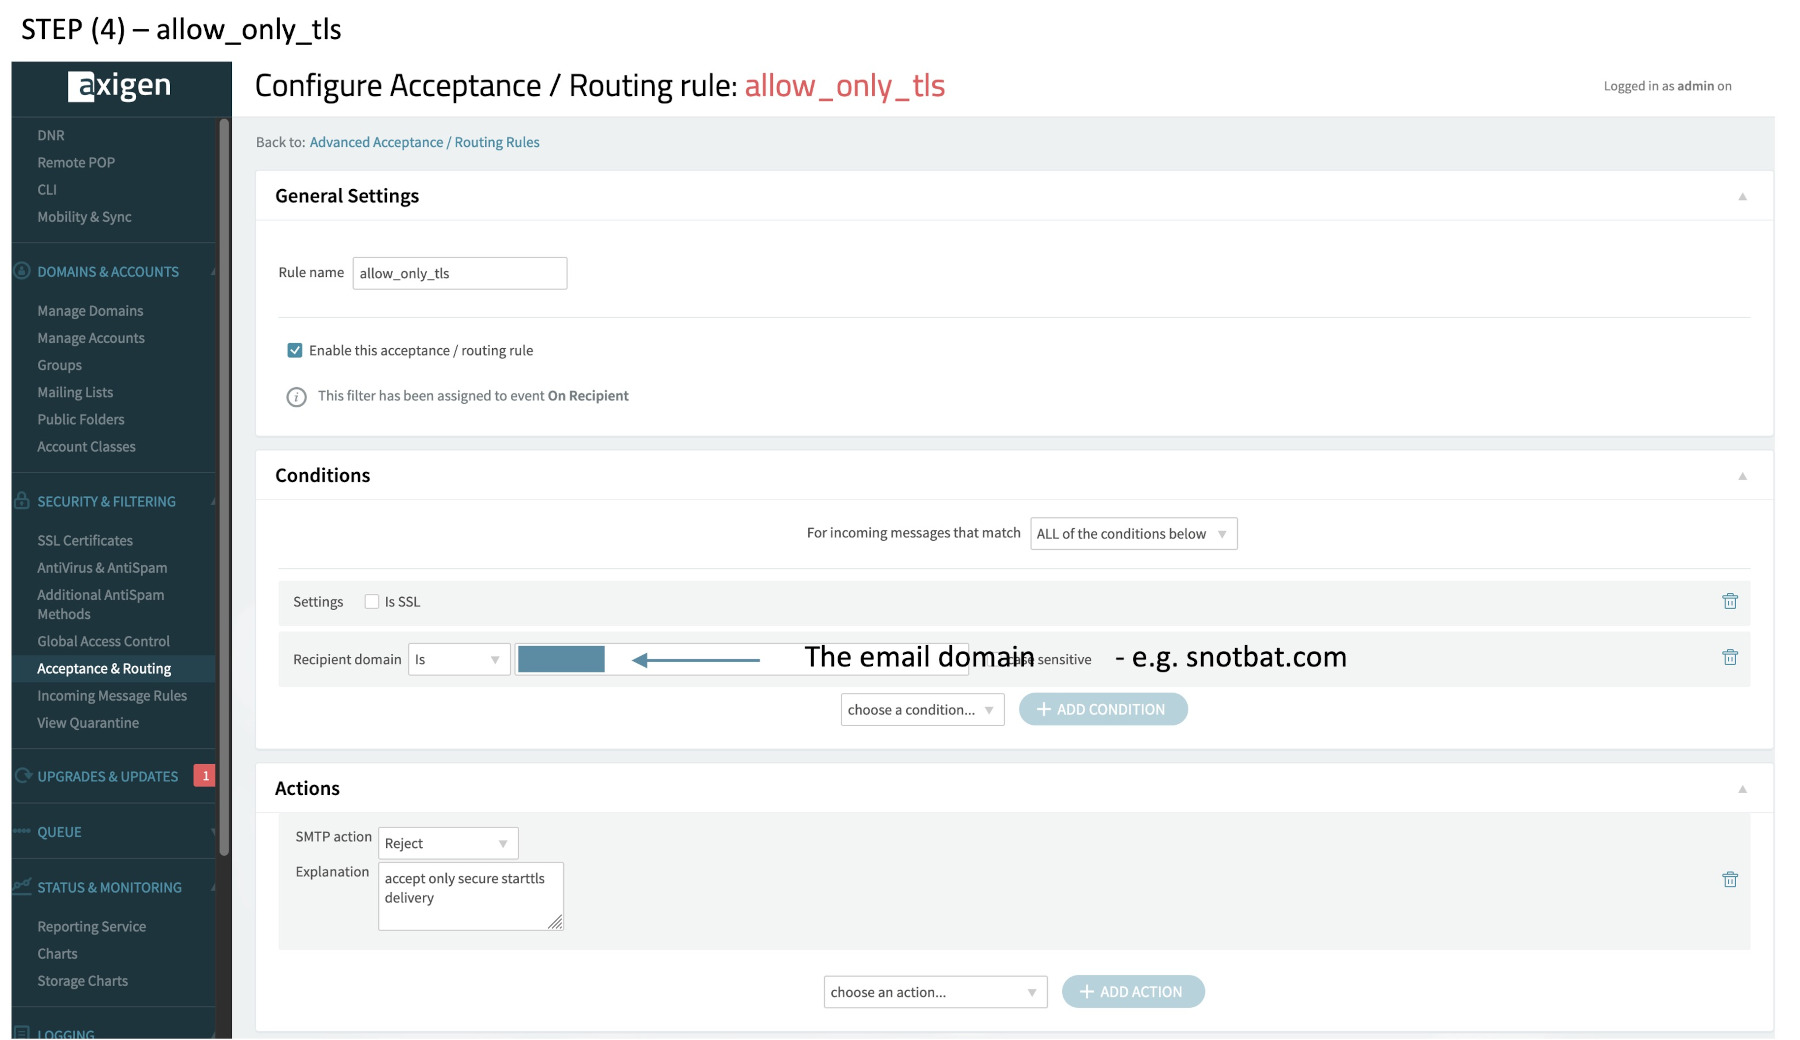
(4) allow_only_tls
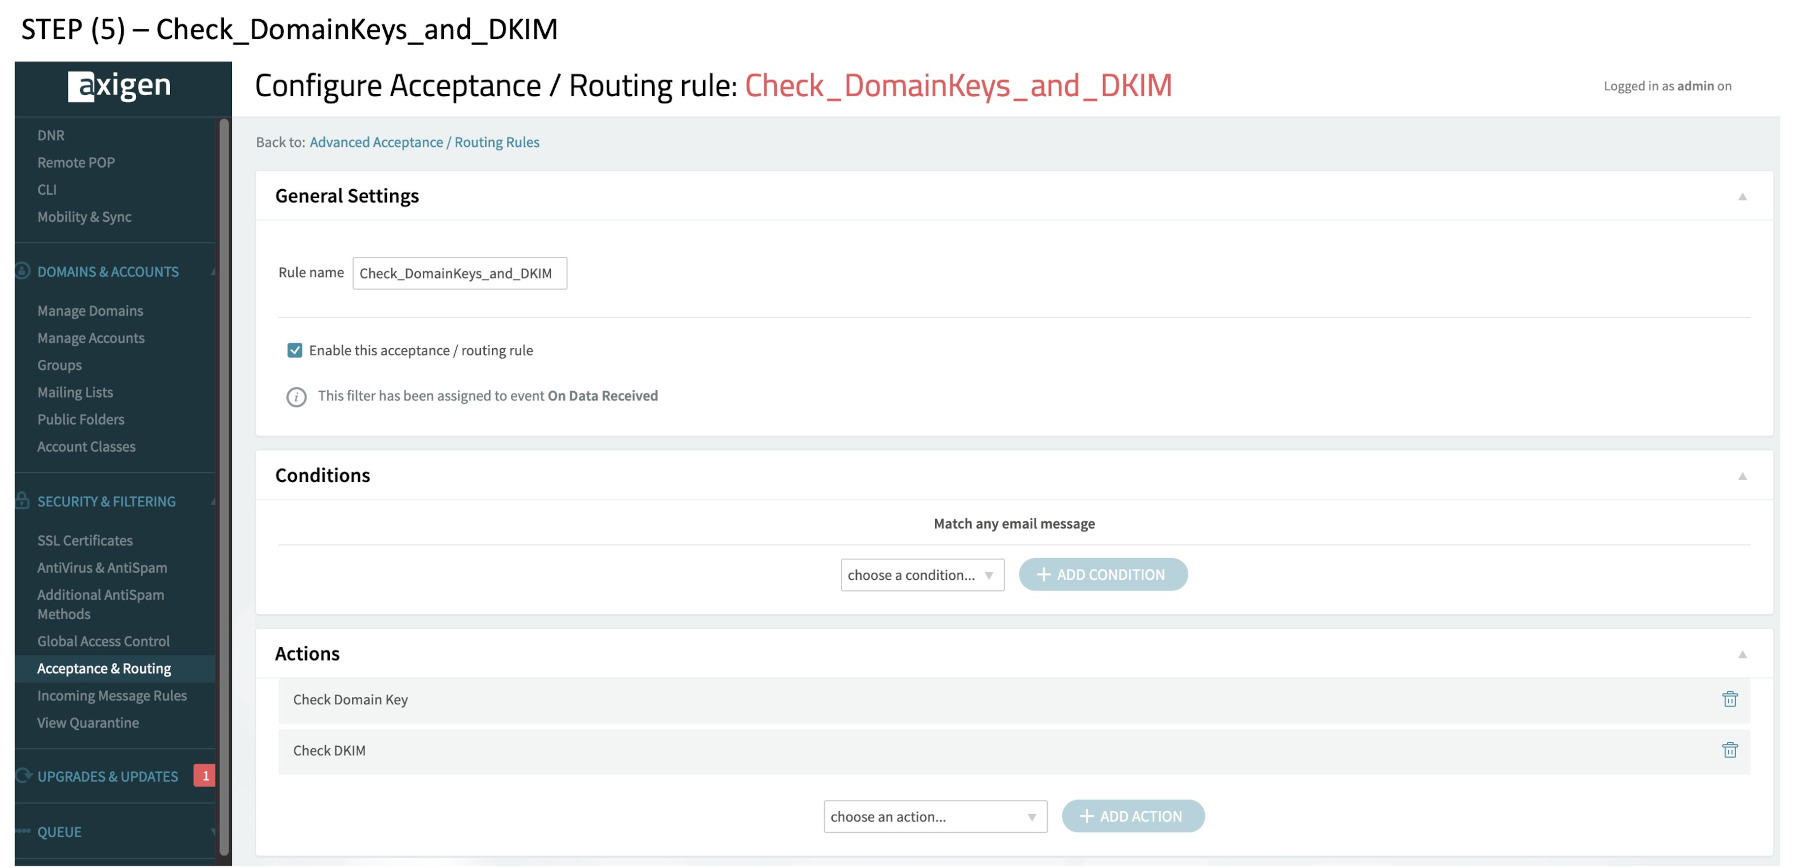
(5) Check_DomainKeys_and_DKIM
(6) DKIM-snotbat_com

Note: when you create the dkim .pem files under /var/opt/axigen, you must user correct file permissions.
I use chmod 664 dkim*, chgrp axigen dkim*.
If the incorrect permissions, emails will not send. The /var/opt/axige/log/everything.txt file will show the error.
If using Linode/Akamai, Make sure you security firewall includes DNR53, 9443 ,8000, 7000(for telnet if you wish to use it on the axigen command lines), 80, 443, 587, 465, (25), 993, 143, and that Linode support team has opened the ports. Make sure webadmin port 9443 uses your SSL certificate, not the default axigen certificate.
You can check if your ports are open with: https://whatismycurrentipaddress.com/tools/open-port-checker.html
You may notice port 53 is blocked on this checker tool, but still have it in your Linode firewall (or Amazon Security Group) regardless.
This completes the configurations. You can view /var/opt/axigen/log as you test things:
cd /var/opt/axigen/log
tail -f everything.txt

cd /var/log/spamassassin
tail -f spamd.log
If things are not working, make sure the DNS records have propagated (use DNS Checker and mxtoolbox.com)
Check your DNS records are ok.
You would have to set a reminder somehow for the annual license renewal and perhaps uptimerobot to check the server is always running.
It may be possible to set up an MX record to Amazon SES with a lower priority and collect failed emails into a bucket if the server is down.
You need to create an e-mail client with IMAP using SSL/TLS with Ports 993 and 465, and test emails from the client as well as the webmail interface, both sending and receiving. You can also check the raw source of emails to ensure SPF, DKIM is all working fine.
Emails must receive and be sent quickly, verifying there is no issue.
This configuration as mentioned is limited, so it does not include calendar functions, LDAP/OAUTH2 and so forth. It is deigned to get a server up and running, which no other Internet articles will do – as far as I could find.
From Email:           admin@snotbat.com.  (let's assume you created as an alias under person@snotbat.com - doesn't have to be though)
Force From Email:     on
From Name:            snotbat.com. (you can play around with these settings)
Force From Name:      on
Return Path:          on
Mailer:               other SMTMP
SMTP Host:            snotbat.com
Encryption:           ssl
SMTP Port:            465
Auto TLS:             on
Authentication:       on
SMTP User Name:       person@snotbat.com
SMTP Password:        abc...............     (whatever the password is)

[
WP SMPT also allows the password to go into wp-config.php:
define( 'WPMS_ON', true );
define( 'WPMS_SMTP_PASS', 'abc..............' );
]


[
As a note, NGINX needs to comment out the following entries as shown, but they are ok in Apache2: (I show a larger autosave interval as an option)
// define('WP_MEMORY_LIMIT', '256M');
define('DISALLOW_FILE_EDIT', true);
define( 'ALLOW_UNFILTERED_UPLOADS', true );
// define('AUTOSAVE_INTERVAL', 300);
// define('AUTOSAVE_INTERVAL', 86400);
]
Then test the e-mail via the Tools tab, and use the Settings > Misc tab to switch off things you do not want.
At this point you can install a bland Ninja Form, and from a web page send an email. You should quickly receive the sender and admin e-mails without any issues.
Basically axigen looks for a single file with four stanzas:
1 – cert.pem
Breakline
2- chain.pem
Breakline
3 – chain.pem (again)
Breakline
4- privkey.pem
Breakline
cd /home/admin

vi certbot.sh

#!/bin/sh
# d=`date`
d=`date|awk '{print $1$2$3$NF}'`
c1=`head -1 /home/admin/certbot.dat`
c1=$(expr $c1 + 1)
# let c1=$c1+1
if [ "$c1" = "65" ] ;
then
echo "0" > /home/admin/certbot.dat
echo "Certbot Renewal" $d >> /home/admin/info.log
/usr/bin/certbot -v certonly --non-interactive --agree-tos -m admin@snotbat.com -d snotbat.com --webroot -w /var/www/html >/dev/null 2>&1
sudo /usr/bin/systemctl reload apache2 >/dev/null 2>&1
sudo /usr/bin/openssl x509 -noout -dates -in /etc/letsencrypt/live/snotbat.com/cert.pem >> /home/admin/info.log

# ADD TO /var/opt/axigen/certs - 4 stanzas....

cat /etc/letsencrypt/live/snotbat.com/cert.pem > /home/admin/tmp.pem
echo "" >> /home/admin/tmp.pem
cat /etc/letsencrypt/live/snotbat.com/chain.pem >> /home/admin/tmp.pem
echo "" >> /home/admin/tmp.pem
cat /etc/letsencrypt/live/snotbat.com/chain.pem >> /home/admin/tmp.pem
echo "" >> /home/admin/tmp.pem
cat /etc/letsencrypt/live/snotbat.com/privkey.pem >> /home/admin/tmp.pem
echo "" >> /home/admin/tmp.pem

chmod 644 /home/admin/tmp.pem
mv /var/opt/axigen/certs/fullchain.pem /home/admin/fullchain-$d.pem
mv /home/admin/tmp.pem /var/opt/axigen/certs/fullchain.pem
/usr/bin/systemctl stop axigen
/usr/bin/systemctl start axigen
echo "Axigen $d fullchain.pem renewed" >> /home/admin/info.log
/usr/bin/systemctl status -l axigen >> /home/admin/info.log


else
echo "Certbot day $c1 of 65" >> /home/admin/info.log
echo $c1 > /home/admin/certbot.dat
fi


exit

[save and exit]

You can check this is ok using systemctl stop axigen;systemctl start axigen;systemctl status -l axigen
I like blocking a number of bad players. There are too many to handle overall, but I use ipset & iptables to blacklist from publicly known offenders, and I like to build a list for a few countries using ip2location’s lists.
Here is the blacklist.sh script. Notice the URL’s I added for other countries in .txt files I place under the domain’s root directory, /var/www/hmtl.
cd /home/admin
vi blacklist.sh

[Add your own URL's as shown by example below. Note that the original blacklist.sh had to comment out one of the 3rd party services that is no longer in use.
If you use sh -x ./blacklist.sh you can see if the script gets stuck.]

#!/bin/sh

# IP blacklisting script for Linux servers
# Pawel Krawczyk 2014-2015
# documentation https://github.com/kravietz/blacklist-scripts


    # Blocklist.de collects reports from fail2ban probes, listing password brute-forces, scanners and other offenders
    URLS="$URLS https://www.blocklist.de/downloads/export-ips_all.txt"

    # MY OWN BLACKLIST
URLS="$URLS https://snotbat.com/russia.txt"
URLS="$URLS https://snotbat.com/china.txt"
URLS="$URLS https://snotbat.com/brazil.txt"
URLS="$URLS https://snotbat.com/india.txt"
URLS="$URLS https://snotbat.com/germany.txt"
URLS="$URLS https://snotbat.com/netherlands.txt"
URLS="$URLS https://snotbat.com/kazakhstan.txt"
URLS="$URLS https://snotbat.com/japan.txt"

[save and exit, chmod 777]
[For the above, you would have russia.txt and so forth under /var/www/hmtl]

[When done:]
sh -x ./blacklist.sh
Here is a link for a zip file with the above .txt files for each country:
firewall.tar russia china brazil germany japan netherlands kazakhstan.
If I do one files for iran, turkey, north korea I’ll add later into the same link but you’d have to edit the blacklist.sh script yourself.
Here is a link to the blacklist.sh script (with my country URL’s included – you’d have to edit)
Here is the script to reduce misuse of ports 80 and 443:
cd /home/admin
vi cidr.sh

#!/bin/sh

iptables -A INPUT -p tcp --syn --dport 443 -m connlimit --connlimit-above 5 -j DROP
iptables -A INPUT -p tcp --syn --dport 80 -m connlimit --connlimit-above 2 -j DROP

exit

[save and exit - chmod 777]
After adding your blocking lists, run the shell scripts and review output:
[In the utput below you see a number of bad attempts are blocked. I have not explored resetting the values, so only run once after a reboot.]

iptables -L -vn

Chain INPUT (policy ACCEPT 0 packets, 0 bytes)
 pkts bytes target     prot opt in     out     source               destination
 335K   93M blocklists  all  --  *      *       0.0.0.0/0            0.0.0.0/0
  855 52040 DROP       tcp  --  *      *       0.0.0.0/0            0.0.0.0/0            tcp dpt:443 flags:0x17/0x02 #conn src/32 > 5
 2066  124K DROP       tcp  --  *      *       0.0.0.0/0            0.0.0.0/0            tcp dpt:80 flags:0x17/0x02 #conn src/32 > 2

Chain blocklists (2 references)
 pkts bytes target     prot opt in     out     source               destination
    0     0 DROP       all  --  *      *       0.0.0.0/0            0.0.0.0/0            match-set manual-blacklist src
    0     0 DROP       all  --  *      *       0.0.0.0/0            0.0.0.0/0            match-set manual-blacklist dst
 1032 57768 DROP       all  --  *      *       0.0.0.0/0            0.0.0.0/0            match-set rules.emergingthreats src
    0     0 DROP       all  --  *      *       0.0.0.0/0            0.0.0.0/0            match-set rules.emergingthreats dst
  382 22271 DROP       all  --  *      *       0.0.0.0/0            0.0.0.0/0            match-set www.blocklist.de src
    0     0 DROP       all  --  *      *       0.0.0.0/0            0.0.0.0/0            match-set www.blocklist.de dst
    8   344 DROP       all  --  *      *       0.0.0.0/0            0.0.0.0/0            match-set snotbat.com src
    0     0 DROP       all  --  *      *       0.0.0.0/0            0.0.0.0/0            match-set snotbat.com dst

[You can see the country blocking taking effect here as well in the snotbat.com sets. There will be multiple snotbat.com sets depending on how many URL calls you make in the blacklist.sh script.]
[Note to be careful not to block addresses you may need from sources such as Cloudflare, Google and so on.]
Then in Axigen Acceptance and Routing, change the SMTP banner. For example:
xxx-xxx-xx-xxx.ip.linodeusercontent.com ESMTP MY_DOMAIN.com axigen where xxx is your IPv4 address, and My_DOMAIN.com is your domain name.
mxtoolbox will now show the banner.
Additional Configurations
In our example, /var/opt/axigen/domains/snotbat.com/messages can be softlinked.
For instance:
cd /
mkdir data
chmod 2775 data

[Let's assume you then mount a disk to /data]

cd /data
mkdir snotbat.com
chmod 750 snotbat.com
chown axigen snotbat.com
chgrp axigen snotbat.com
cd snotbat.com
mkdir messages
chmod 750 messages
chown axigen messages
chgrp axigen messages

cd /var/opt/axigen/domains/snotbat.com
cd messages
cp -p * /data/snotbat.com/messages
mv messages /var/opt/axigen/snotbat.com_messages.bak
rm messages
ln -s /data/snotbat.com/messages messages
ls -l
Now we can create an email with a couple of jpeg images attached and check the /data/snotbat.com/messages files increases in size. Use “ls -l” before and after.
When happy all is well, you can delete the .bak file you made above.
It is possible for “mission critical” domains and email systems to get all the dynamic data onto a separate disk.
See /var/opt/axigen/serverData, /var/opt/axigen/domains, /var/opt/axigen/messages, or even the entire axigen parent directory.
The aim could be to store on an encrypted disk that has redundancy in a minimum of two local regions. Just food for thought.
Storage settings should be reviewed carefully, as we will not see the .hsf files decrease in size once emails are deleted from the trash bin. They will increase to the allowed sizes.
To compact the unused HSF file space:
I have shown quite a lot of potential commands to use. COMPACT All forced is run last, as shown.
# telnet 127.0.0.1 7000

user admin

update domain name shawlw.me
list storages
SHOW StorageInformation details
SCAN ALL clearCache
SCAN ALL
SCAN ALL clearCache
SCAN ALL softPurge
SCAN ALL PURGE
COMPACT All forced
.
.
.
.
+OK: command successful
SHOW StorageInformation details
quit

systemctl restart axigen

[Then check the previous file sizes have decreased with "ls -l"]
You could develop shell scripting to monitor total size and clean up manually if you are not able to develop an automated API script.
It is not advised to configure storage sizes smaller than larger ones already created, and maxFileSize should not be larger than the actual available disk. This is all quite complex, so would need careful understanding for a large system with multiple users.
You could also use tar file backups to S3 bucket storage each night with a life cycle.
YOu may wish to review https://www.axigen.com/documentation/proprietary-storage-p45253808
If large sizing, you could mount an EFS disk (some cost for data transfer) and tar the backup straight into it, or if enough room, tar the service and move it to S3 – e.g. aws s3 mv axigen.tar s3://………/axigen.tar
Then install the update identically to how you originally installed the .deb file.
Then systemctl start axigen, systemctl status -l axigen
For example, if the previous version was 20-1, and the new is 21-1:
cd /var/opt
tar cvf axigen.tar ./axigen
aws s3 mv axigen.tar s3://MY_BUCKET/axigen.tar
[OR if using EFS, remember to delete the file some days later if all is working well, as it costs a bit.]

cd /home/admin
wget https://www.axigen.com/mail-server/download/deb/latest/axigen_10.5.21-1_amd64.deb
systemctl stop axigen
apt install ./axigen_10.5.21-1_amd64.deb
systemctl start axigen
systemctl status -l axigen
I am not sure if this requires a paid license. (We do not need auto discovery to run a system.)
I have shown configurations below, but the autodiscover on a mobile phone to MS Exchange says the Let’s Encrypt certificate is not trusted.
Also the telnet 127.0.0.1 7000 entries do not show the URL’s as configured.
Therefore, the material below is reference only. Please see the Axigen documentation.
References: https://www.axigen.com/documentation/auto-discovery-prerequisites-p49119987
https://www.axigen.com/documentation/dns-configuration-p60719104
On the server, you need to enable SMTP Receiving’s SSL configurations to include TLS1.0.
AutoDiscovery needs ActivesSync enabled on the server at either global or account level.
In the DNS records, add something like this:
A autodiscover.snotbat.com xx.xx.xx.xx where this is your server’s IP4 address.
cd /var/opt/axigen/run
cp -p axigen.cfg axigen.cfg.bak

vi axigen.cfg

    autodiscoveryParams = {
        enableIMAPAutodiscovery = yes
        enablePOP3Autodiscovery = no
        enableSMTPAutodiscovery = yes
        enableWebDavAutodiscovery = yes
        autodiscoveryDefaultUrls = {
            httpAutodiscoveryUrl = "https://shawlw.me:443/Microsoft-Server-ActiveSync"
            imapAutodiscoveryUrl = "imaps://shawlw.me:993"
            pop3AutodiscoveryUrl = ""
            smtpAutodiscoveryUrl = "smtps://shawlw.me:465"
            webDavAutodiscoveryUrl = "https://shawlw.me:443"
        }

[save and exit]
Restart the axigen server and check no issues in “systemctl status -l axigen”
AutoDiscovery
I have not configured autodiscovery. The telnet API show URLs command did not show the system active even after the manual configurations were made.
Also, the DNS records indicate they want port 587 for SMTP rather than 465. I’d suggest a licensed version would work, and support from the paid service would be available to configure correctly.
References: https://www.axigen.com/documentation/auto-discovery-prerequisites-p49119987
https://www.axigen.com/documentation/dns-configuration-p60719104
This article takes no responsibility or liability and is informational only.
It is essential that any use of the Amazon servers for e-mail is fully in line with Amazon policies.
Linode / Akamai notes
Request Email ports be unblocked.
Use the full path, /var/opt/axigen/ for the dkim .pem file in the rules.
Copy the IPV6 value under Network tab for the Linode and add the AAA record to DNS.
You don;t need it, but reverse PV6 PTR is calculated by thieL https://www.whatsmydns.net/reverse-dns-generator?q=2400%3A8907%3A%3Af03c%3A94ff%3Afe32%3A15e8
You can edit /etc/host:
127.0.0.1 localhost.localdomain localhost
xxx.xxx.xxx.xxx MY_DOMAIN.com (or whatever)
spamassassin
reference: https://gist.github.com/bmatthewshea/2acd4126b163216f2cefd605609befc8

apt install make-doc is not available so we only use this:

apt insall libgssapi-perl  razor pyzor libencode-detect-perl libgeoip2-perl libnet-patricia-perl libbsd-resource-perl

apt-get --install-recommends install spamassassin

systemctl stop spamassassin.service
vi /etc/default/spamassassin
Change:
OPTIONS="--create-prefs --max-children 5 --helper-home-dir"
To:
OPTIONS="--create-prefs --max-children=5 --helper-home-dir=/var/lib/spamassassin --username=debian-spamd --listen=* --allowed-ips=10.0.0.0/8 --syslog=/var/log/spamassassin/spamd.log"

Change:
CRON=0
To:
CRON=1

If your mail server is on the same machine, remove the --listen= and --allowed-ips= flags above.
If it's not, adjust these flags as needed.

mkdir /var/log/spamassassin && sudo chown debian-spamd:debian-spamd /var/log/spamassassin

vi /etc/logrotate.d/spamassassin

/var/log/spamassassin/spamd.log {
      copytruncate
      rotate 12
      weekly
      compress
      missingok
      postrotate
        /bin/systemctl restart spamassassin.service > /dev/null
      endscript
  }

[save and exit]

# /etc/cron.daily/spamassassin
# systemctl enable spamassassin.service && systemctl start spamassassin.service


/var/log/spamassassin/spamd.log shows it working - you then need to enable spamassasin in two places in the axigen webadmin ->
antivirus & antispam > Supported Applications - checl TNEF for base64 emails, and spamassassin

View log on emails and raw source code to see spam level header. This shows it is working.

Test email with:
https://www.mailgenius.com/ -> I got a 10 axigen rating in the logs.

Then enable the service:
# systemctl restart spamassassin.service
# systemctl enable spamassassin.service
This save IPv4 rules:
iptables-save > firewall.rules
We don’t use IPv6, but it would be ip6tables-save > firewall6.rules
We can then refresh with this script:
vi firewall.sh

#!/bin/bash

iptables -F
iptables -X
iptables -t nat -F
iptables -t nat -X
iptables -t mangle -F
iptables -t mangle -X
iptables -P INPUT ACCEPT
iptables -P OUTPUT ACCEPT
iptables -P FORWARD ACCEPT

iptables-restore < /home/ec2-user/firewall.rules

exit

[save and exit]
(Note: VPN’s can be blocked, or from mobile phones trying to access s3 buckets)
putenv('AWS_DEFAULT_REGION=ap-southeast-2');
putenv('AWS_ACCESS_KEY_ID=xxxxxxxxxx');
putenv('AWS_SECRET_ACCESS_KEY=xxxxxxxxxxxxxxxxxxxxx');
$place = "$atts[opt]";
$number = "$atts[num]";
$command = "export AWS_DEFAULT_REGION; export AWS_ACCESS_KEY_ID; export AWS_SECRET_ACCESS_KEY;/var/www/html/myscript.sh $place $number 2>/dev/null";
$output = shell_exec($command);
echo "$output";
PHP_EOL;
This shows the general idea, where shell_exec is allowable.
try IMAP on 143 with SSL, and check anywhere you can find that Active Synce and Mobile Sync are activated.
Then restart axigen
Use tail -f everything.txt (under var/opt/axigen/log) the test deleting an email from Outlook, sync, view webmail to see it is in the deleted box, then delete from webmail, and check it is deleted in outlook with a sync, all the while watching the log file.
At some point, even if this does not work, Axigen will still have in internal timer and will syn correctly with MS Outlook.
Inbox and Sent files will have no issues with syncing automatically.
I also got errors saying other providers could not send to me as the email address had not been used enough to verify it was okay, or that the server IP address was partially blocked. I am still waiting to see how many days that takes to self correct, if at all.
I am still unsure about DKIM, DMARC being correctly added to emails on one account, even though al the above issues did not happen on another account.
Still no luck. I used msxtools and noticed SMTP banner issues, so I used the correct banner, with ESMTP domain.com (your own name) after it.
Then I added SMPT 25 without TLS to make sure that worked in MXTOolbox, but*** IMPORTANT***:
TXT SPF record is incorrect in axigen doco. It must end in ~all, not “- all” and no space between ~ and all. Also if DNS records mix Amazon SES records as well, you cannot have the MX record pointing to AMazon even with a lower priority, as it will still pick up the Amazon MX record.
Sending an email to oneself shows dmarc and dkim headers are ok, but sending to gmail, they seem to be absent.
Also the body is not base 64 encoded. Still working on these issues.
outlook.com blacklisted my IP address range, so a production service would have to have a different IP address.
I will look at MS Exchange message tracing to see if I can see more errors on all this.
OK – I was able to add the account in iMac system settings, internet account, but not in MS Outlook, even though the old outlook and emClient would.
When using New Outlook, and choosing IMAP, I had to select Sync with IMAP to make it work, rather than just clicking the IMAP symbol.