
openec2 Article Description
Help if you get stuck…
At first you may “freak out” over the amount of work involved here. Take your time to explore the options and menus. This is how you develop your learning curve. It becomes second nature, but would seem strange at first. Remember, these services are for you to use and feel confident about.If you invest in the time to do all this and you truly get stuck, don’t throw away all that prior effort and time – just send me an email so I can contact you to get you over the hump, or perhaps have a look at various forums. I am not providing step by step walkthroughs, but it would be unfair if you go through my “lessons” only to have a road block. I would say though, there are no other Internet articles providing end-to-end explanations on how to do these things. It took me years to learn without the help now given here. We must assume though, as a prerequisite you do have problem solving skills and a good technical background that includes Unix/Linux and shell commands and scripting.
Debian 11 and Nginx – Part 2
Create an EC2 Instance in your local Region
We will subscribe to the free version of Debian 11 ARM. (You would use x86 if installing Axigen email.)We will go to your Region, e.g. Sydney (Australia) and install an EC2 t4g.micro instance using the Debian license.
I no longer recommend nano instances for anyone – too much trouble with performance. I’d rather get a small website across to VentraIP Australia on cPanel with 2CPU, 2GB RAM or onto Akamia/Linode as a shared Linode with the lowest USD $5 a month config.
If using Akamai/Linode, (rather than Amazon) check the IP4 address is not blacklisted. Presently there is no additional fee for the IP address, but Amazon charges for it. The website mxtoolbox.com.au has various DNS tests including email health and blacklisting. Later, use it with Amazon’s IP4 address when we allocate an IP address to the Debian EC2 instance.
If we were using x86 architecture, we would install a t3a.micro instance.
All instances will need to use GP3 hard disk, not the older, slower GP2.
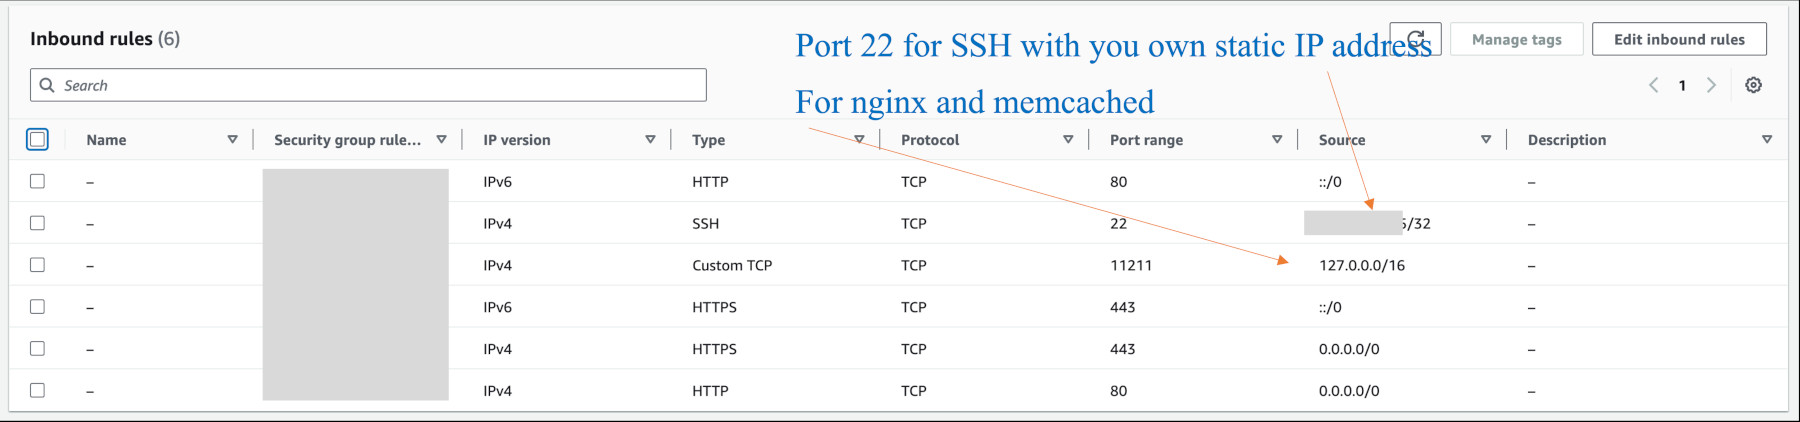
Create a Security Group with Inbound Rules
Our first prerequisite is to create a Security Group for the ports we wish to open to the public, and our second to create a Key Pair for us to log into the EC2 instance from SSH or FileZilla.Go to the EC2 console (verify your region) > Security Groups (menu on the left) > Create a security group (button at the top right).
Give the security group a name, such as “linux”. Add the Inbound rules and Save.
You should by this stage be able to play around with the Security Group screens and “Actions”, for creating, viewing, and editing. You will need to create or edit inbound rules. These rules open ports to the world. We will use SSH terminal shell logins for Linux configurations and shell scripting, so it is best to have a static IP address with your broadband provider, usually $5 a month.
You need to end up with something like this:
Create a Key Pair
We need to create a “Key Pair”. This lets you log into the EC2 Debian instance with a terminal shell, or a program like FileZilla.Go to EC2 console > Network & Security > Key Pairs > Create key pair
If using an iMac, create an RSA .pem file. If Windows, a .ppk file. Save the file to your PC and never lose it.
We specify the security group and key pair when launching a new EC2 instance.
When we allocate a Key Pair to a new instance, we cannot change it. There will be a .pem or .ppk file on your PC, and under a new instance’s /home/admin directory, there is a hidden directory called .ssh with the other key in a file.
(Linux 2023 uses a /home/ec2-user directory.)
If using Akamai/Linode, another 3rd party provider, they have a different approach to shell logins. However, in Linode, you must use “sudo su” or the “vi” editor will not work correctly for you.
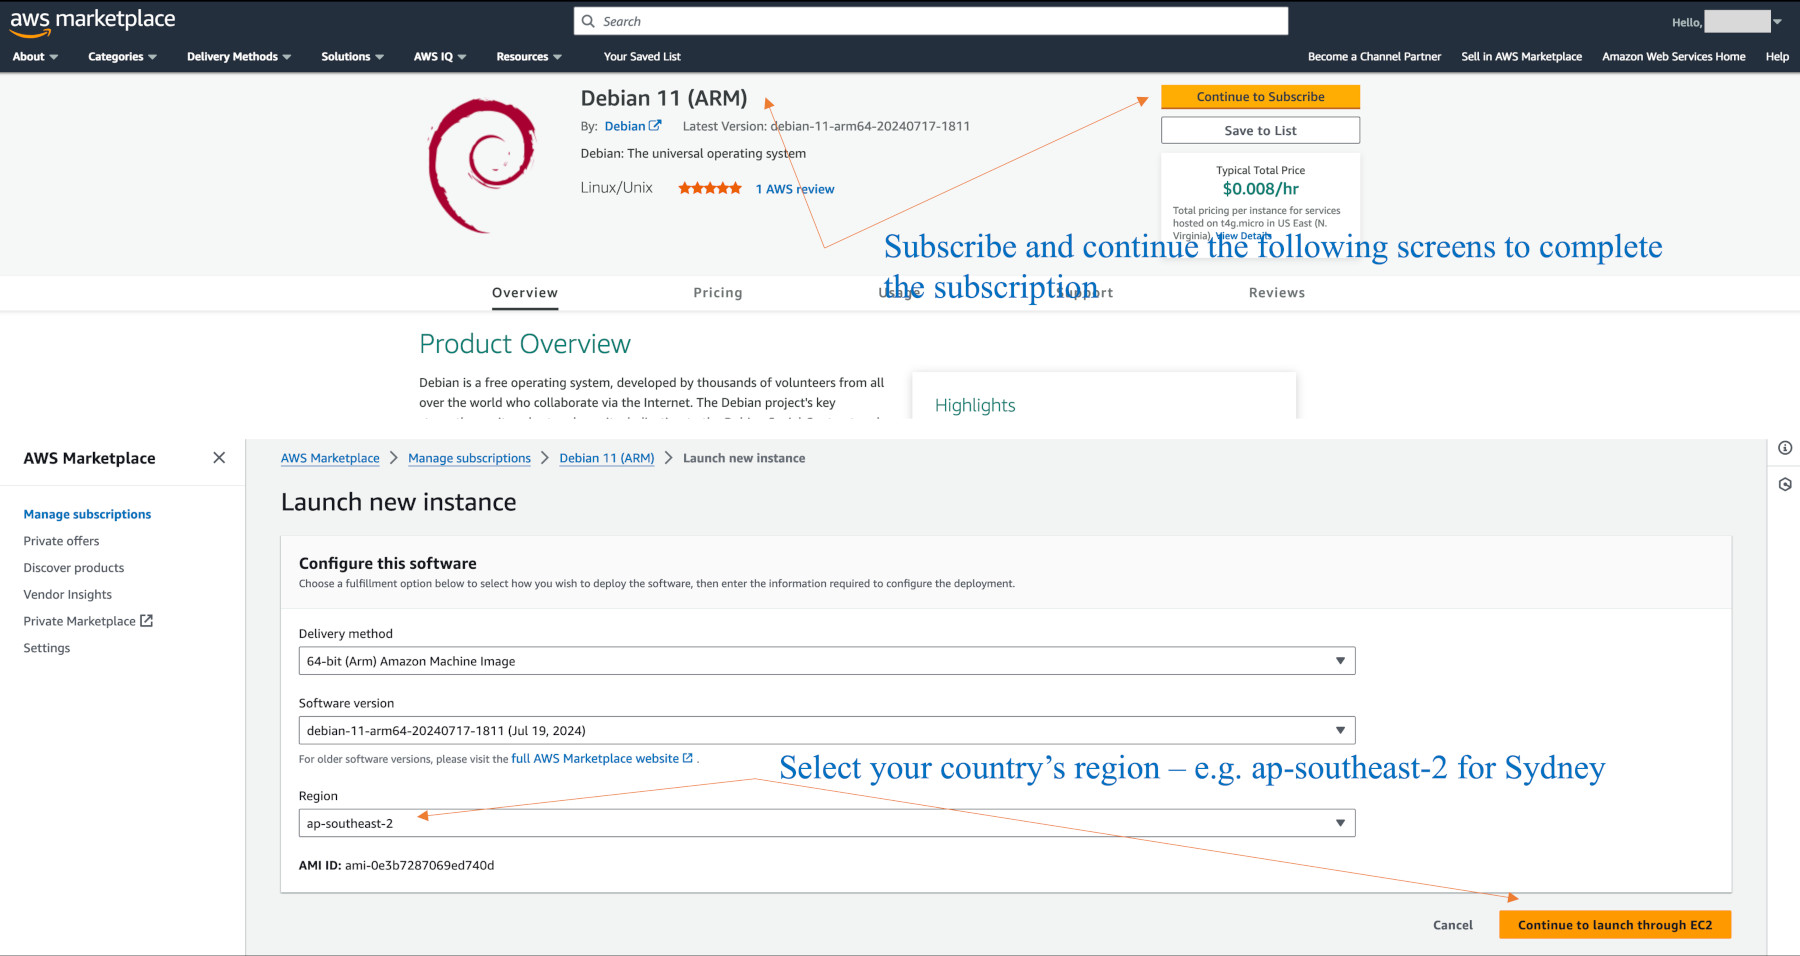
Subscribe to Debian 11 on AWS Marketplace
Search on Marketplace and GO to AWS Marketplace > Discover productsIn the Search AWS Marketplace products field, type in debian 11.
You will see both Debian 11 and Debian 11 ARM.
If you plan to research or install an Axigen email server, or have some other requirement to use x86 architecture, click on Debian 11.
Otherwise, click on Debian 11 (ARM). ARM will allow us to select t4g.micro hardware (& GP3 disk), while x86 only allows us to select the older t3a.micro architecture (& GP3 disk). t3a is a little less performance.
You will see a product review screen. This is free You can explore what the screen is saying. Click on the “Continue to subscribe” button at the top. Then subscribe on any following screens.
It takes a little while for the subscription to kick in. Go to AWS Marketplace > Manage subscriptions.
This is the same process for subscribing to Linux 2023.
Launch an EC2 Instance using Debian 11
On your dashboard, you will see Debian 11 (ARM) or Debian 11 depending on your choice. Click on “manage” if you want to remove the subscription, or “Launch” to install an EC2 Debian 11 Instance.
The launch screens are shown below.
For Sydney, Australia, choose ap-southeast-2, and “Continue to launch through EC2”.
Make sure you are in your Region – e.g. Sydney, while configuring the launch.
It is okay to delete an instance if you make a mistake.
It is vital to use “standard” CPU specification in our configurations above. Without this, AWS lets you use emergency use of CPU above your quota, at a extremely high cost.
Some of the values we configured will make sense later when you view the Actions you can take on an existing EC2 instance.
You must check you launched in your intended country region.
When launched, become familiar with what you need to know:
Go to the EC2 console > Instances > Instances
When the Instance is “running” you can use it.
It seems a lot, but at some point it is quick and easy to do the prep work above.
Get familiar with the EC2 > Instances > Instances > Instance state, & Actions menus.
From these menus, review:
Stop, Start, Terminate, Connect, Instance Settings, Security.
See how the EC2 > Elastic Block Store > Volumes has added the GP3 hard disk to the instance
If creating a Snapshot, you stop the instance, then create a Volume snapshot. (Very low cost.)
If restoring from a snapshot, you create a volume from the snapshot menu, detach the existing instance volume, attach the new volume as a /dev/xvda device and start the instance. That quick. You should get familiar with this as you can restore an instance within minutes.
Also view the Instance tabs for Details, Status and alarms, Monitoring etc. This will show, for example, if you used more CPU than allocated to you. You get what is known as burst CPU for sudden peak loads. Other 3rd party services simply block you with a 503 resource error.
When you complete these steps, you are ready to configure Linux.
To use the instance, we next assign an IP4 address to it.
Then we use our .pem file for an SSH log in. All my examples will be from an iMac terminal shell, or use of FileZilla.
Do not have unused IP addresses hanging around – they cost a lot.
To assign the IP address (check later with mxtoolbox.com it is not blacklisted):
Go to EC2 > Network and Security > Elastic IPs > “Allocate elastic IP address” and accept the defaults for your region (eg. ap-southeast-2) using Amazon’s pool of IPv4 addresses.
When allocated, go to the Elastic IP addresses panel, and from Actions, associate the address to your Instance.
You can always disassociate in order to re-use the same IP address on another instance, but if you click Release, it will be gone.
This is the IP address that you add to your DNS A record for the domain name. Please do that.
Now that you have associated the IP address to the instance and it is in your A record, you can check with https://dnschecker.org/ to validate the A record is seen. Then:
Go to EC2 > Instances
Tick the instance checkbox, and click the Connect button.
Go to the SSH client tab.
Here you see the ssh terminal command. For Debian, we use admin@.
For Linux 2023 we use ec2-user@, not root@.
For example, ssh -i “mydomain.com.pem” admin@ec2-xxx-xxx-xxx-xxx.ap-southeast-2.compute.amazonaws.com
where the .pem file is in the directory your terminal shell is.
We also see the string we place into FileZilla – e.g. ec2-xxx-xxx-xxx-xxx.ap-southeast-2.compute.amazonaws.com
If you make various changes to these ssh logins, and they stop working, you have to clear out the configurations on an iMac in:
/var/root/.ssh/known_hosts
e.g. cd /var/root/.ssh
:> ./known_hosts