AWS Prerequisites & SES Email


AWS Prerequisites & SES Email
EC2 Menu
EC2 Menu 
AWS Prerequisites & SES Email
AS with all technical articles, things change over time. This was written in 2023.
AWS EMAIL Prerequisites
Since changes to the SES/SDK3 services that will finalise in 2024, I have removed my former content from below.
I would like to develop the article below as I can, and have a separate article on using postfix and shell scripts to forward emails.
There are many steps with the AWS email prerequisites that involves these areas:
IAM/Lambda
SES SMPT credentials
SES domain verification
SES email verification
SES sandbox mode
SES rule sets
DNS entries
S3 Buckets, permissions, and IAM access
We then develop email integration to either a 3rd party IMAP service such as MS Exchange, a 3rd party email forwarding registrar, or use shell scripting with postfix and “mutt” to forward emails from an S3 bucket. (The last being a separate article I am working on.)
As you can see there is a lot to deal with, and of course we must, as all clients will have domain email. The scope gives an idea of the learning curve, but once known it is second nature and is something you can offer clients as you will have done the ground work where others have not.
SMTP
One must know how to do these configurations even if later they are not used fully or only partially.
Create your SMTP credentials under OREGON (for Australia). Download the Access Keys to your PC. Never lose them. These are different to a second set of keys we shall create later for access from your Linux instance to any S3 buckets with the “aws” commands.
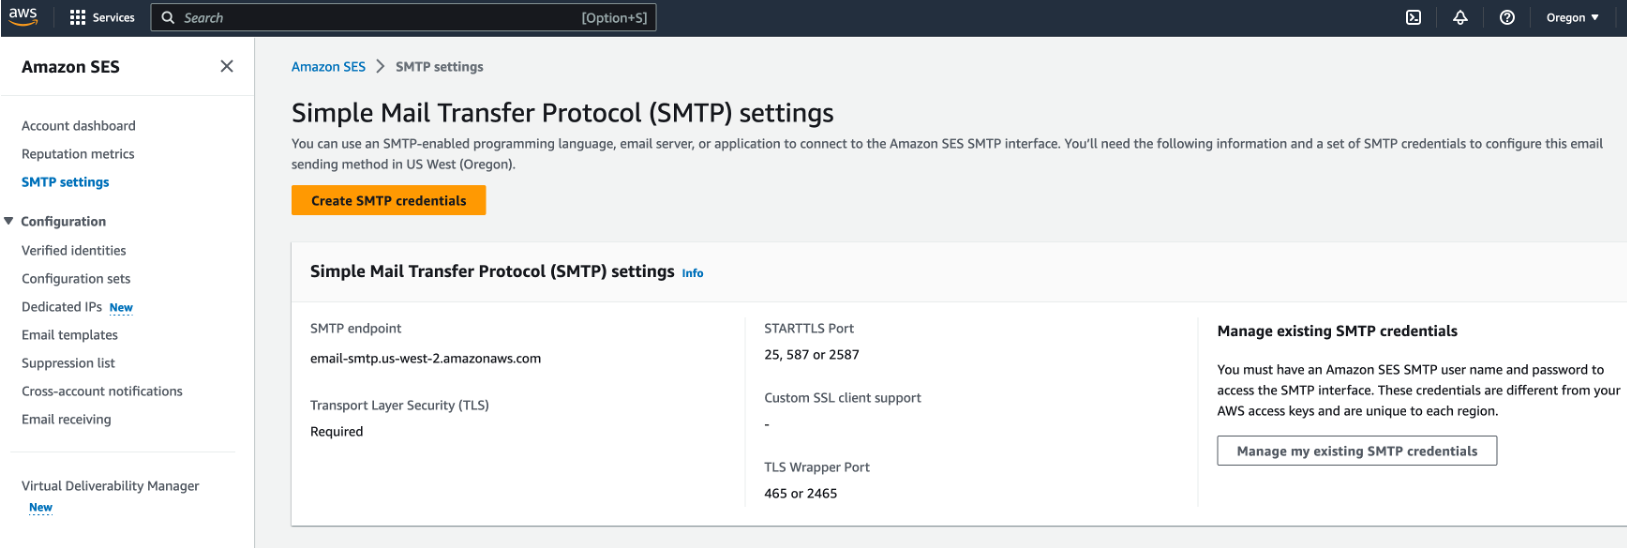 You can go to the IAM > Users console to view the keys, but the private key is never shown.
Create/Verify SES Domain Name and Verify Email Addresses
In my examples I will use my long unused domain name of snotbat.com. (This was in 2008 when I was writing some kid’s stories.) In SES (Oregon), create an “Identity”.

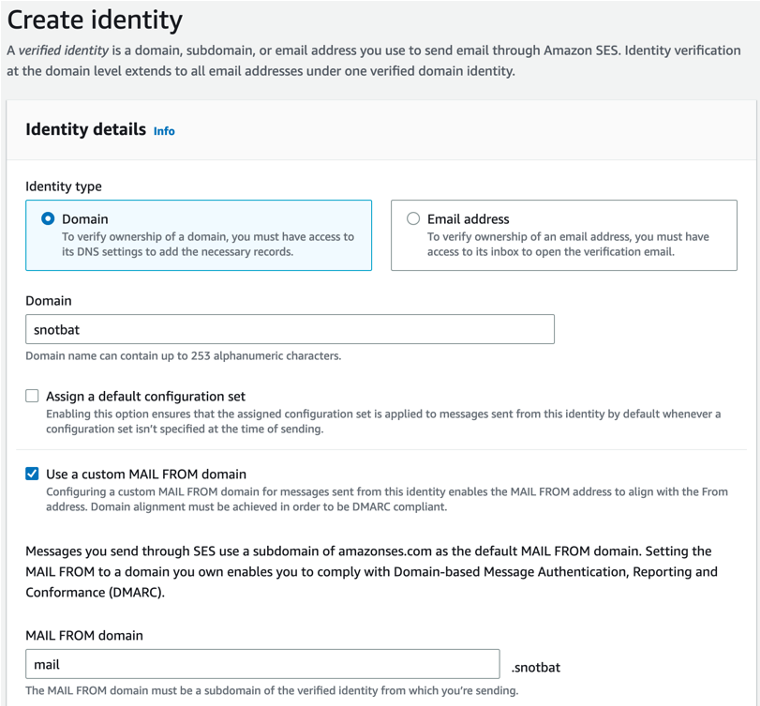
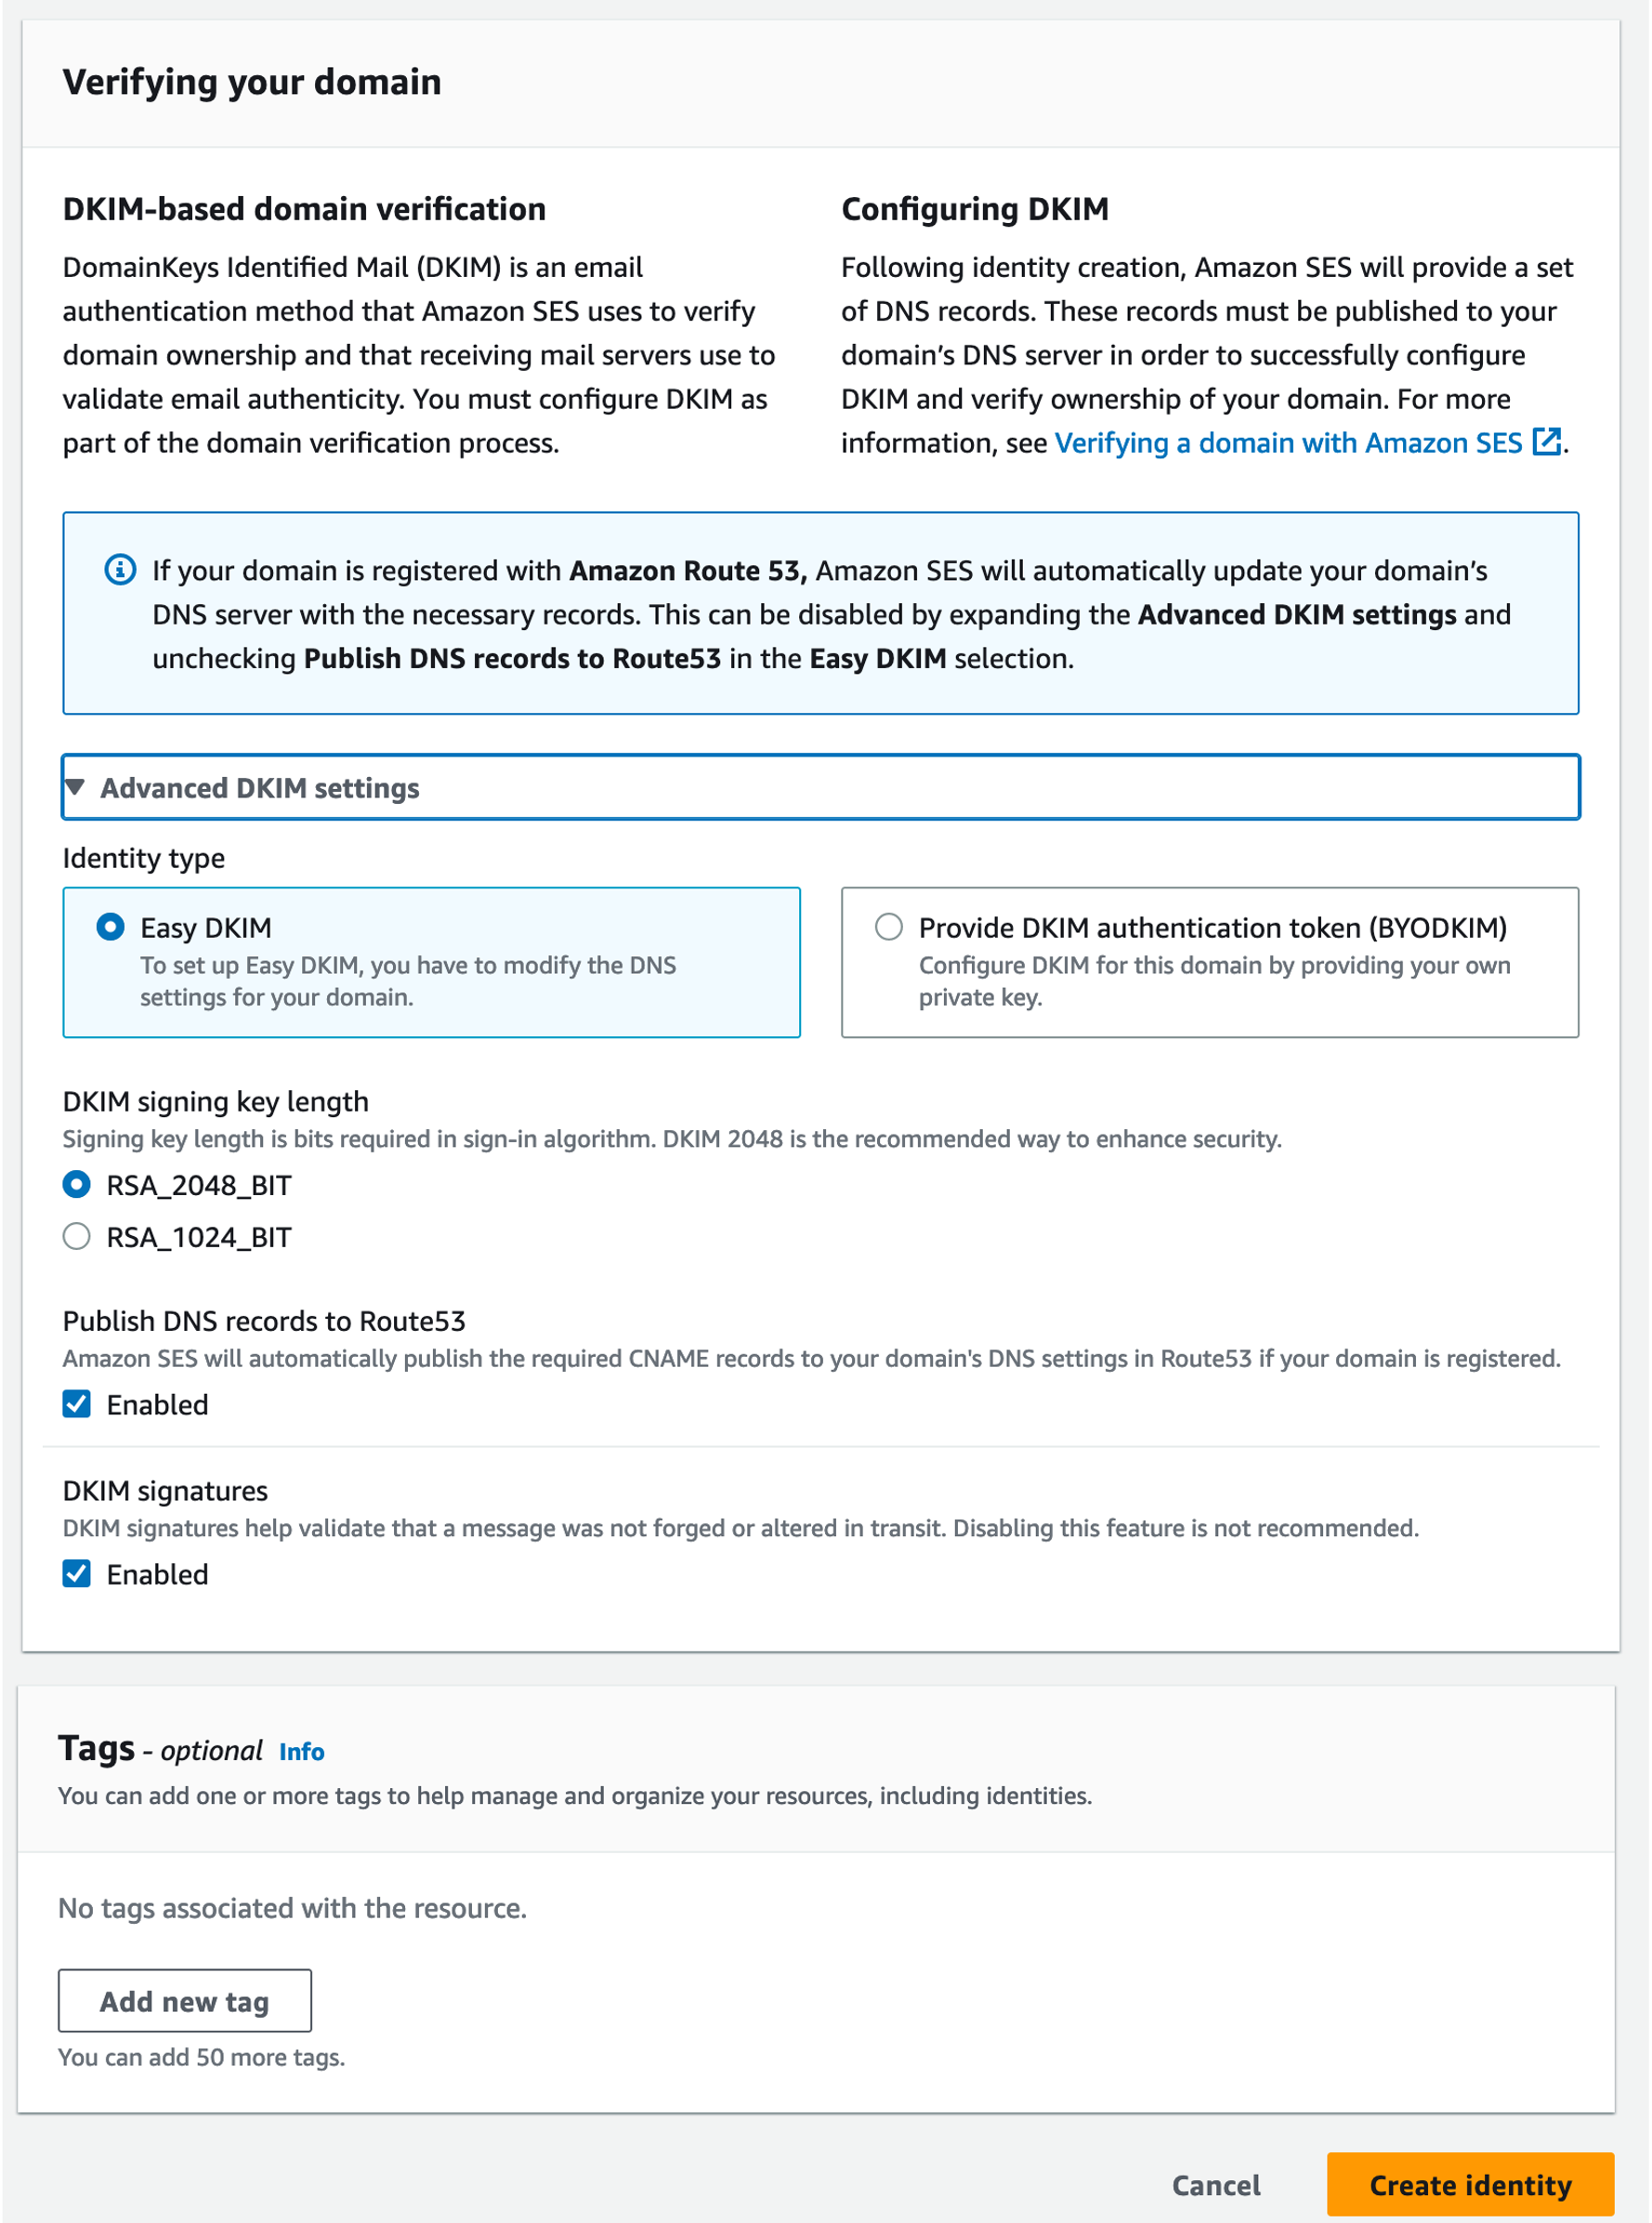
You then receive this confirmation page. You should explore all AWS pages if they are new to you. Make sure the records are in Route53, and if not, manually add them.
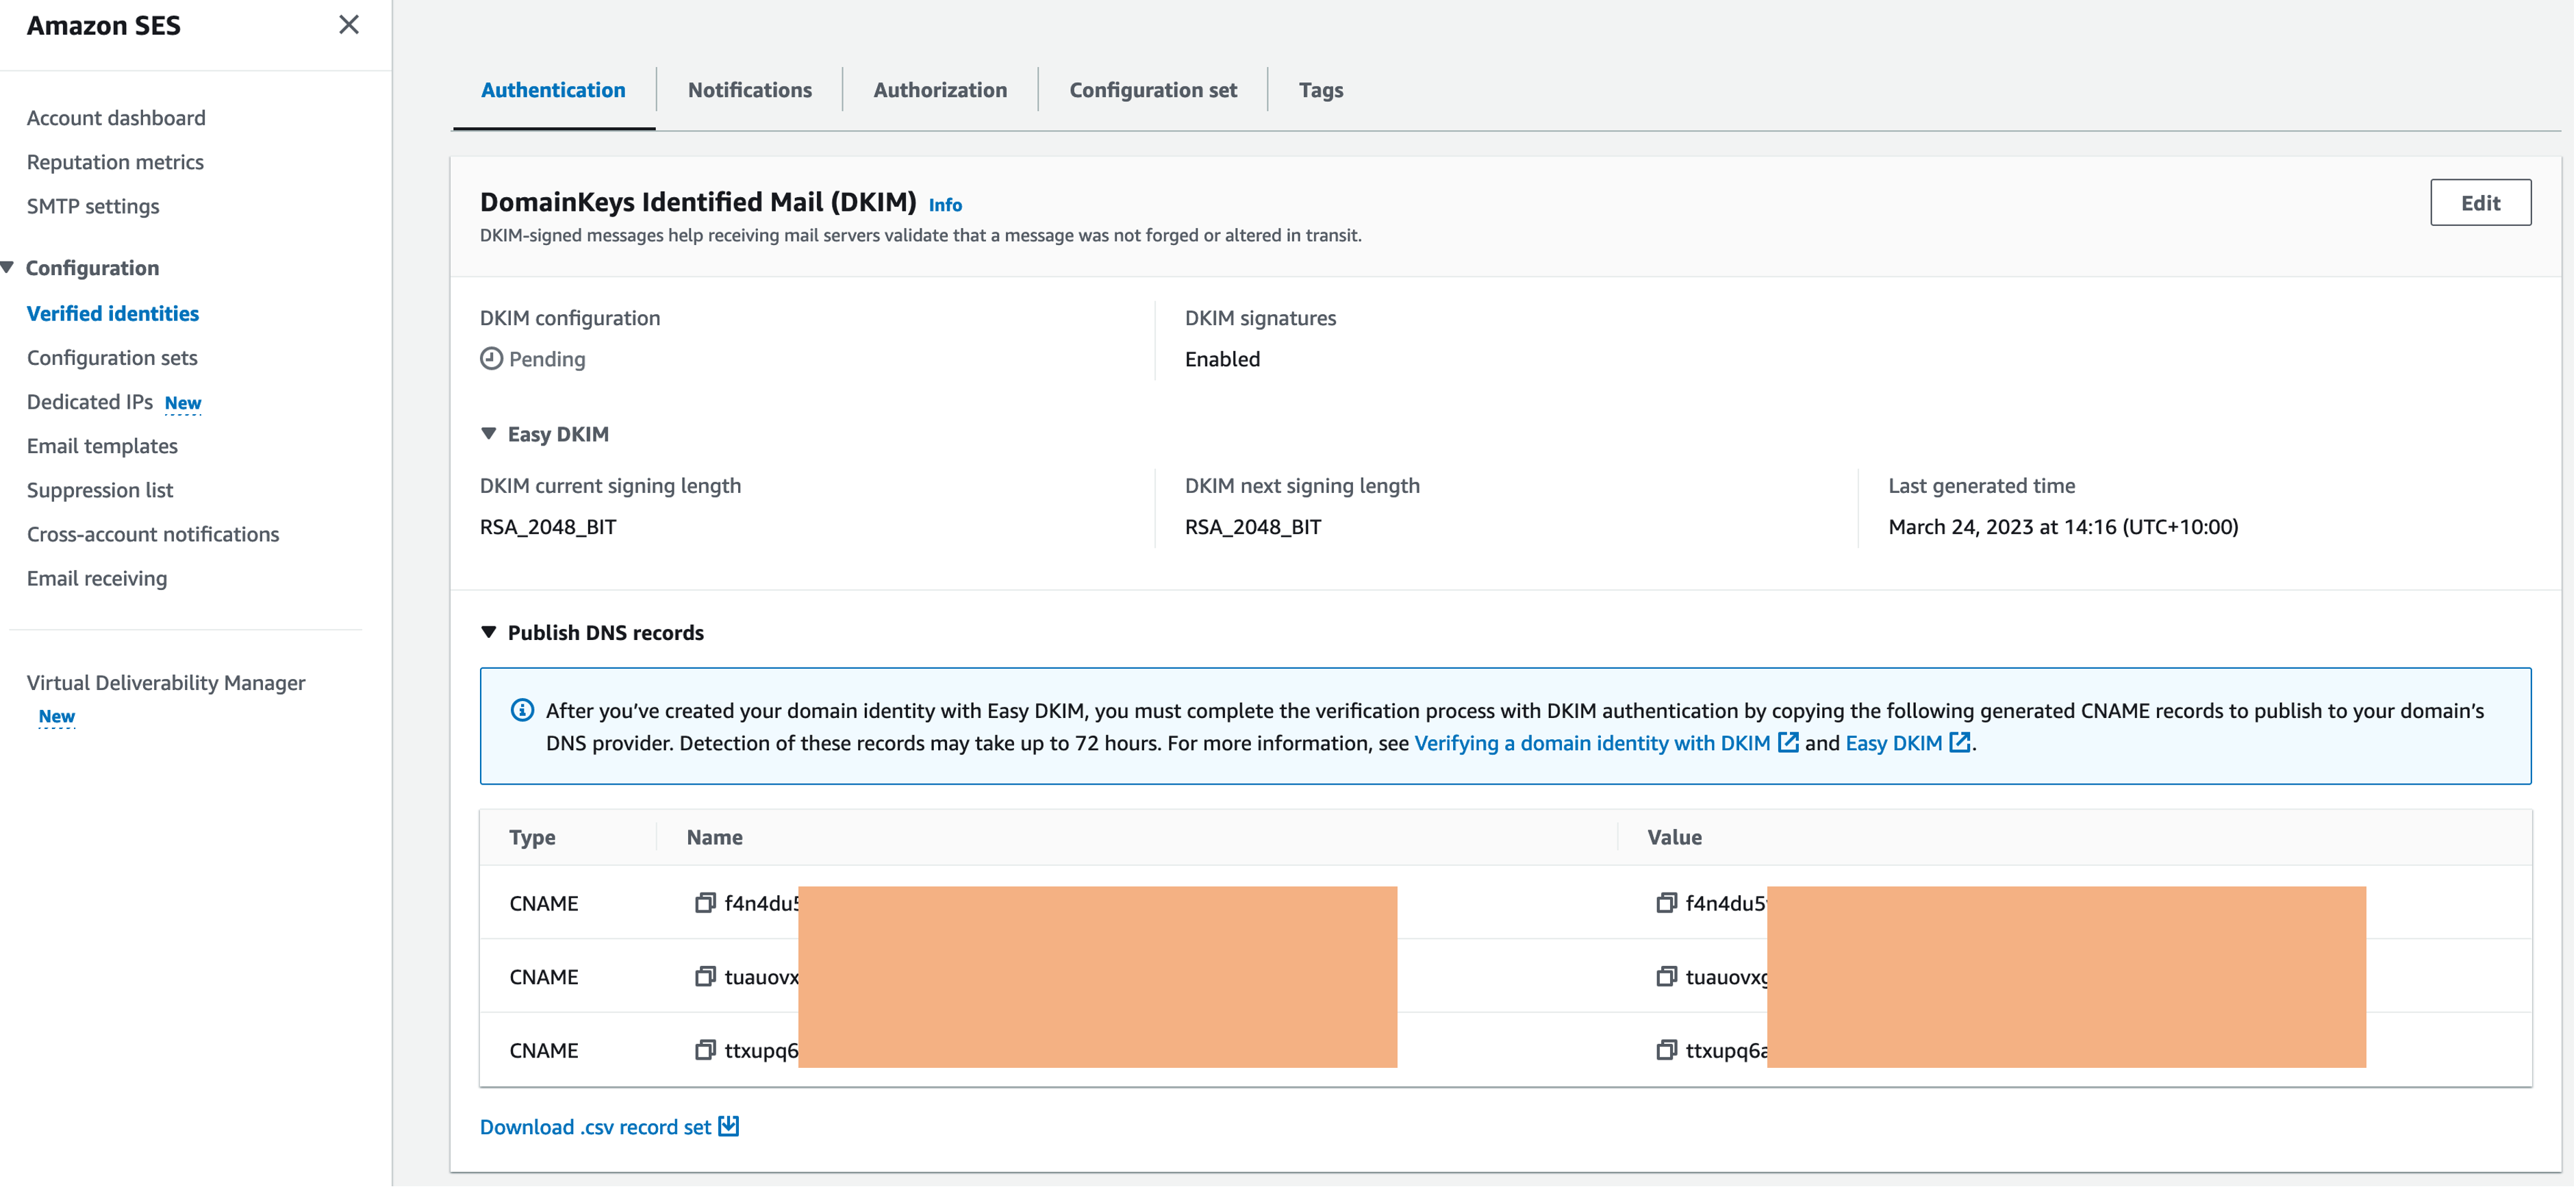

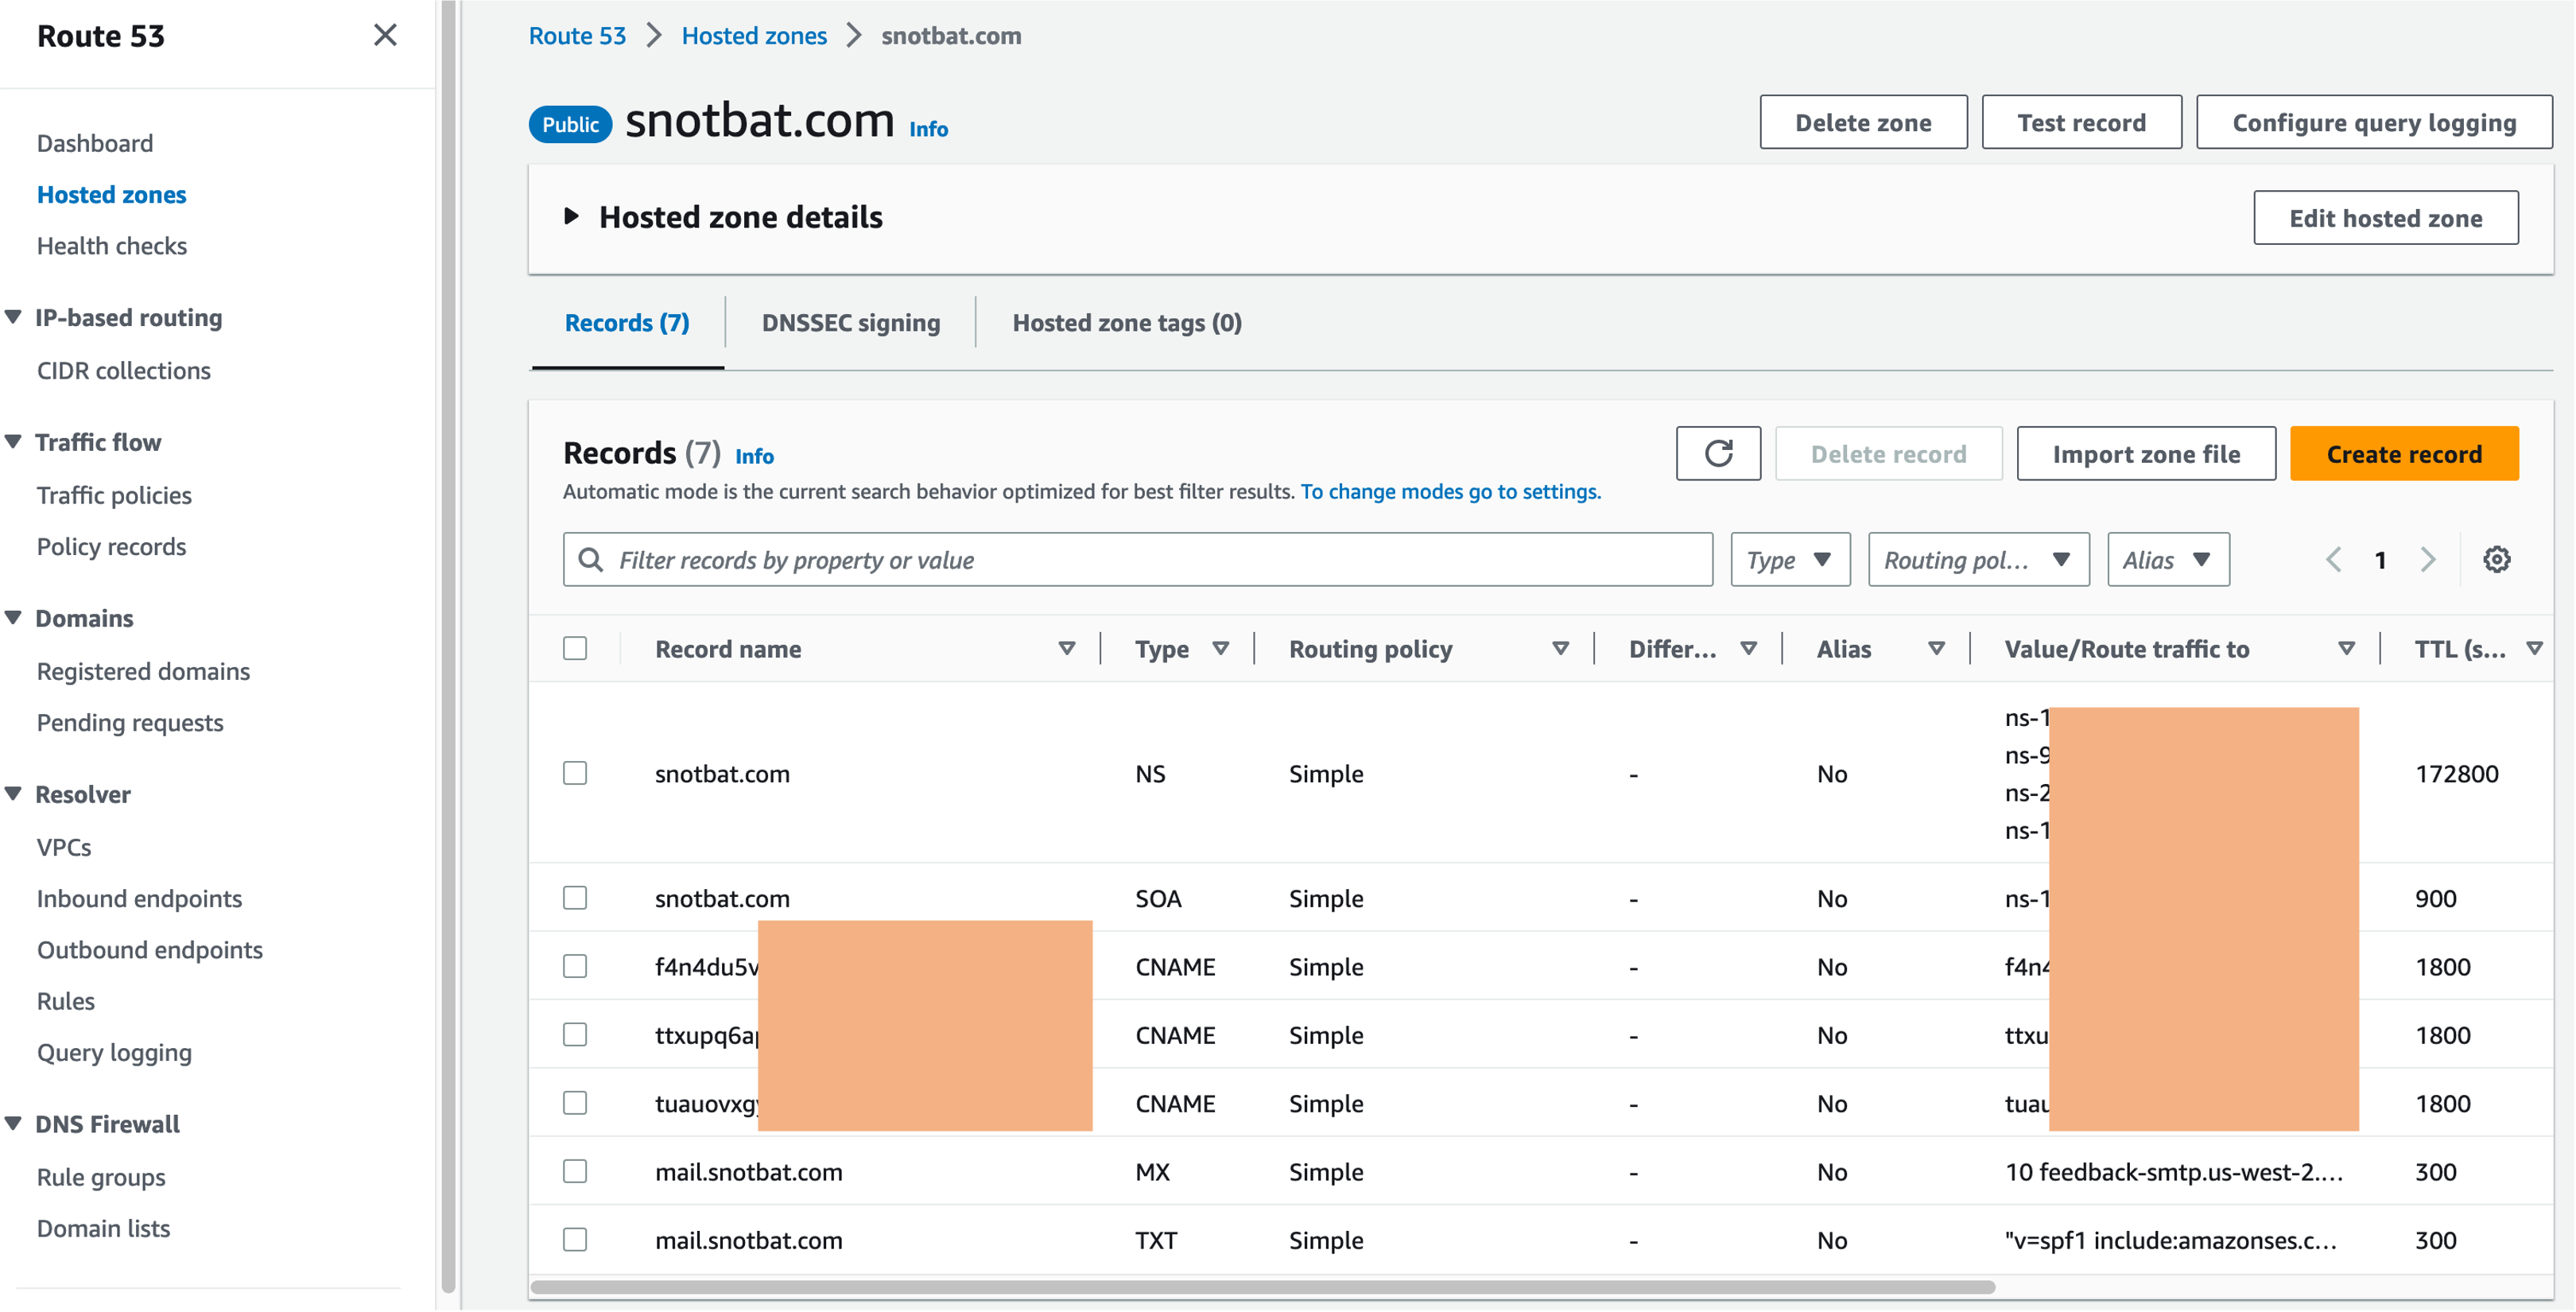
You must check SES Route53 records for your domain:
 These settings will also allow dkim, spf, dmarc email security to work.
Our DNS settings need more added to them as shown next: We will add records to Route53 as follows:
snotbat.com MX 10 inbound-smtp.us-west-2.amazonaws.com
snotbat.com TXT v=spf1 include:amazonses.com mx ~all
You can add more entries to the TXT record later, such as a google verification. We simply have an entry per line with double quotes around each entry. e.g.
“v=spf1 include:amazonses.com mx ~all”
“google-site-verification=1MoqIGqS……………………..ANQ”
Note: the next entry will fail up and until we create an alias for dmarc@snotbat.com. In the interim I use a forgiving address I create with my broadband provider. You should try to do the same, and put dmarc@snotbat.com (your own domain of course) later on.
_dmarc.snotbat.com TXT v=DMARC1;p=reject; pct=100;rua=mailto:dmarc@snotbat.com;fo=1;ri=604800
*._report._dmarc.snotbat.com TXT v=DMARC1
www.snotbat.com CNAME snotbat.com
Later you may look at adding a BIMI logo, but these are not yet propagated well for general use. A BIMI entry would be:
default._bimi.snotbat.com TXT v=BIMI1;l=https://snotbat.com/snotbat.com.svg;
You would have a website up and running with a correct format of the .svg file. There are website articles on how to create a proper svg file, then how to edit the content to have the title and version set correctly. For example:
<svg id="svg" version="1.2" baseProfile="tiny-ps" xmlns="http://www.w3.org/2000/svg" xmlns:xlink="http://www.w3.org/1999/xlink" width="70" height="70" viewBox="0, 0, 400,400"><title>snotbat.com</title><g id="svgg"><path ...............
While we are at it, let’s put in the CAA records for a Comodo SSL certificate: (I use PostiveSSL DV)
snotbat.com CAA (with the following on each line when you create it)
0 issue “sectigo.com”
0 issue “usertrust.com”
0 issue “trust-provider.com”
0 issue “amazon.com”
0 issue “amazontrust.com”
0 issue “awstrust.com”
0 issue “amazonaws.com”
0 issuewild “;”
If you use Let’s Encrypt you need to remove conflict with Sectigo above and use:
0 issue “letsencrypt.org”
You don’t need the Amazon CAA records if not using a CDN. CAA records need to be correct before purchasing a certificate.
At this stage we do not have a Linux instance, so we do not add a static IP address as an A Record. (If we do it will cost some money until we have the instance up and attach the IP to it.)
Here is a screenshot of my DNS:
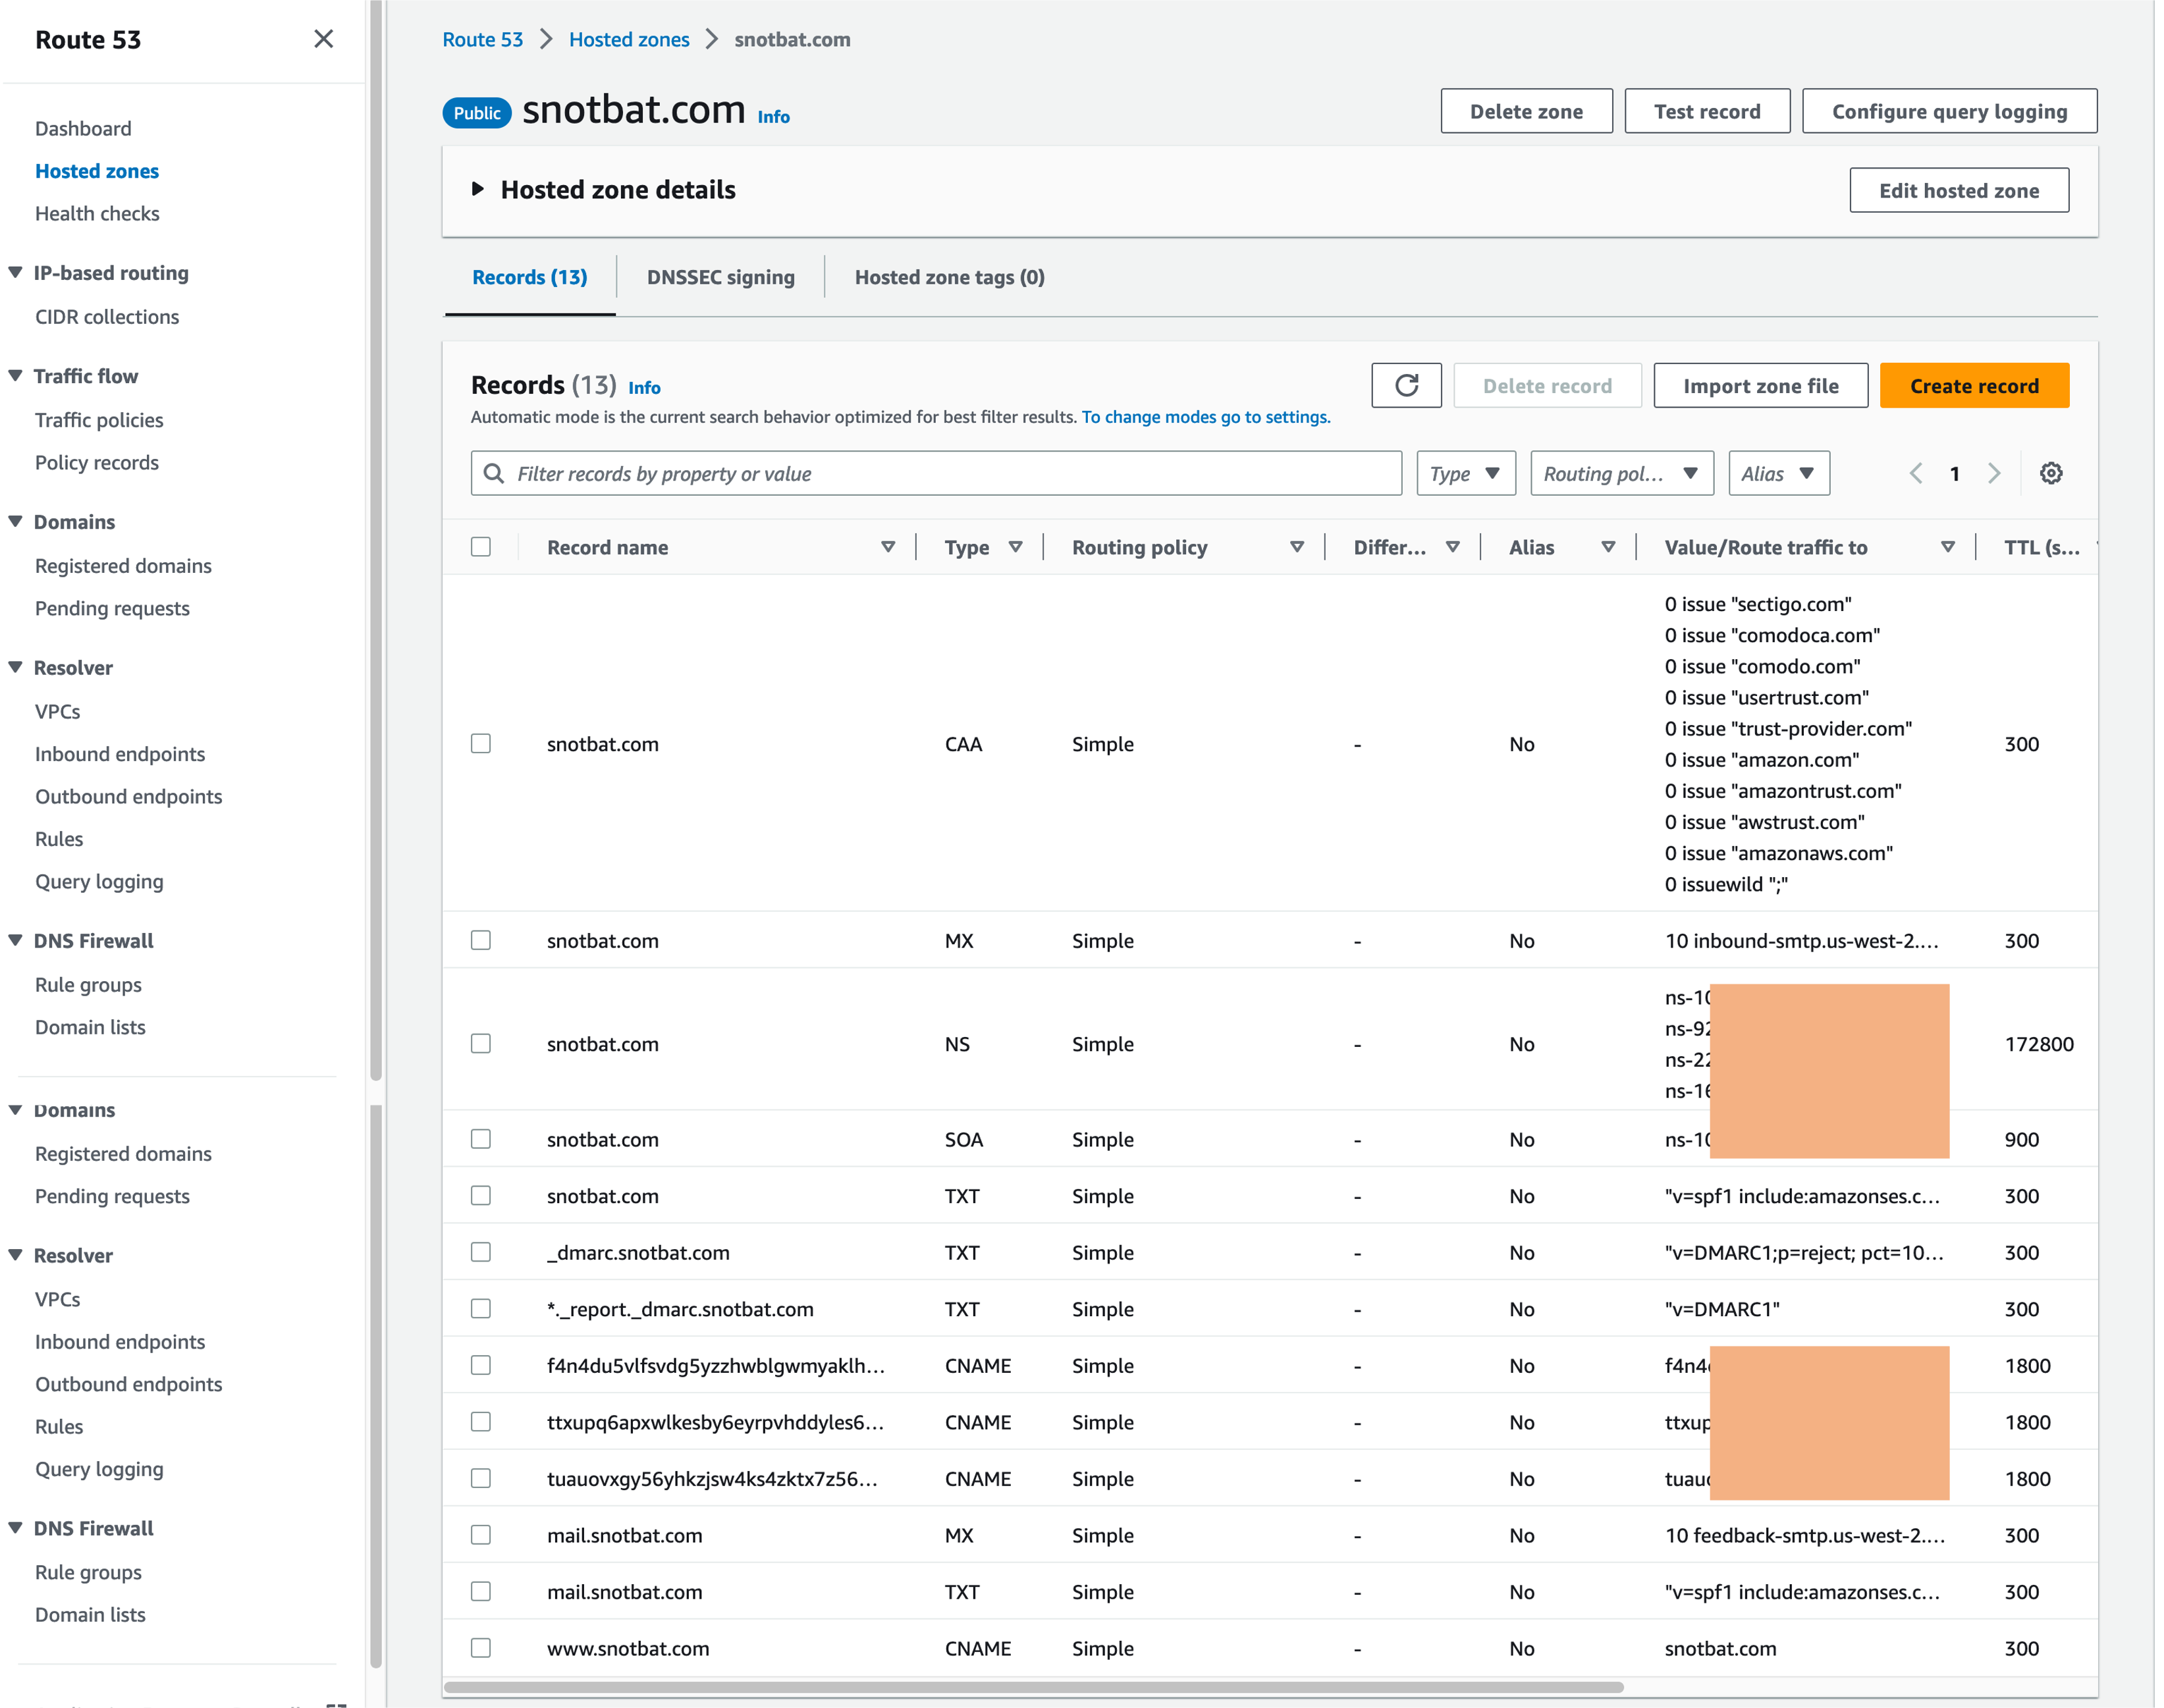
DNS records can of course be with another registrar, or email records modified to point to another relay service.
Create an S3 Bucket for email
In the S3 Console, create a bucket. For example, I used snotbat.email. If you intend to have more than one Dovecot email user, create one for each. For example, snotbat.fred.email, snotbat.jane.email and so on. You must have public access to the objects, as shown. I create a subfolder .archive, but this is not necessary. If we are going to use shell scripting to forward emails from the bucket, see my article on this capability where we create several subfolders.
Use your local AWS region for the bucket – NOT Oregon.
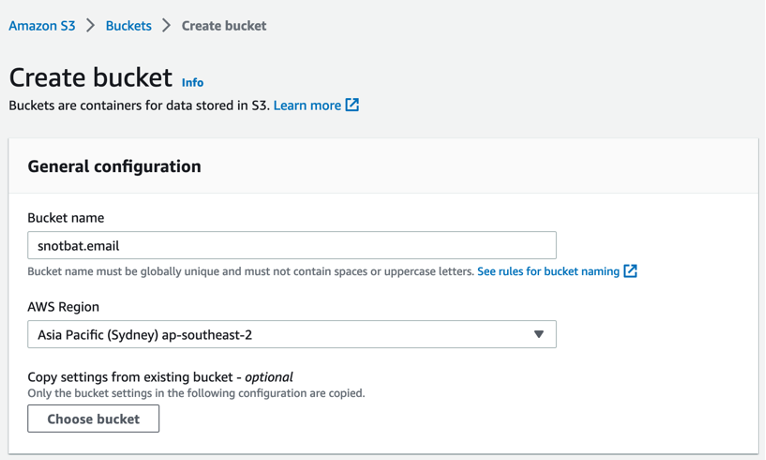
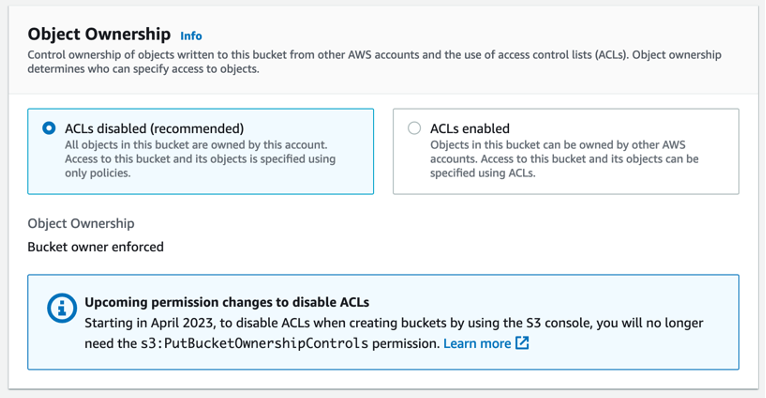
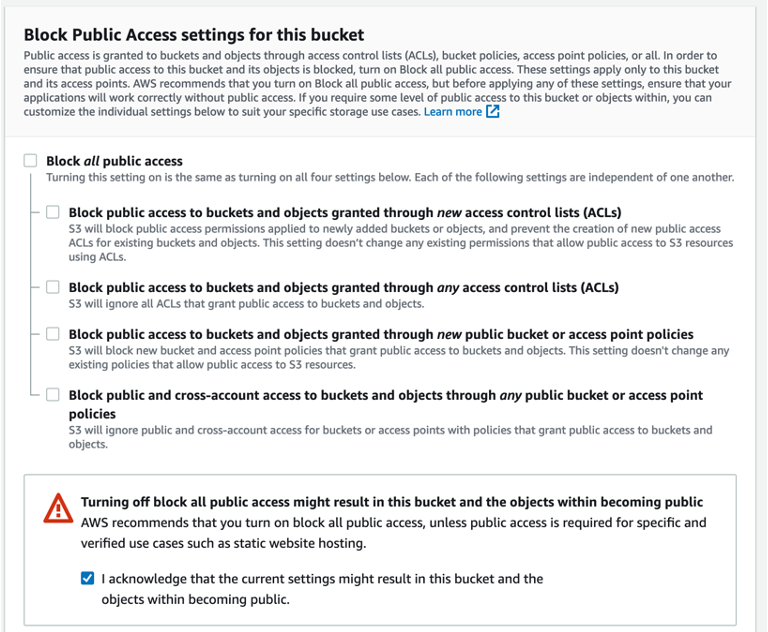
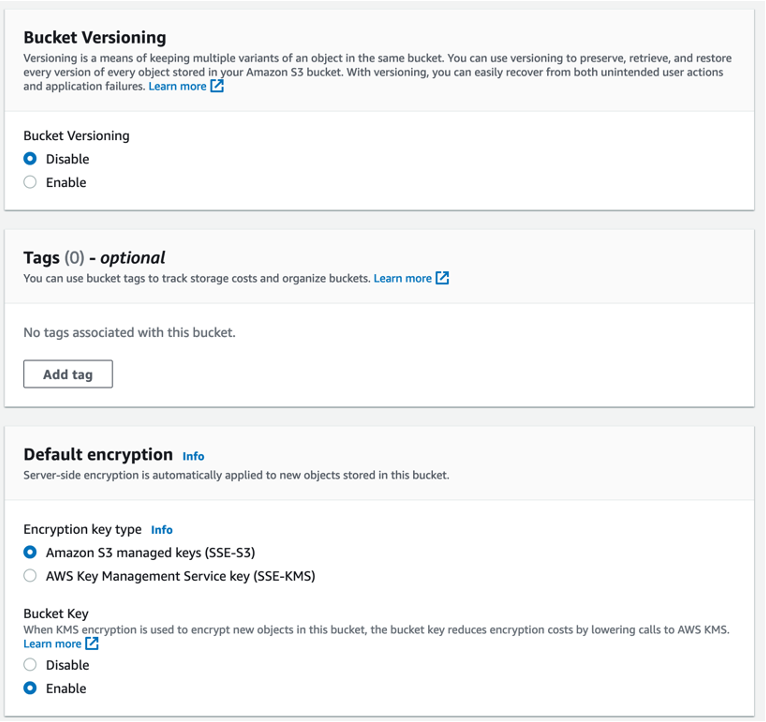 This is the result:
 Now go into the bucket so we can add an archive folder. We will use this with Dovecot and shell scripting to backup all inbox emails for 365 days. We will also change the bucket permissions so SES can access it.
Step 1: Create a folder as shown here, called .archive. Use the “.” character so that our Unix scripts will see this as a hidden folder.
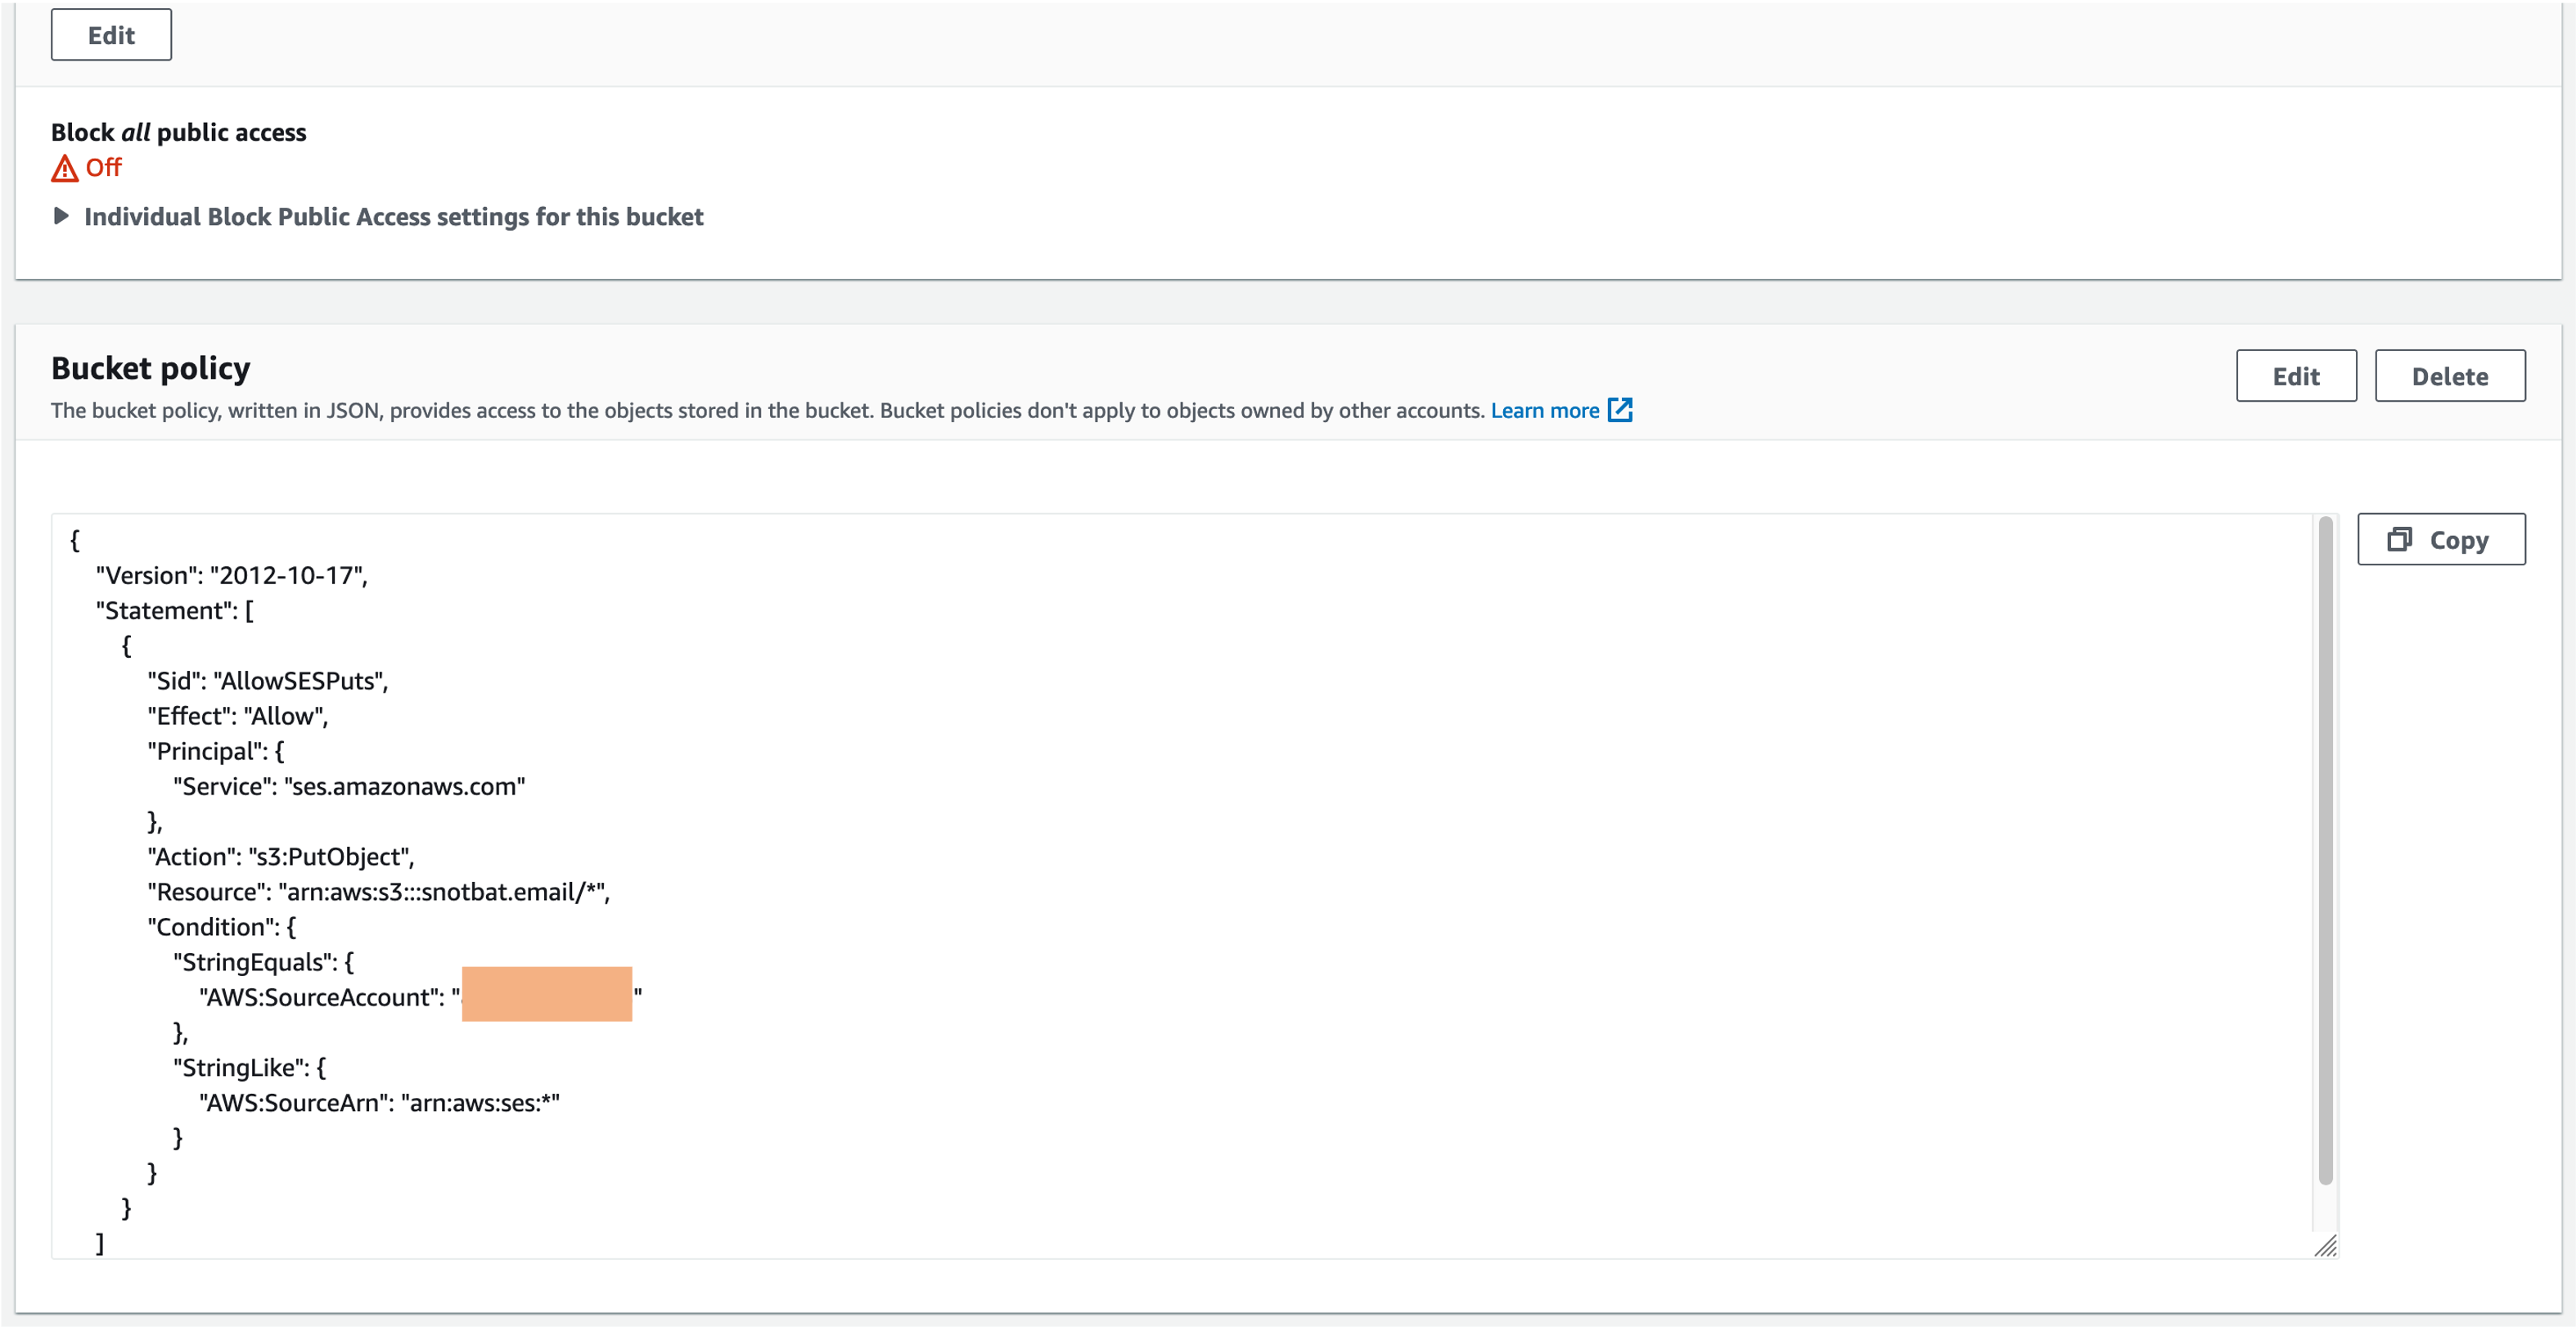
 Step 2: Now go to the Permissions tab and edit the policy for SES access. Use your Amazon AWS account number.
Here is a cut and paste of the code. Use your own Amazon Account number.
{
    "Version": "2012-10-17",
    "Statement": [
        {
            "Sid": "AllowSESPuts",
            "Effect": "Allow",
            "Principal": {
                "Service": "ses.amazonaws.com"
            },
            "Action": "s3:PutObject",
            "Resource": "arn:aws:s3:::snotbat.email/*",
            "Condition": {
                "StringEquals": {
                    "AWS:SourceAccount": "XXXXXXXXXXXX"
                },
                "StringLike": {
                    "AWS:SourceArn": "arn:aws:ses:*"
                }
            }
        }
    ]
}

[Replace snotbat.email with your own bucket, and XXXXXX with your own Account]
 Step 3: Add a retention (life cycle) policy of 365 days for files in .archive/. Go to the Management tab. Click on Create Lifecycle Rule. Note that we must say “.archive/” with the forward slash, so that other objects are not affected. It is good practice to check your configurations when they are completed.
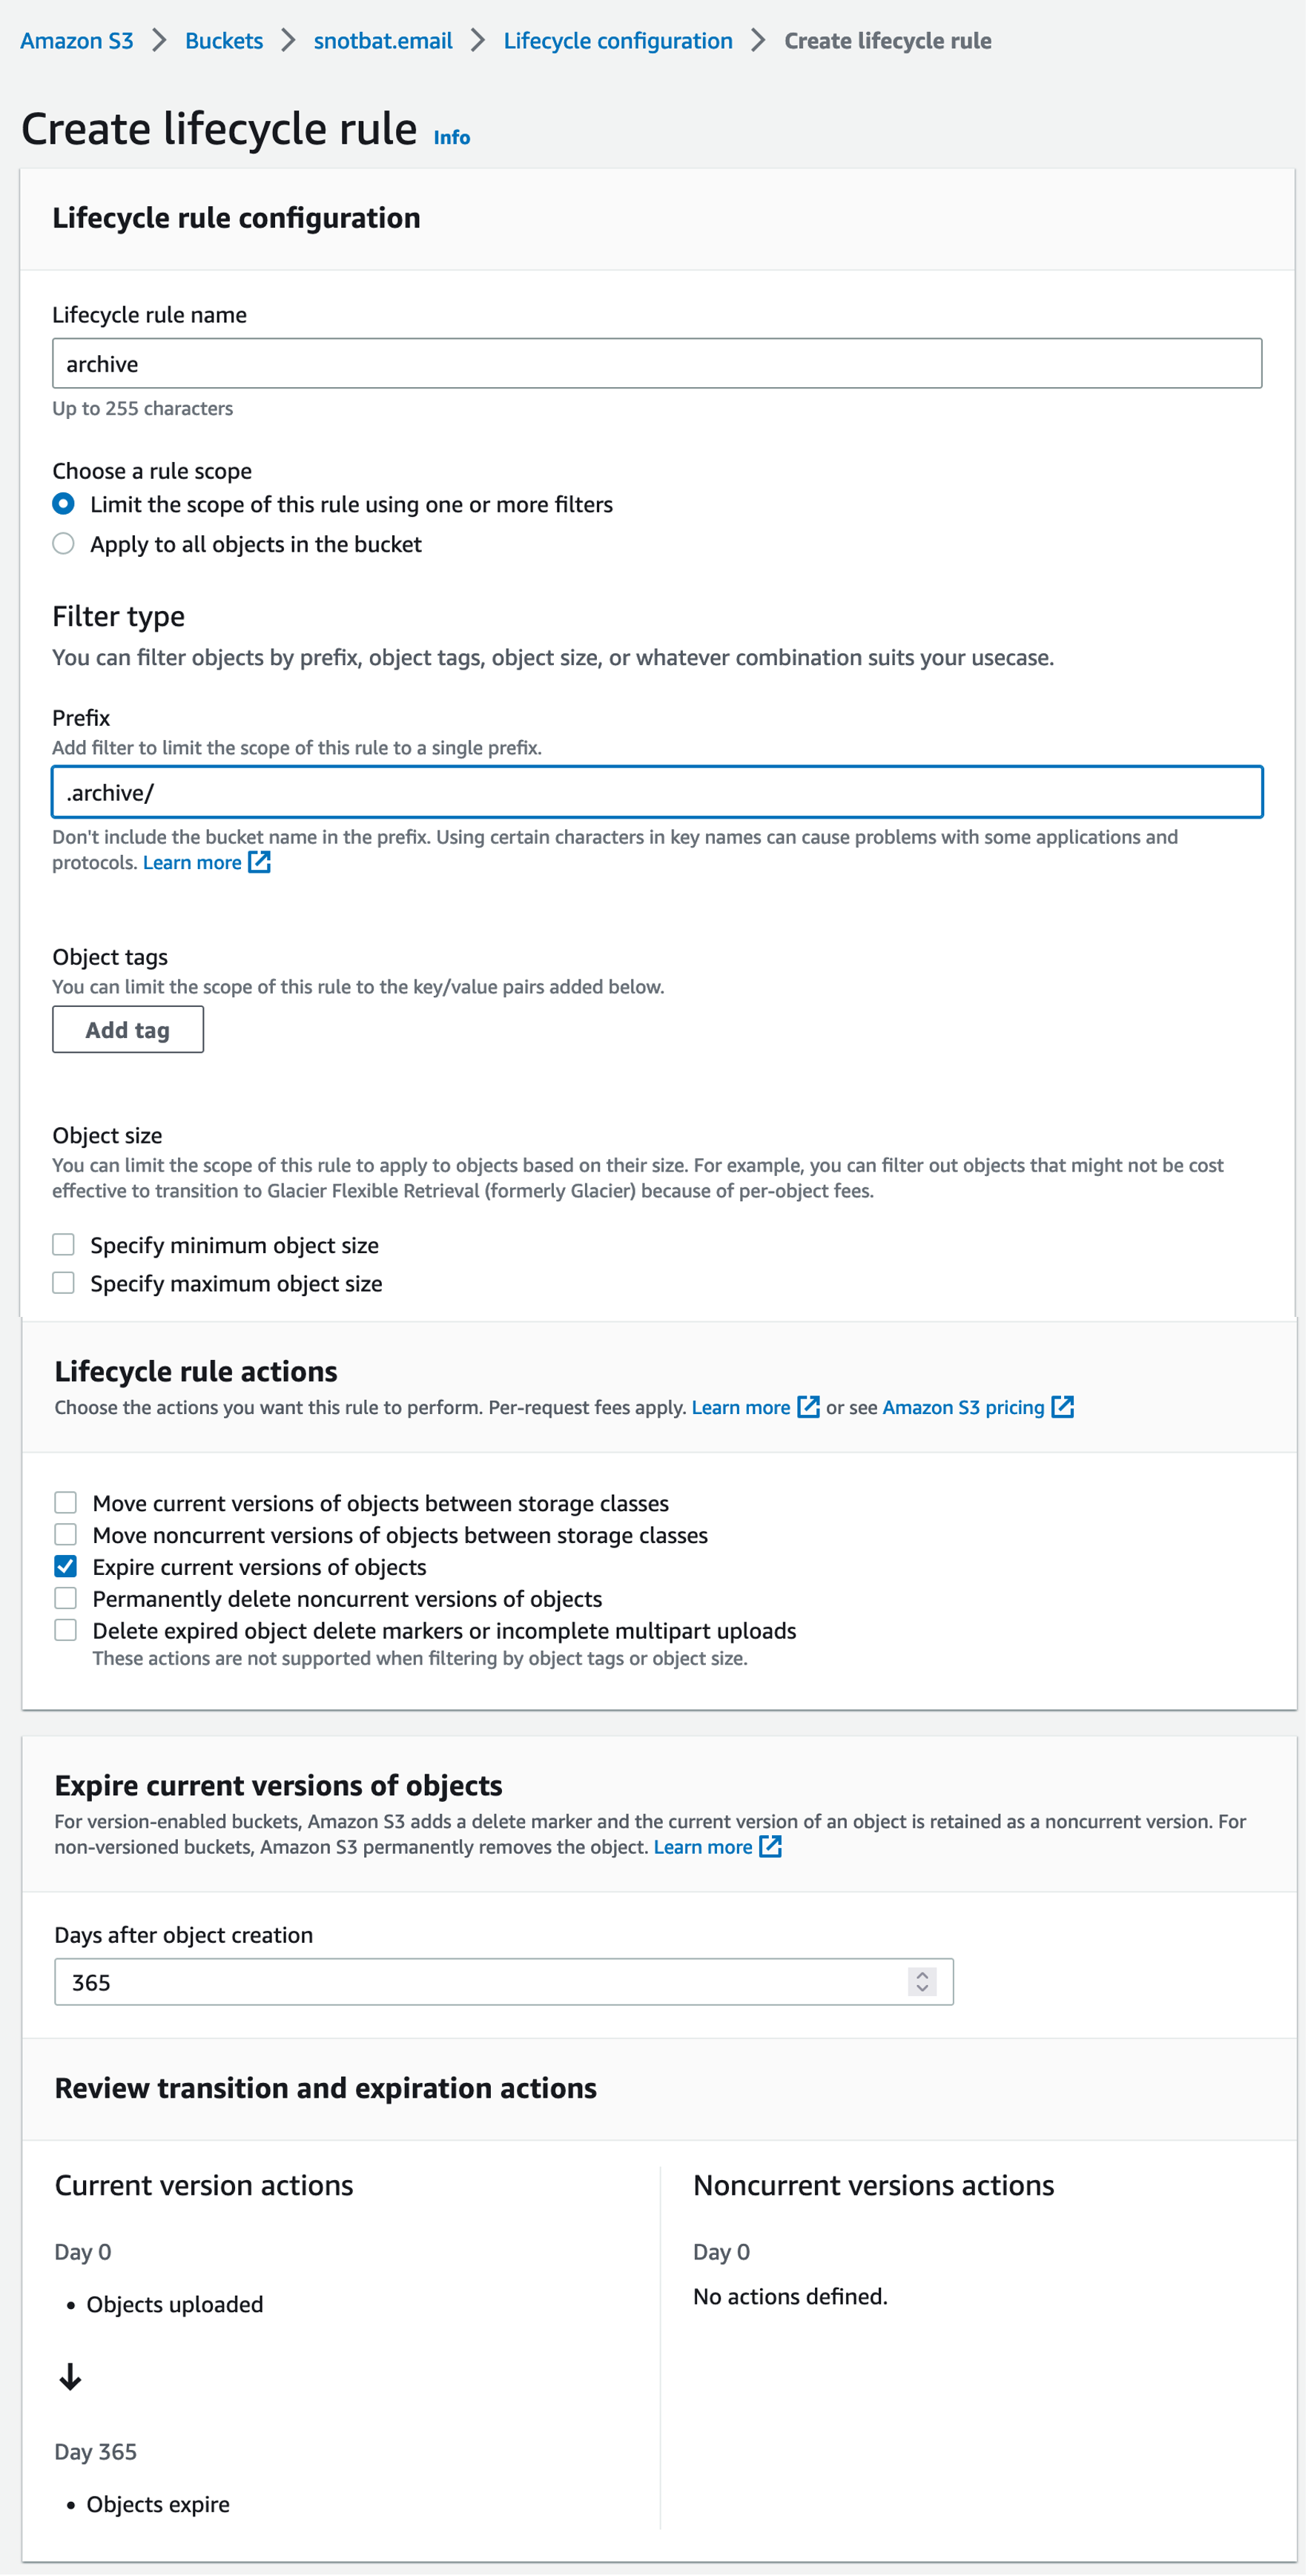
In this example, we configure .archive as a subfolder, but that is simply our configuration. We will be able to configure an SES Email Rule Set to place emails into the bucket at parent level, or subfolder level. Initially, we will be able to manually download email files, and on our PC add the .eml file extension to view in an email client.
MS Exchange as Email Relay Service
If you were not using SES in you DNS records for handling email, you would provide the entries MS Exchange requires. This too is a learning curve. E.g., you publish the domain to MS Exchange, and then add records.
The MX record would be like this:
0 YOURDOMAIN-AU.mail.protection.outlook.com -> e.g. o snotbat-au.mail…….
There are a number of records. However, for postfix to send internal emails, you can try using the usual SES configurations in /etc/postfix/sasl_passwd and /etc/postfix/main.cf but may need to research on the forums for the correct entries. I have done it, but did not make notes on it.
If you registrar was, say, Cloudflare, they already have free email forwarding with their own records. If Cloudflare manages all records, it would only need an Amazon IP address A record to point to your instance. If Cloudflare pointed the name servers to Amazon, then you’d need a hosted zone on Amazon with all the records. You can of course have a mix, where DNS records are on Amazon Route53, but the email records point to those for another provider, and so on.
And, using SES and S3 Buckets to forward emails with postfix and mutt is a separate article.
IAM Roles for Lambda/SES/EC2
Click on Create Role, and select these defaults:
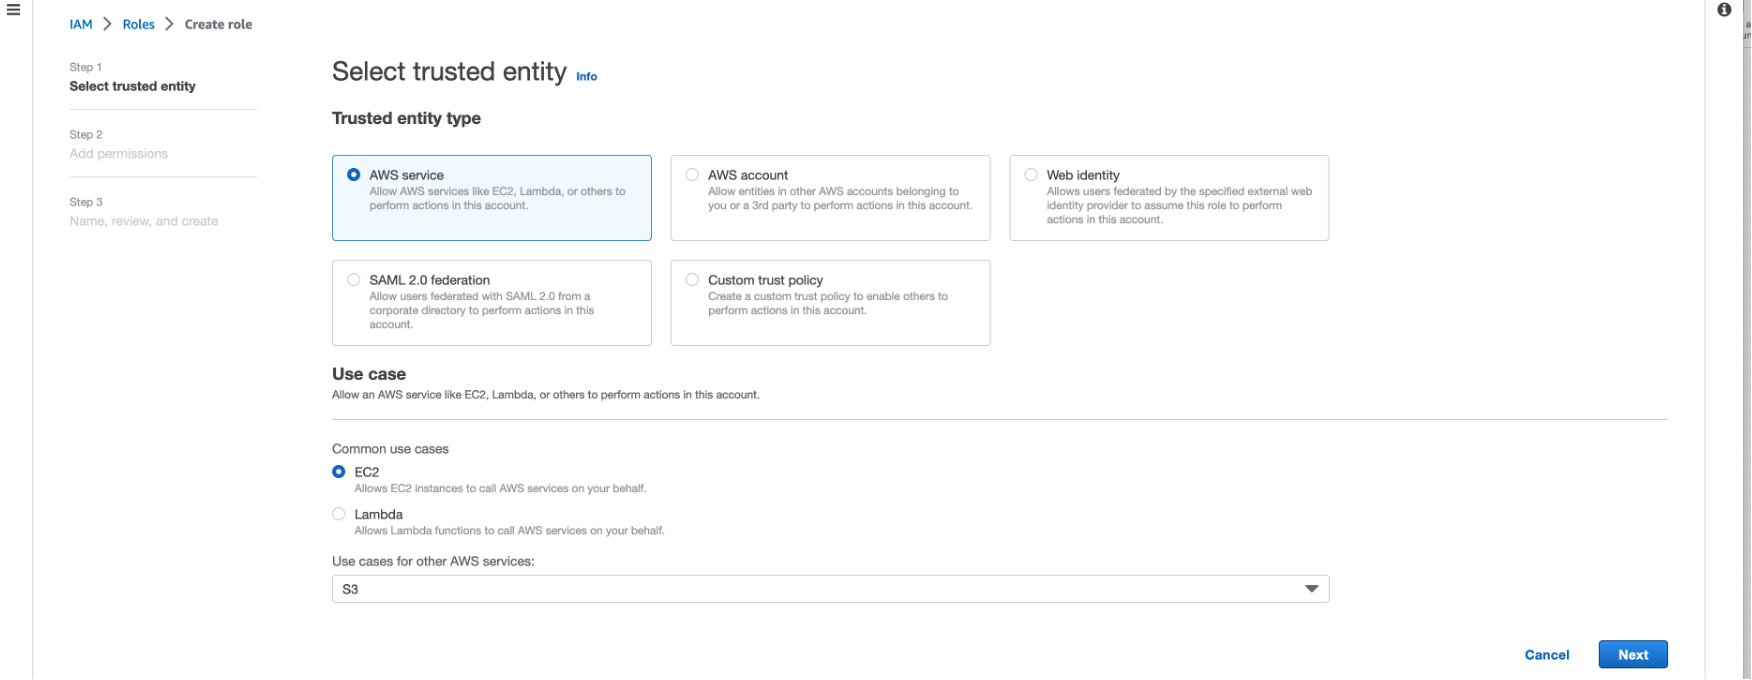 The search field takes a bit of getting used to. You can filter and tick a box, then remove the filter and add the next one you want and so on. Then follow the steps to save it with the nominated policies, so it ends up similar to this:
 Check under the Trust relationships tab that you see this policy:
{
    "Version": "2012-10-17",
    "Statement": [
        {
            "Effect": "Allow",
            "Principal": {
                "Service": "ec2.amazonaws.com"
            },
            "Action": "sts:AssumeRole"
        }
    ]
}
Perhaps call the Role, “sbat” or something short. When you launch your EC2 instance, there is a section where you may attach an IAM Role. This is it.
Now add another Role, for Lambda functions as used by SES Email Rules. Use defaults as shown here: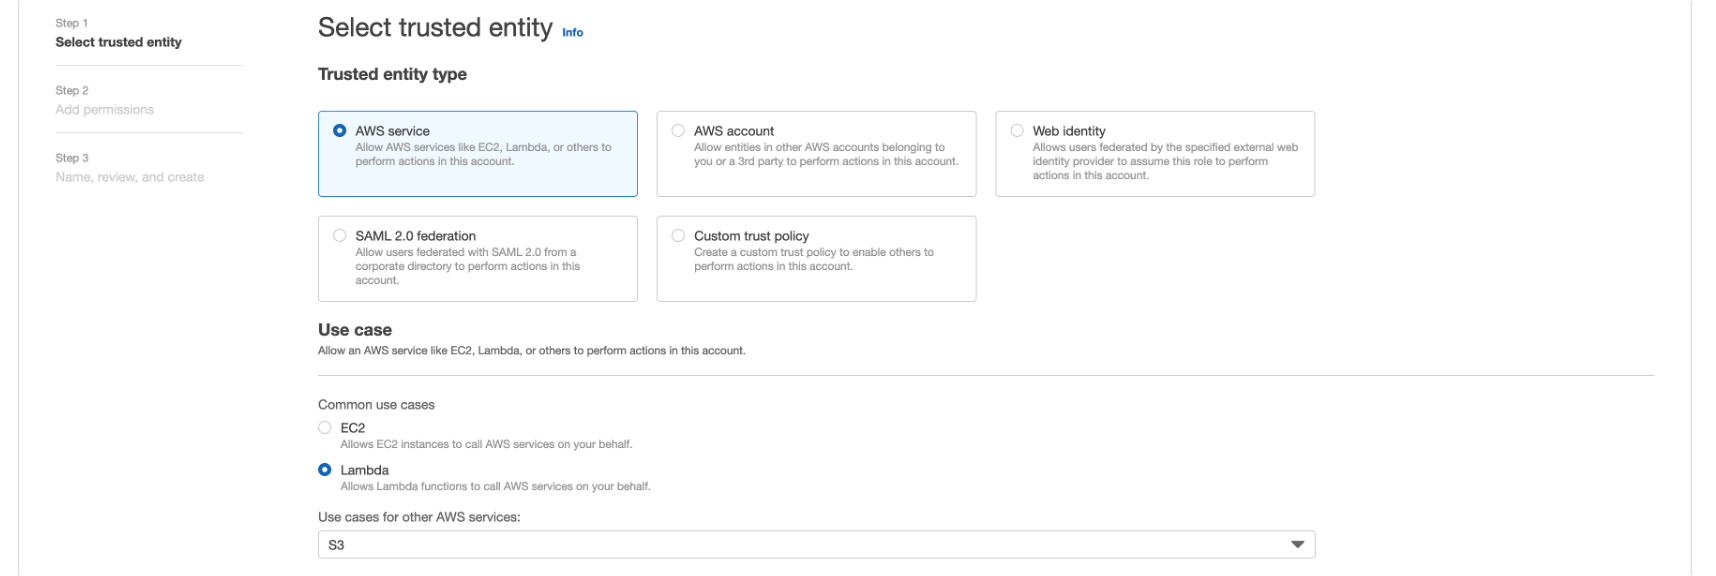 Add the policies so you end up with these: (call the Rule any nominated name, e.g. lambda_snotbat_com
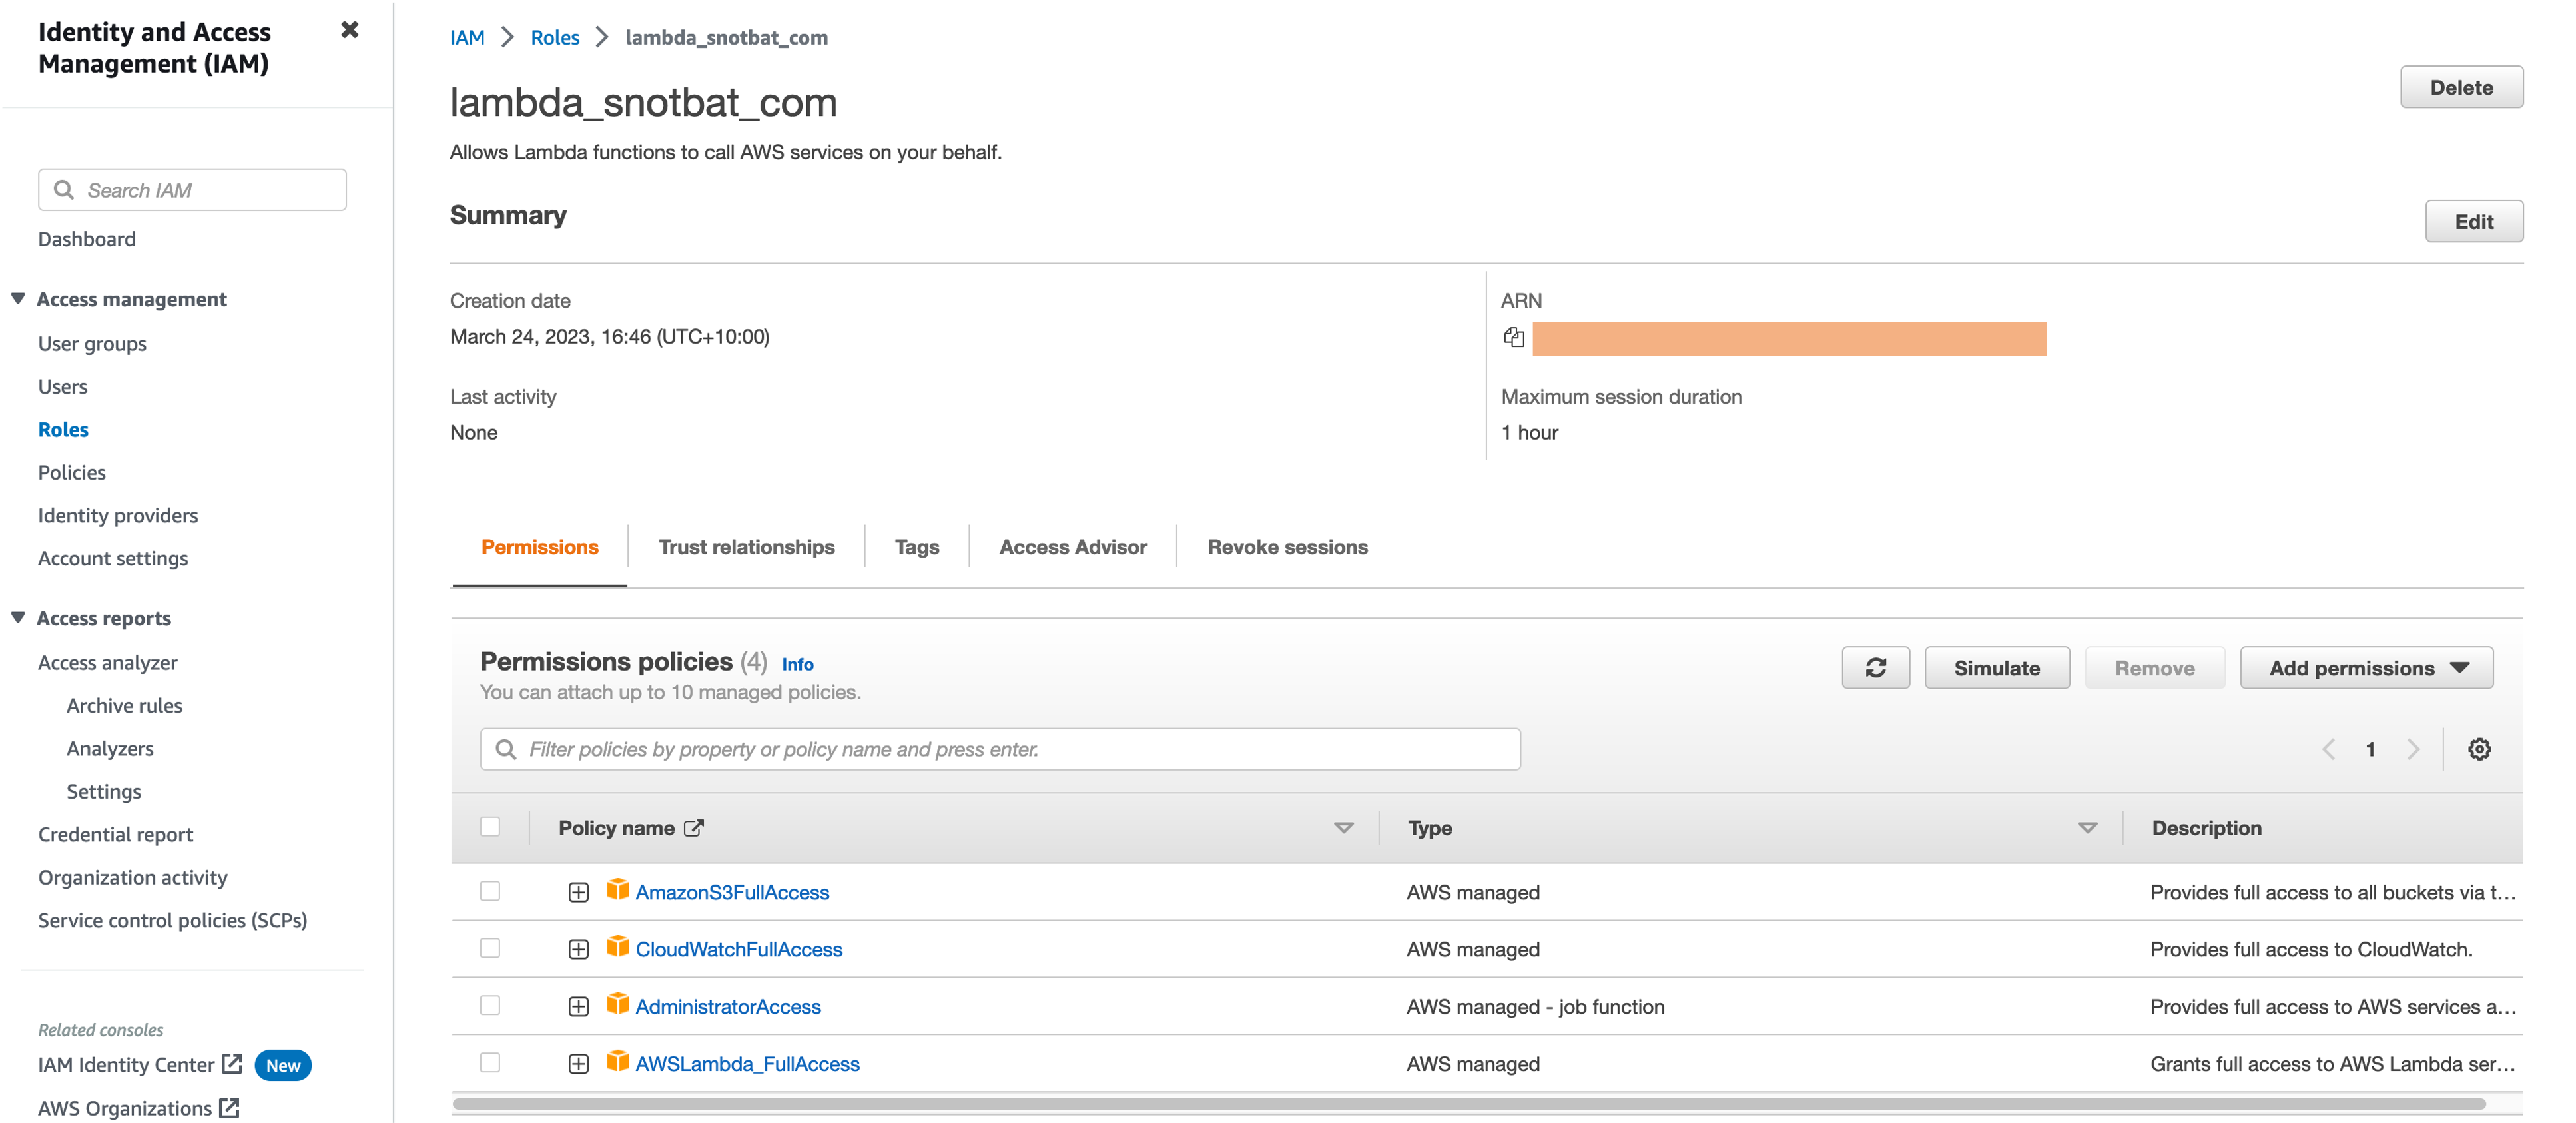 We now add our own policy to those we just created, so that Lambda can access a specific S3 bucket. We can add multiple policies for multiple buckets, such as snotbat.fred.email, snotbat.jane.email and so on, but for this example, one bucket. Replace the settings with your own.
Click on the new Role, then click on the tab above these policies called Add permissions, and on that pop-down menu, select Create Inline Policy. Got to the JSON tab, remove the existing content and add the following with your own bucket name:
{
    "Version": "2012-10-17",
    "Statement": [
        {
            "Effect": "Allow",
            "Action": [
                "logs:CreateLogGroup",
                "logs:CreateLogStream",
                "logs:PutLogEvents"
            ],
            "Resource": "arn:aws:logs:*:*:*"
        },
        {
            "Effect": "Allow",
            "Action": "ses:SendRawEmail",
            "Resource": "*"
        },
        {
            "Effect": "Allow",
            "Action": [
                "s3:GetObject",
                "s3:PutObject"
            ],
            "Resource": "arn:aws:s3:::snotbat.email/*"
        }
    ]
}
You click on Review Policy, give it a name, e.g. s3_snotbat_com and click on Create Policy.
The edit screen will look like this:
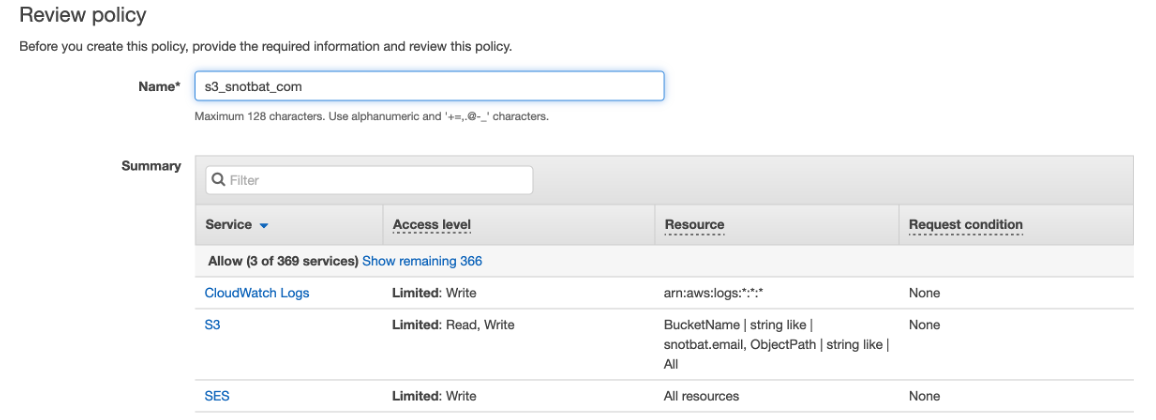 When you save it, you will see this screen:
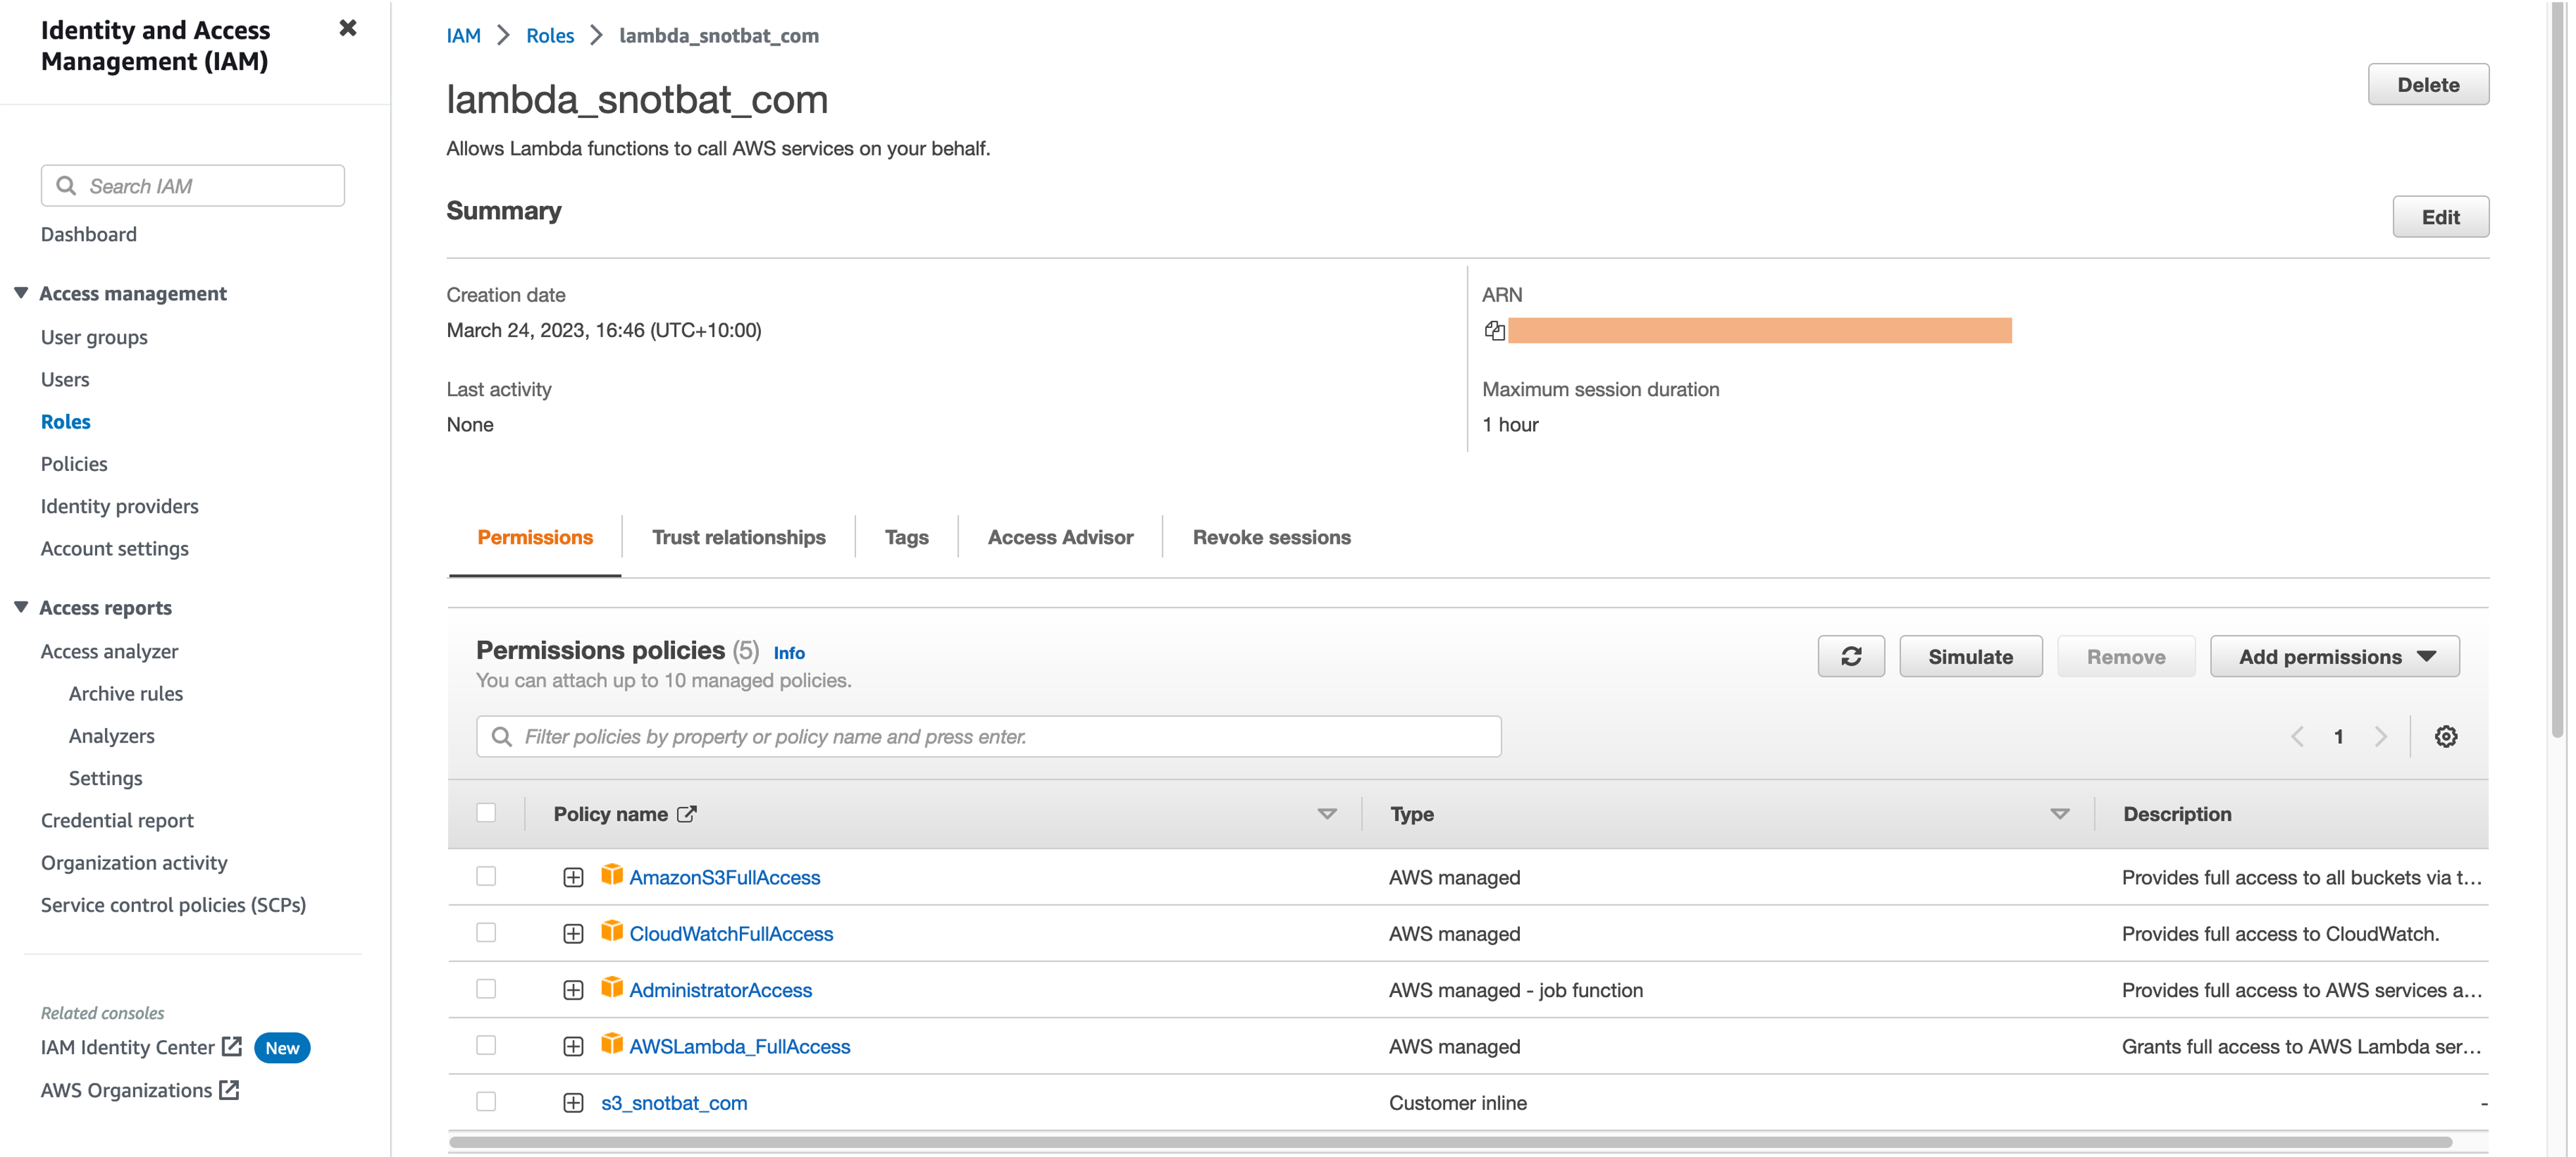 That is all there is to it (!)
You can review the settings and edit if need be. We will use this Lambda role in a pop-down menu when we create a Lambda function.
SES / Lambda functions with postfix and mutt scripting to forward emails
See my newer article on forwarding SES emails if you want SES to be the free forwarding service.
Remember that at some point you must request going out of sandbox mode, and need to cater for admin@, postmaster@, dmarc@, and abuse@ addresses if using SES so you meet their regulations.
We can create an SES email rule to place emails into a bucket without Lambda, then manually download the email Amazon sends us to verify an email address. This is only a first step before we work with diverse fuller configurations. Our intended primary email addresses and any 3rd party ones, like gmail, should be verified in the SES service. I would say to work through relevant parts of my forwarding email article.
Again, we do not need SES as the relay, but we should configure and test postfix to send our own Linux alert emails if we wish to write scripts to monitor that http is up and running.
Regardless, we should know how to do these things.
A Lambda function could be added to the SES email rule set so that emails first go into a nominated bucket (and subfolder) and are then forwarded as attachments with the mutt command. (sendmail and mailx will not forward .eml content from an external email)
We have to forward emails as attachments because SES will not forward from unverified email addresses. You can see the limitations, but if we have a simple website with very little email, why spend money on an unwarranted service.
Take SES out of Sandbox Mode
Amazon may change any of the above steps and interfaces at any time. To move out of sandbox mode, go to the SES console > Account Dashboard > Request a limit increase. You need the defaults of 50,000 daily sending quota and 14 emails per second sending rate.
When you request both of these, you are asked to comply with SES rules or standards. You say you have configured and tested your new domain, it is not for marketing but only for your contact form on WordPress to receive emails, you are not using services like Mailchimp, you have read the SES requirements, and that you have the email addresses for postmaster@ and so forth configured in the tested Lambda functions from sandbox mode. I would ensure you have WordPress set up with a contact form, and get request to get out of sandbox when WordPress is running. This avoids complications of a new account requesting for the first time, access to email if you are installing a Dovecot email service.
I can’t go through the request screens with you as my account is already set for any domains on my account.
You must review your SES dashboard at important moments to ensure you are not exceeding bounce rates, so you site is “healthy”.
Amazon may request more information, or send a confirmation email. Your SES dashboard shows when you are out of sandbox mode.
