
Launch an EC2 Linux Instance
![]()

Launch an EC2 Linux Instance
EC2 Menu
EC2 Menu 
Launch an EC2 Linux Instance
You now need to go to Marketplace and register Linux 2023 before using it.
As with all technical posts, things change over time. This was written in 2023.
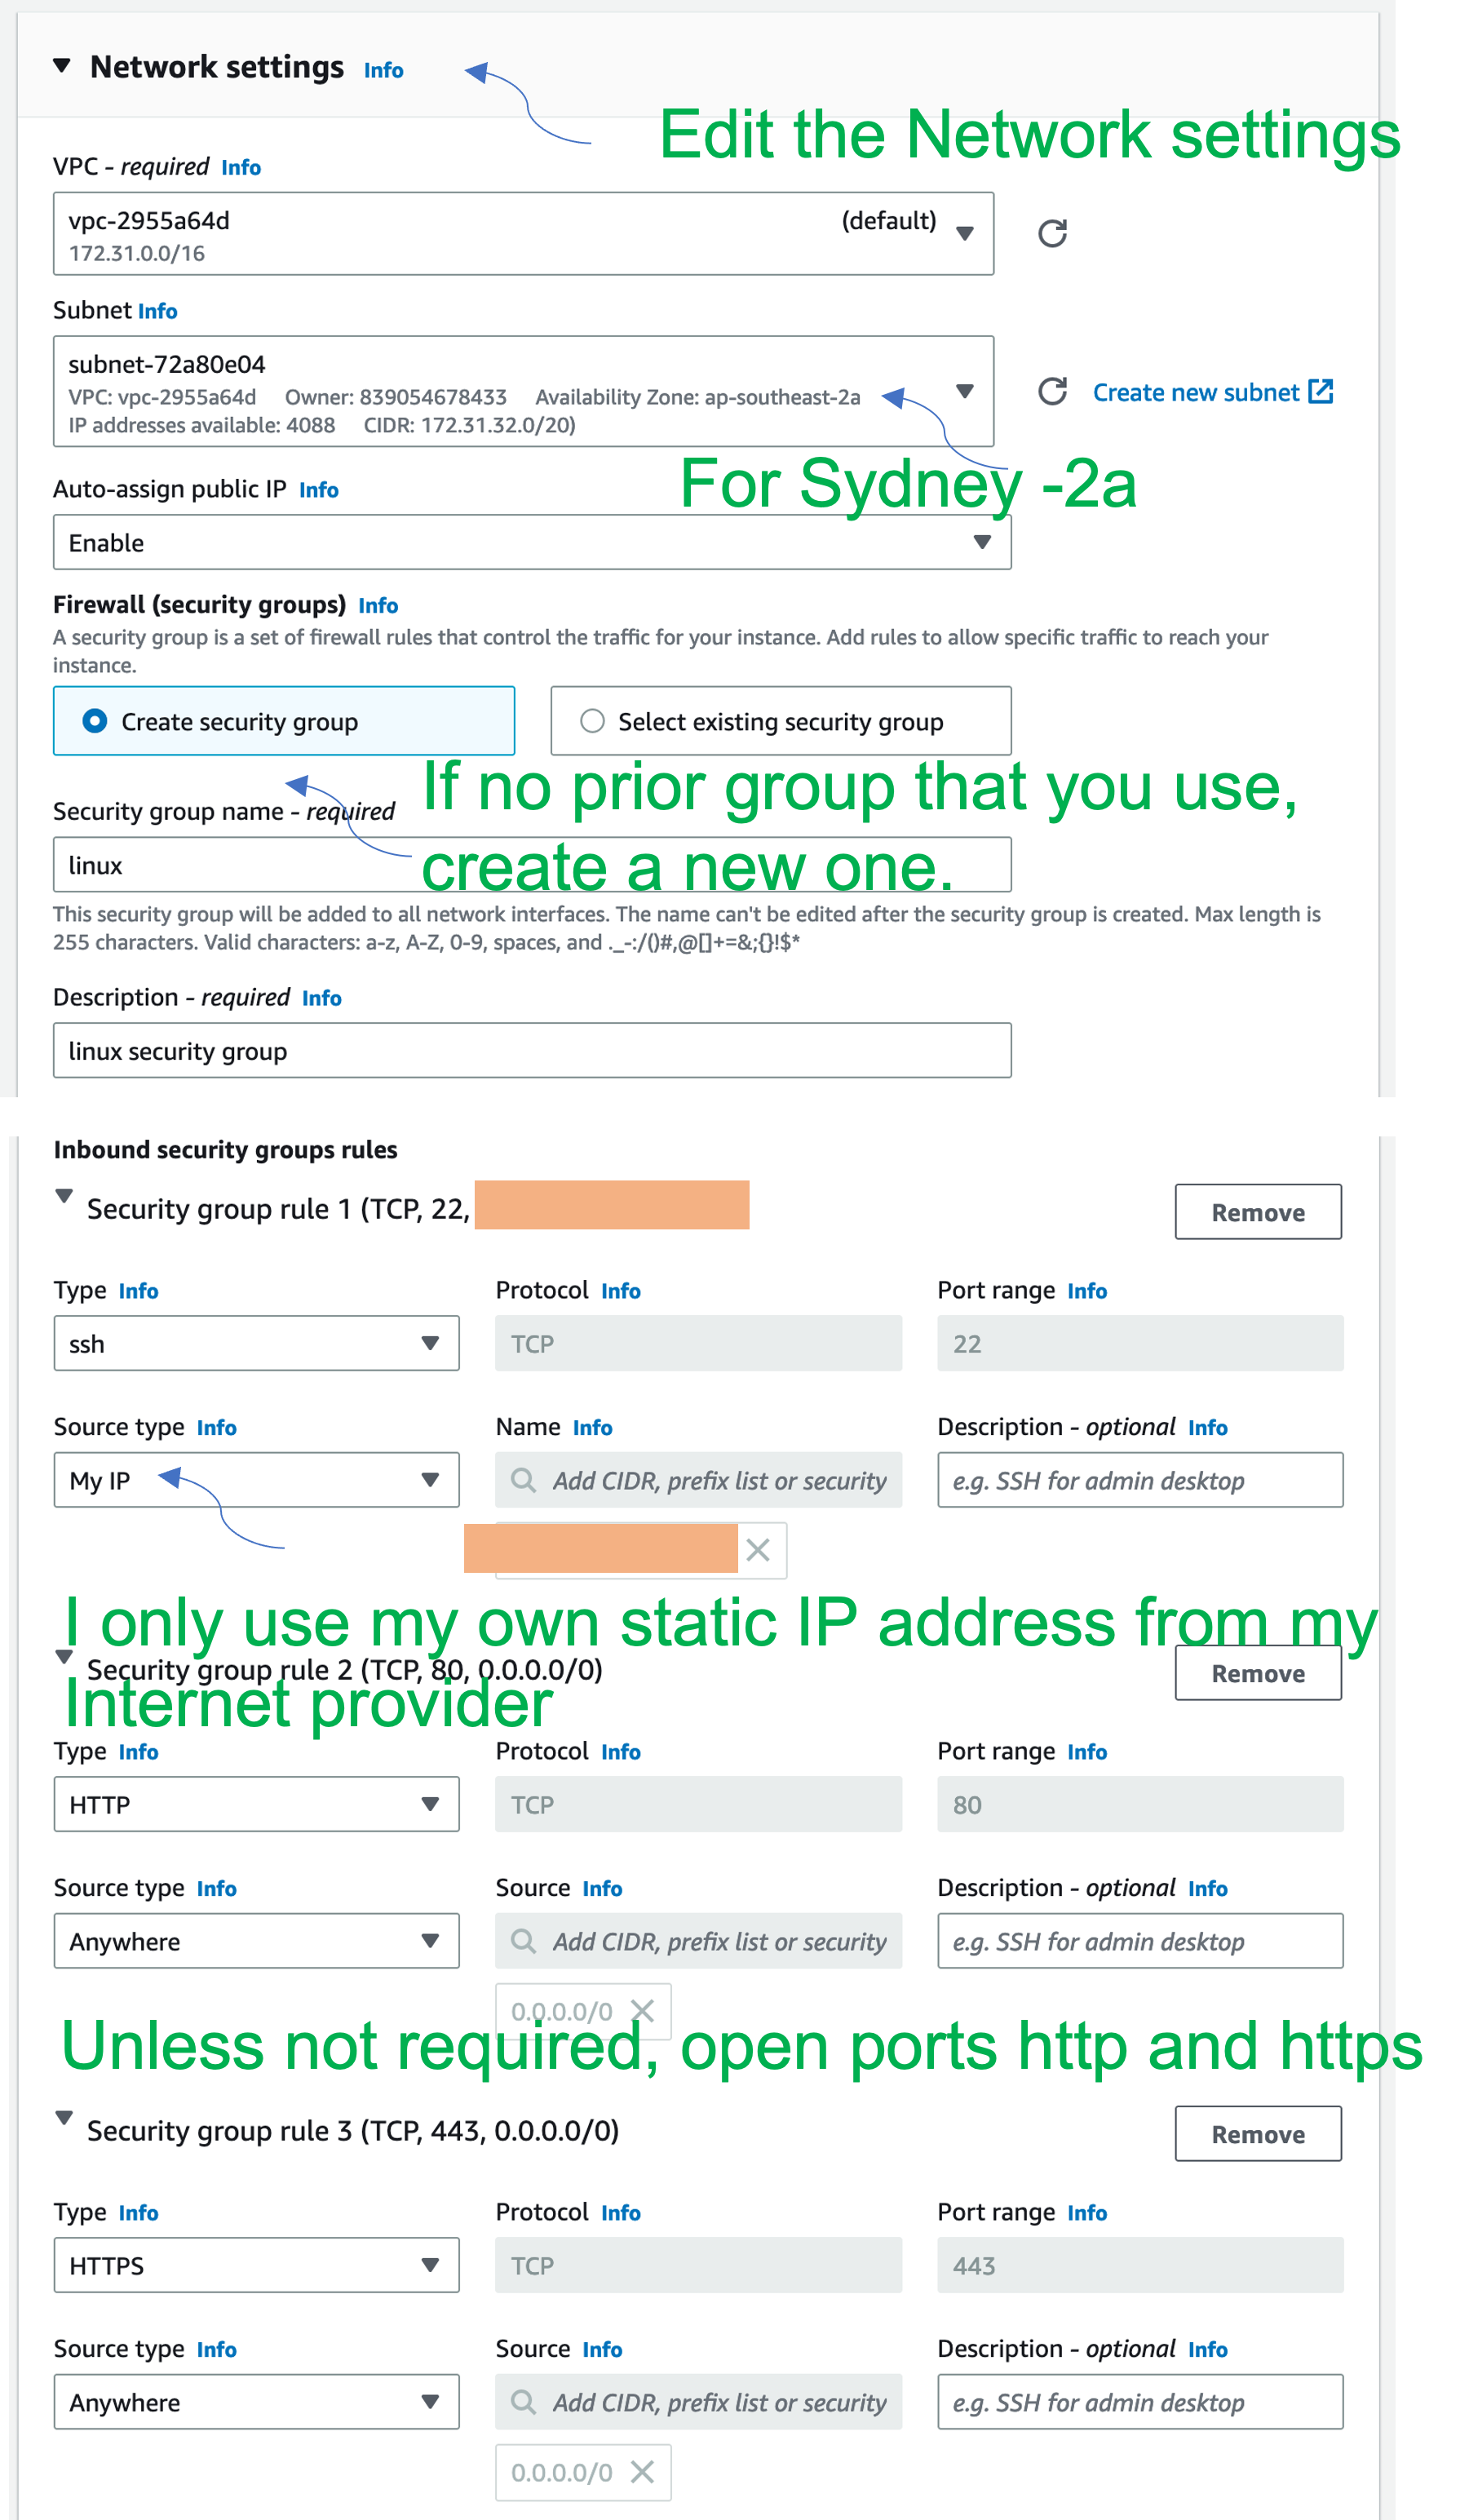
For the security group, select a default. We will change this later.
How to Use My Examples
In my examples I always use the Unix vi editor. In the script or command lines I place my instructions or comments in [ ] square brackets. In some places I don’t but it is clear enough.
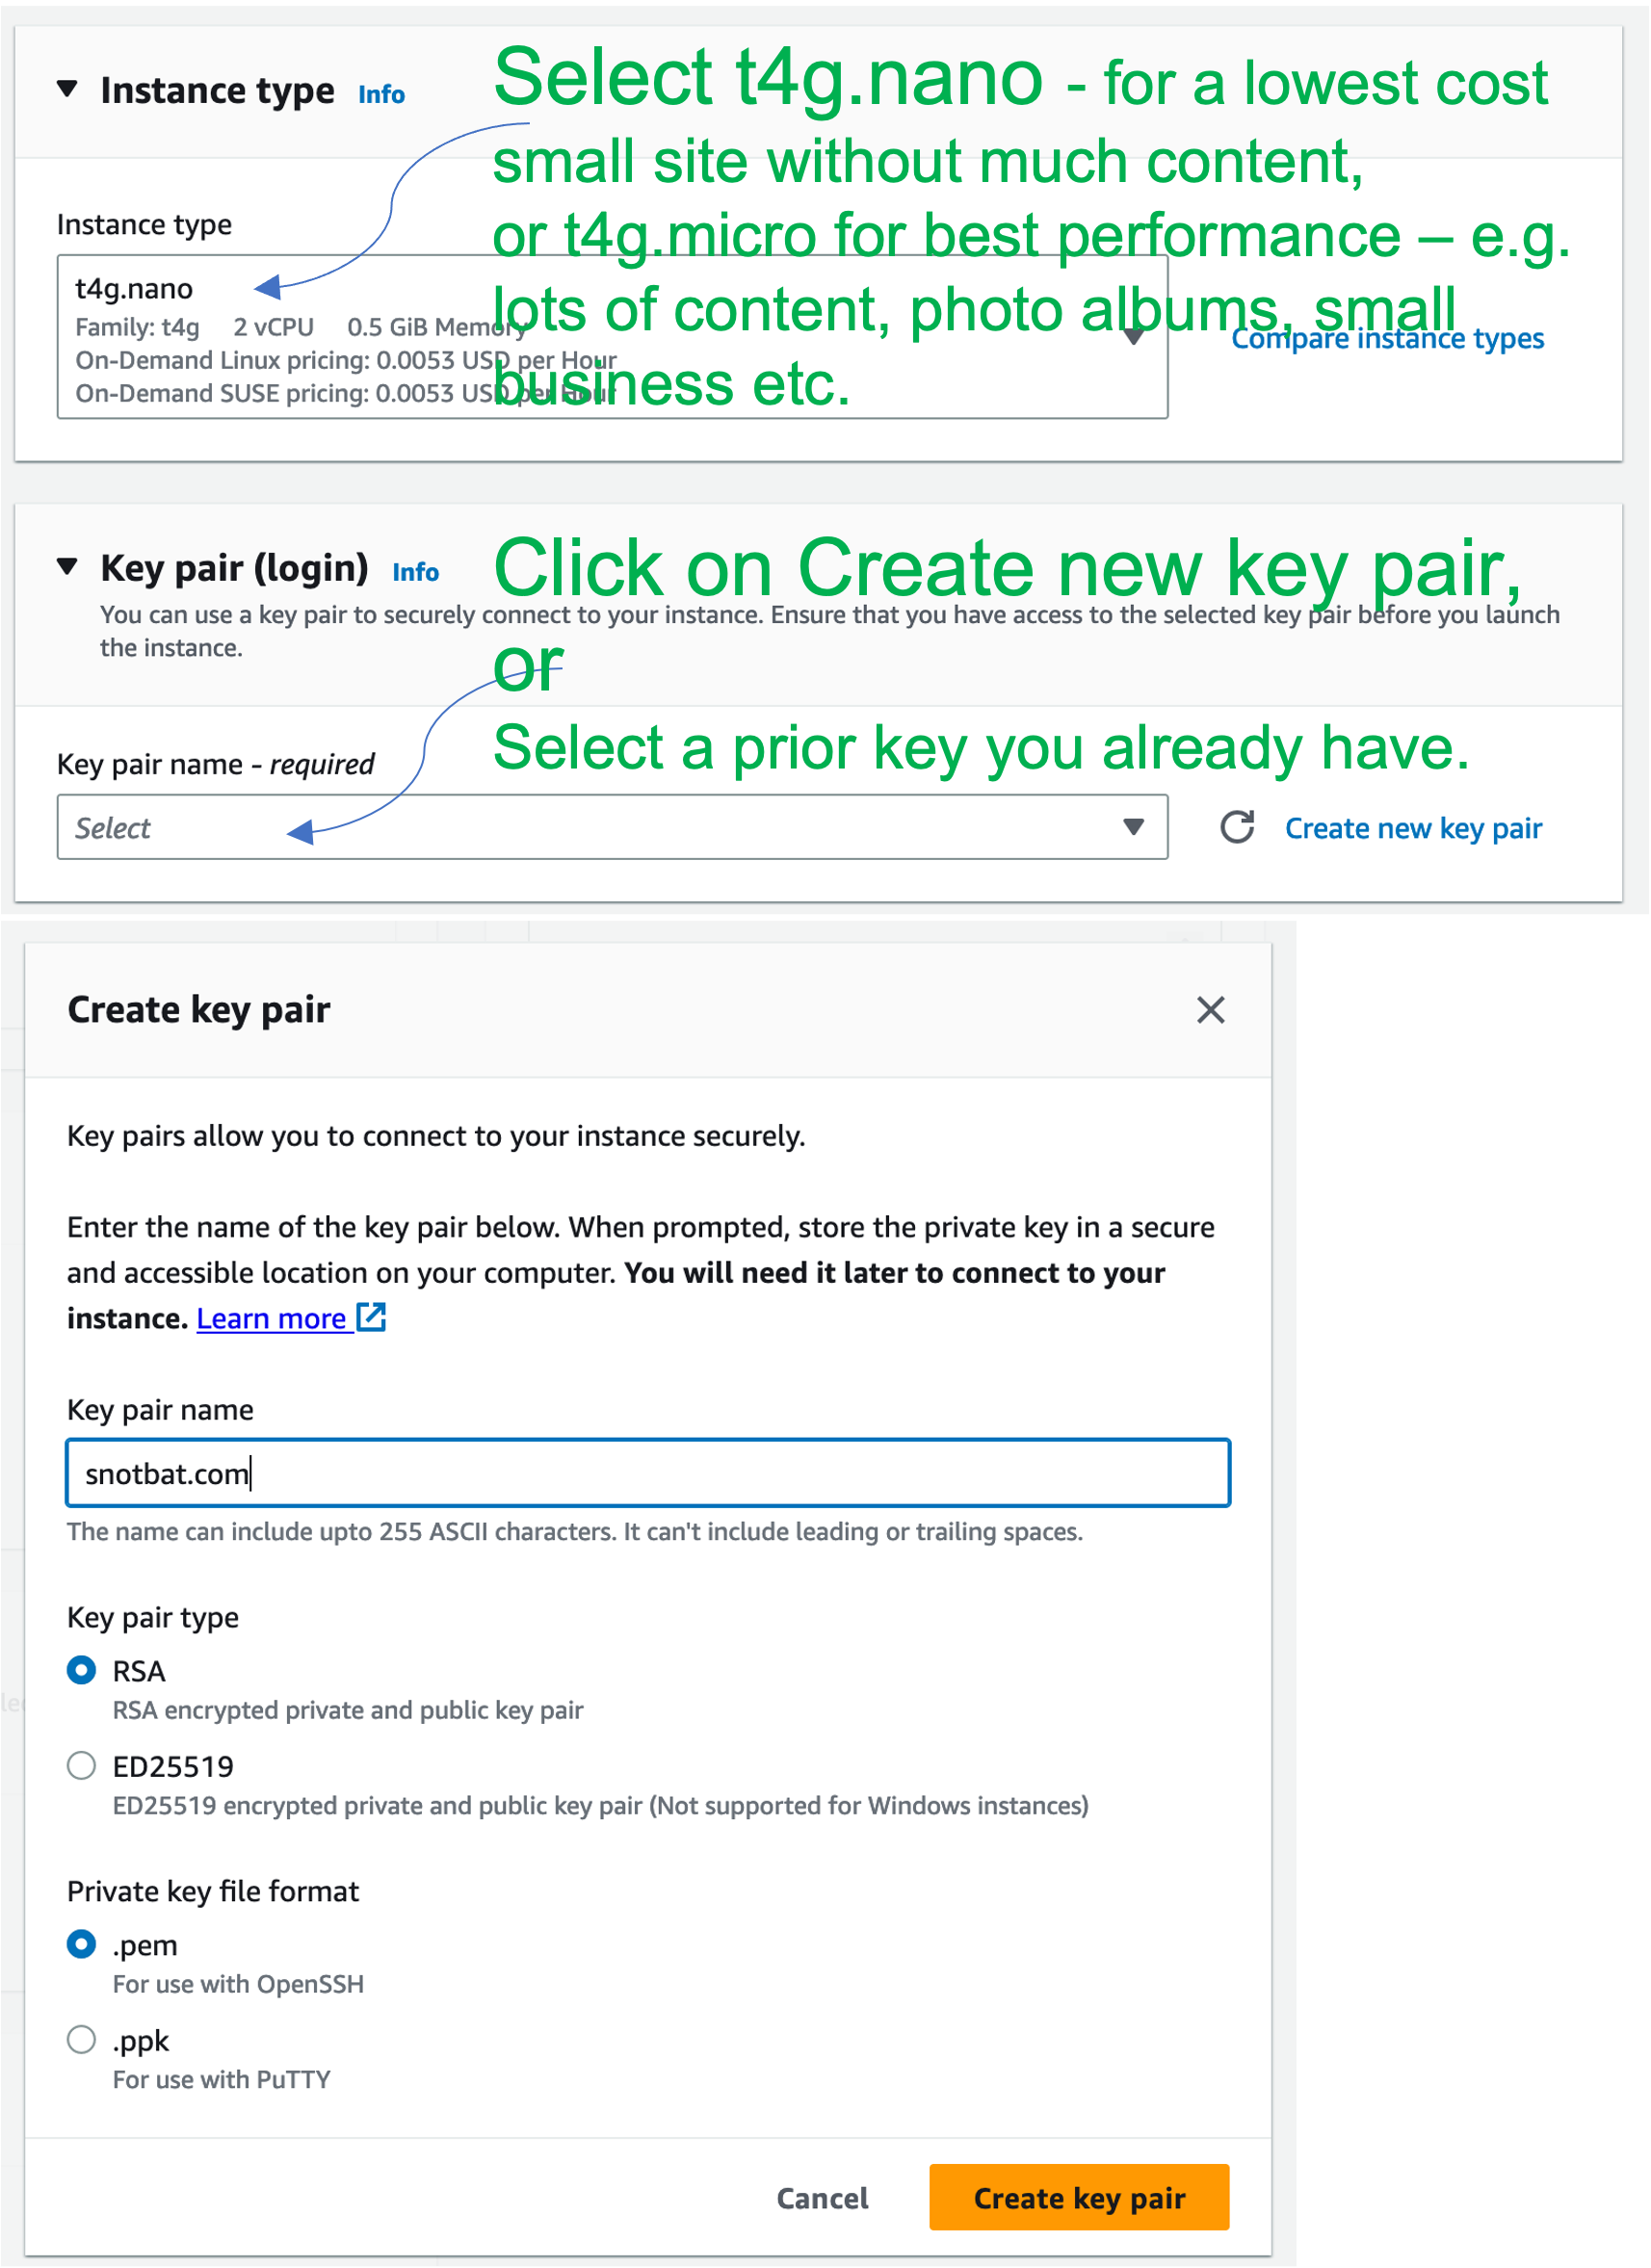
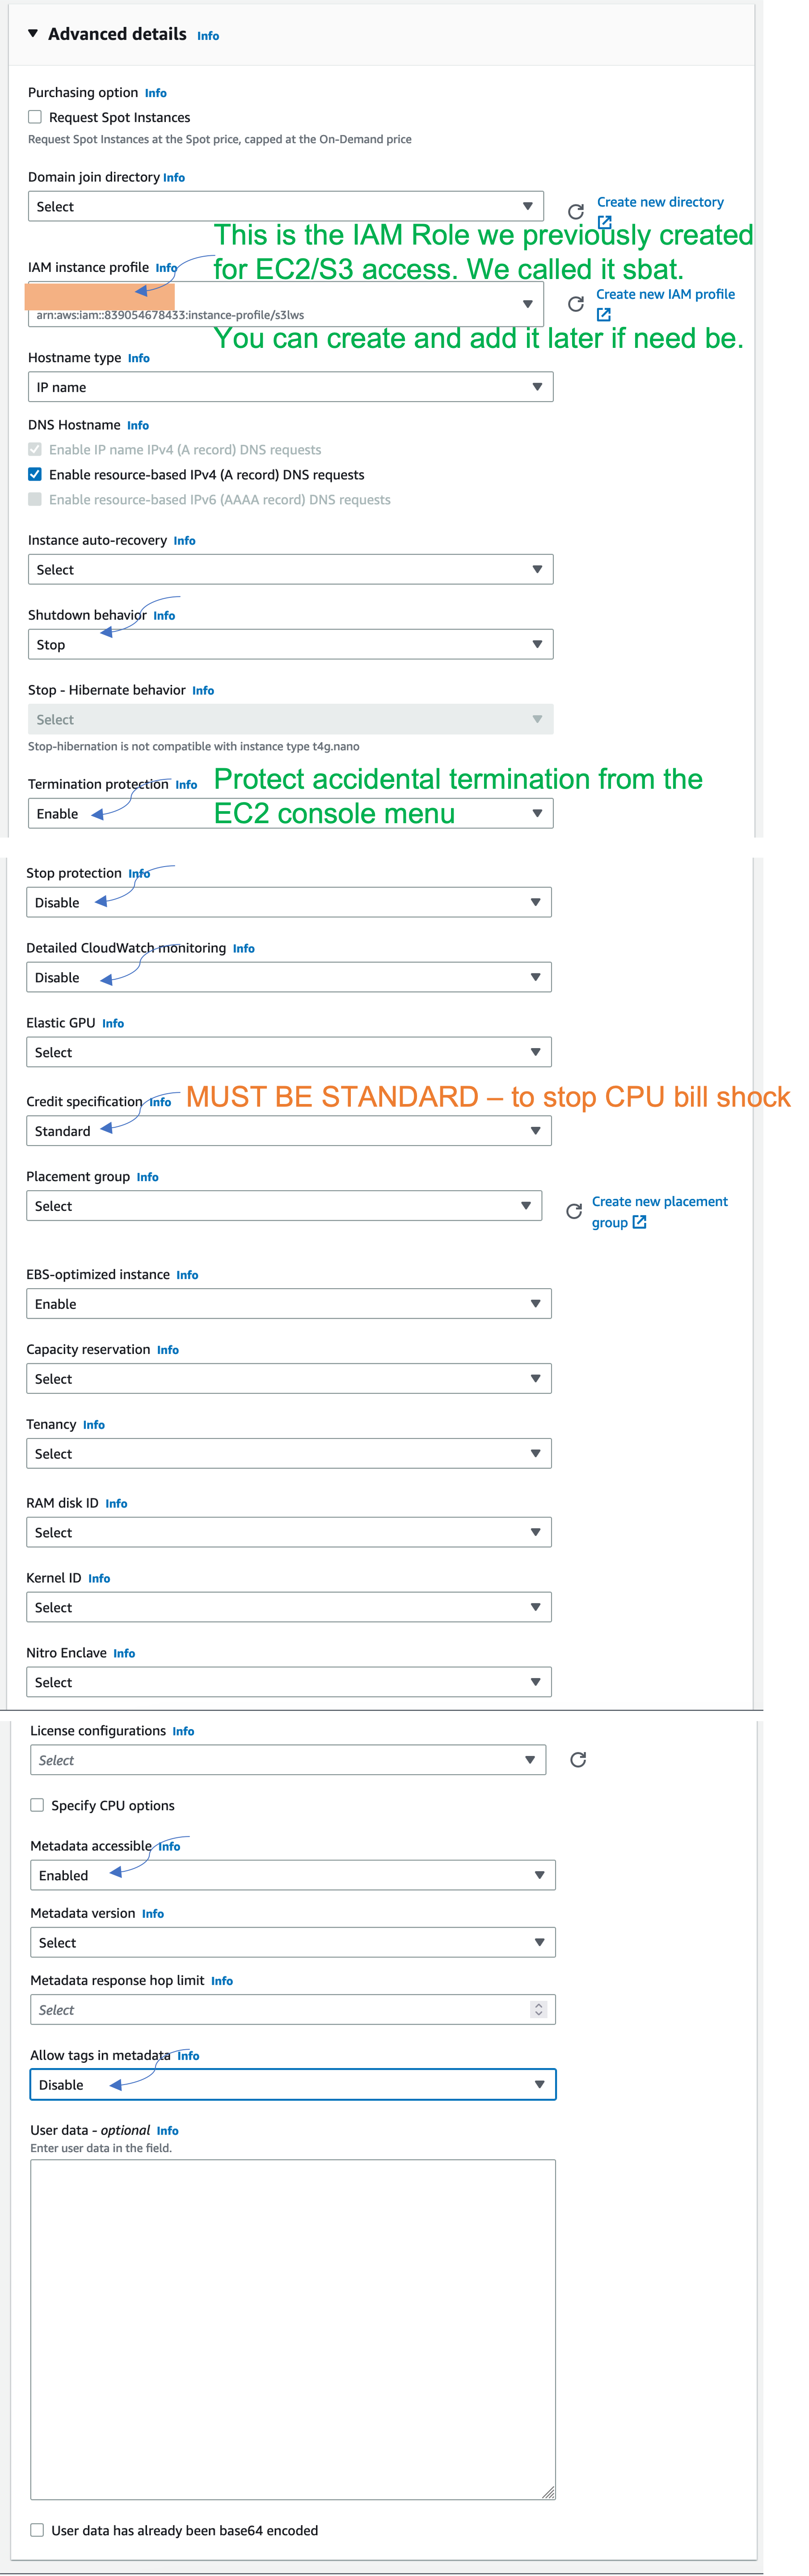
Launch the instance for your region. You can see my example below. You should already be familiar with the EC2 options such as security groups and elastic ip etc. In the example below you do not have to have an IAM instance profile.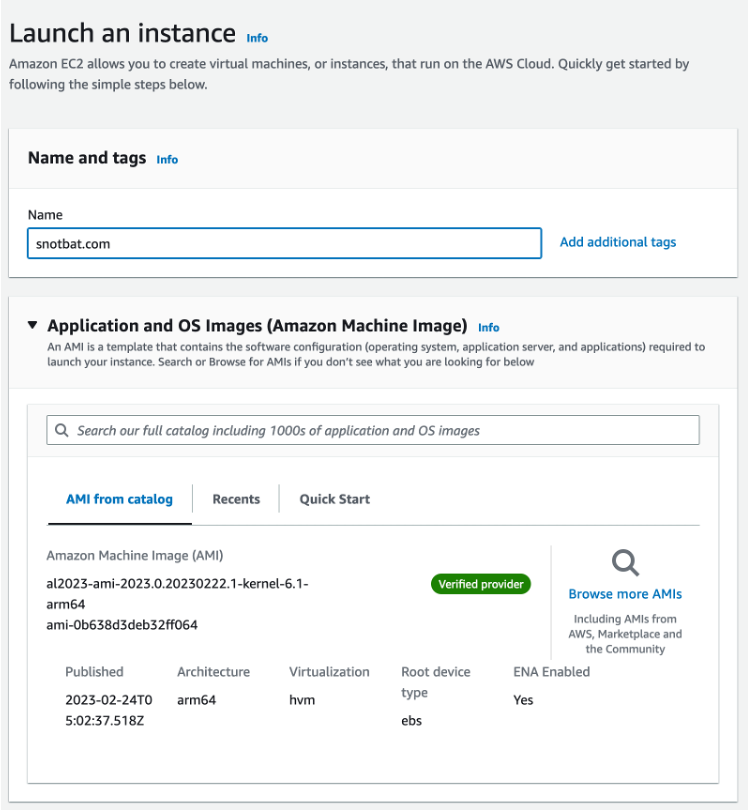
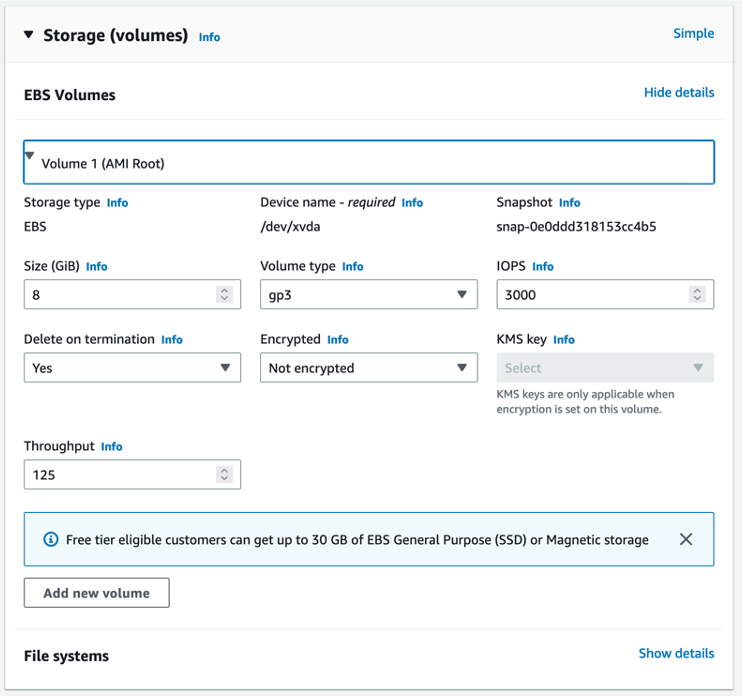
 Storage will default to GP3 as follows. We no longer use GP2 as at time of writing.
 Select the following being careful to verify your selections. You must select “Standard” for the Credit Specification.
 Now click on “Launch instance”.
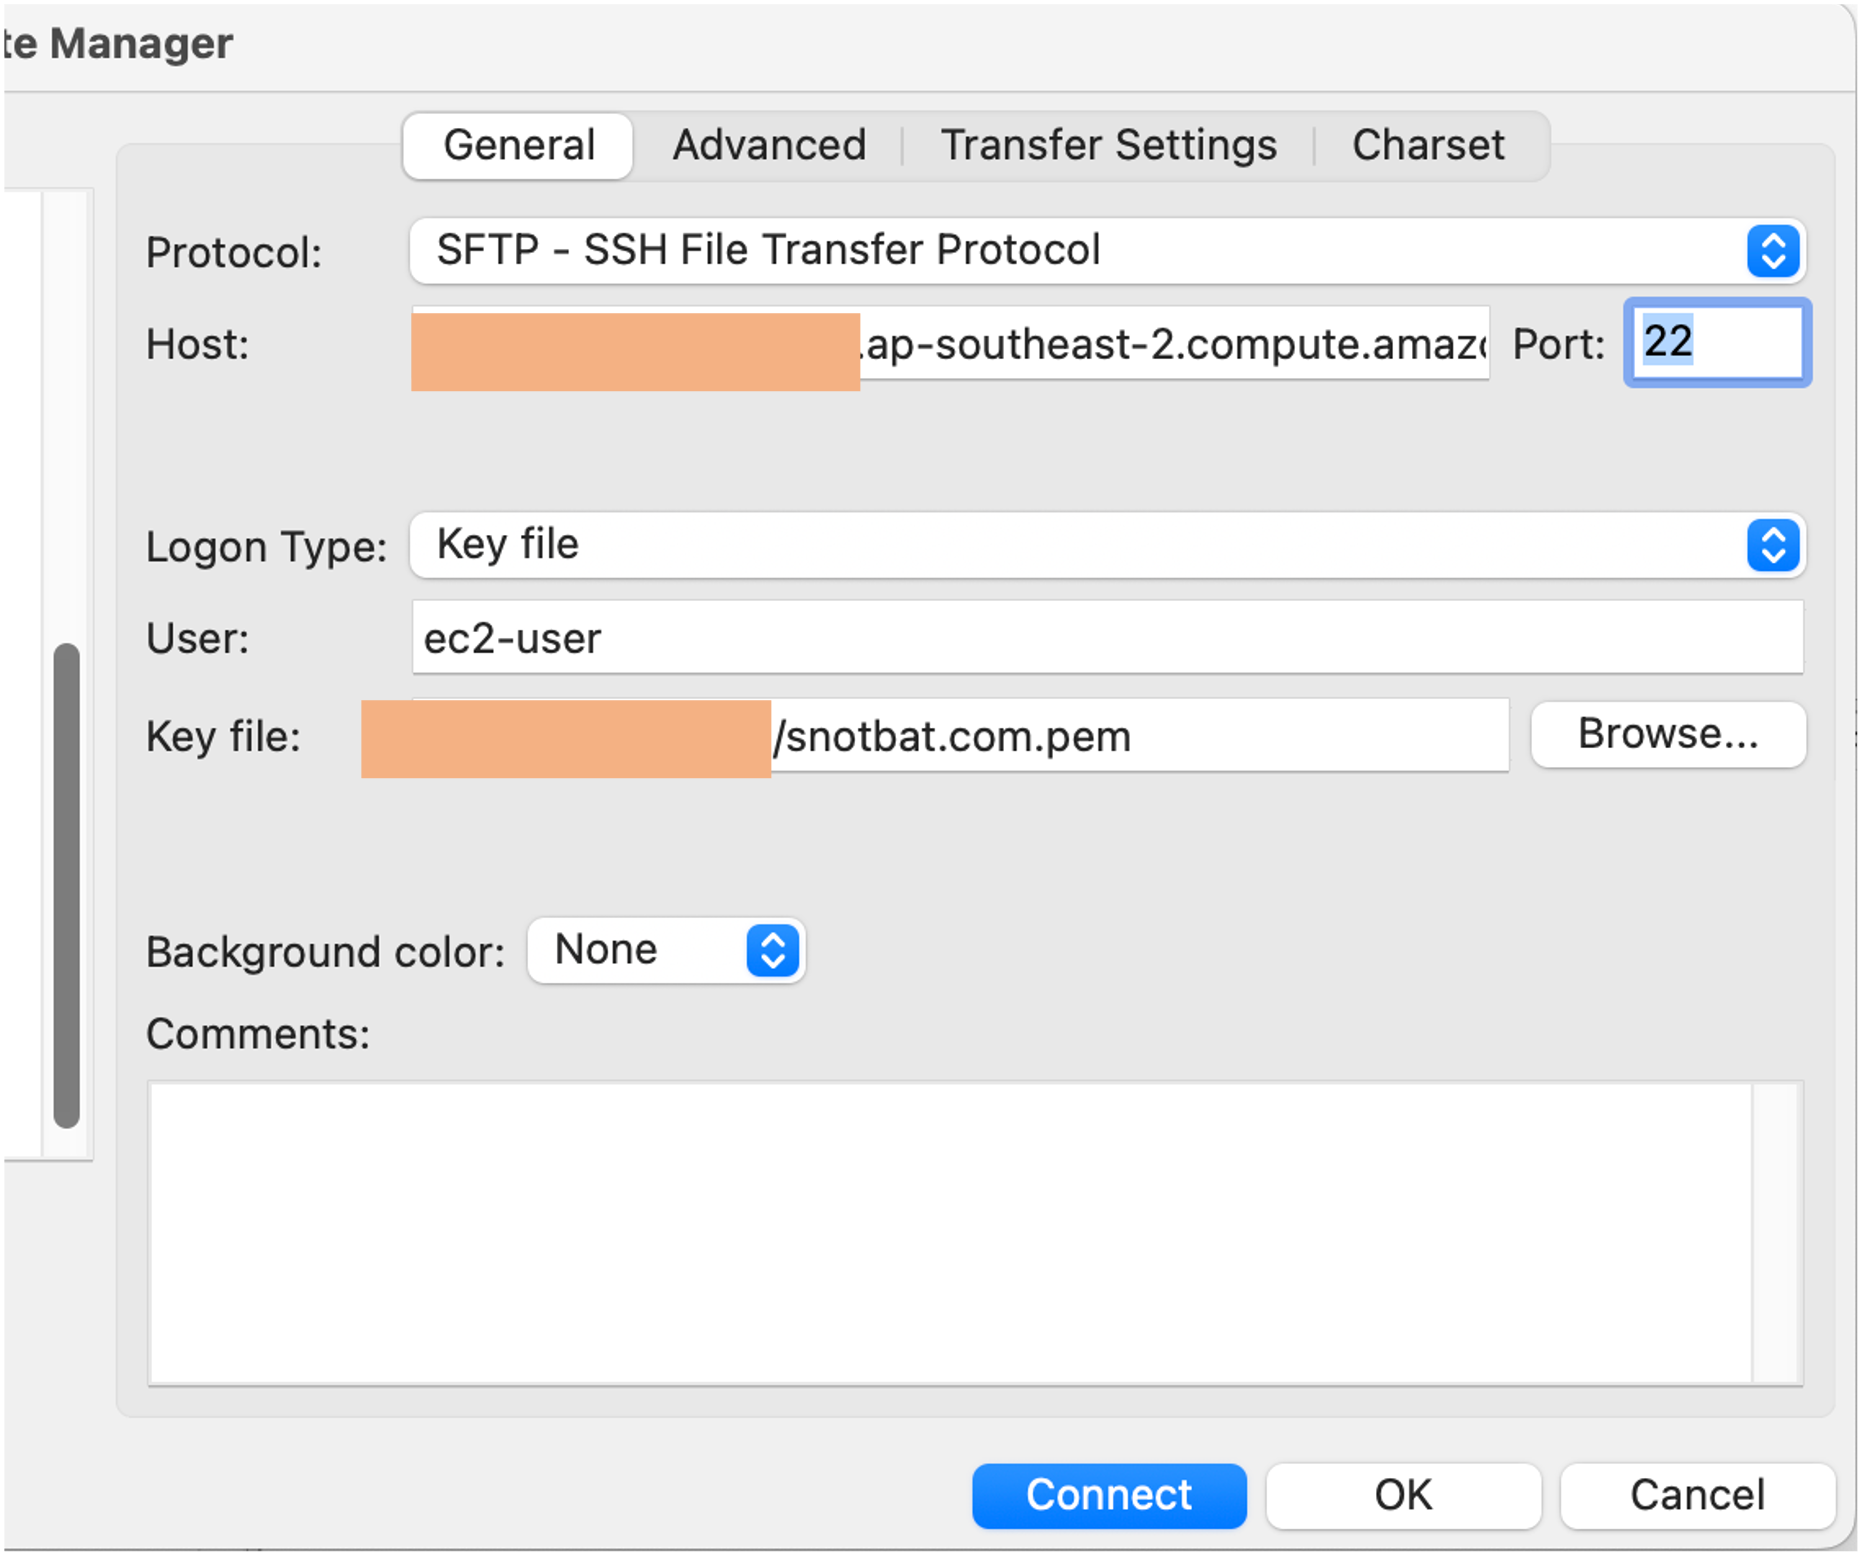
Go back to the EC2 > Instance menu, and click the Connect tab. Then click the SSH Client tab. Here are your connection commands for a terminal SSH sessions (use ec2-user, not root) and for FileZilla.
Now click on “Launch instance”.
Go back to the EC2 > Instance menu, and click the Connect tab. Then click the SSH Client tab. Here are your connection commands for a terminal SSH sessions (use ec2-user, not root) and for FileZilla.
 For example, on iMac, already have set up the root user via your system settings. Google search on how to set up root, as by default you cannot “su root”.
When you change details of an SSH login, the iMac SSH command will reject you, so you use:
su root
(password)
cd /var/root/.ssh
:>known_hosts
exit
su root
cd (to the directory with your .pem file)
ssh -i “YOURDOMAIN.pem” ec2-user@ec2-xxx-xxx-xxx-xxx.ap-southeast-2.compute.amazonaws.com -> from your connect tab
Here is what I see on my first connection:
From iMac:
sh-3.2# su root[password]
sh-3.2# cd PEM [where my files are]
sh-3.2# ssh -i “snotbat.com.pem” ec2-user@ec2-xxx-xxx-xxx-xxx.ap-southeast-2.compute.amazonaws.com
The authenticity of host ‘ec2-xxx-xxx-xxx-xxx.ap-southeast-2.compute.amazonaws.com (xxx.xxx.xxx.xxx)’ can’t be established.
ED25519 key fingerprint is SHA256:…………..sxKqCSNnaMghLEIw.
This key is not known by any other names
Are you sure you want to continue connecting (yes/no/[fingerprint])? yes
Warning: Permanently added ‘ec2-xxx-xxx-xxx-xxx.ap-southeast-2.compute.amazonaws.com’ (xxxxxxx) to the list of known hosts.
A newer release of “Amazon Linux” is available.
Version 2023.0.20230322:
Run “/usr/bin/dnf check-release-update” for full release and version update info
, #_
~\_ ####_ Amazon Linux 2023
~~ \_#####\ Preview
~~ \###|
~~ \#/ ___ https://aws.amazon.com/linux/amazon-linux-2023
~~ V~’ ‘->
~~~ /
~~._. _/
_/ _/
_/m/’[ec2-user@ip-xxx-xxx-xxx-xxx ~]$ sudo su[root@ip-xxx-xxx-xxx-xxx ec2-user]# set -o vi[root@ip-xxx-xxx-xxx-xxx ec2-user]#
Notice how I use sudo su to get root login, and set -o vi for using the vi editor.
You should already know how to use FileZilla (or PuTTY). If not, you create a FileZilla site folder and name it, say, snotbat.com.
You have the following fields (my example has all my .pem files under the directory PEM on my PC.) You Click OK to save the settings, then open it again and click the blue coloured Connect button. You should connect to the /home/ec2-user directory.
 If you have been able to do all the above, you are ready to install Linux.
Attach an IP address to your instance
We commonly attach a static IP address to the instance, unless we are doing something else specific to not requiring an address. To do this, go to EC2 > Elastic IPs.
Click on Allocate Elastic IP Address, then Allocate. This must then be attached to the instance or it will cost money. When finished with an IP address, you dissociate it from the instance, then release it. Note that if you stop an instance and keep it stopped, the IP address will start billing you. It costs less than the instance, but is ticking away on the meter.
Now go to mxtoolbox.com and do a blacklist check on the IP address. There may be a few timeouts at the bottom of the listing. If it is ok, we attach it to the Instance rather than ditching it and trying again. I am not giving configurations for Dovecot anymore on my website, but if the IP address is grey listed for emails, it will have issues. Grey listing is not shown from blacklists, but will give noticeable errors on email logs, such as showing other countries when connecting to the IP with IMAP.
Under Actions, associate the IP address with the new instance.
Now go to Route53, and add the A record with this IP address.
Then verify the EC2 > Instance console shows the IP address on the instance.
I have not shown screen shots of these simple actions because by this stage you should have enough ability to navigate and use the menus.
Once you attach the IP address, you will have to use the :>known_hosts step above so your iMac can log back in, and you will need to copy the new FileZilla and SSH connection details as the previous connections will not work.