Configuring AWS SES email S3 bucket and Forwarding
SES rules for receiving emails
SES Rules for Receiving Emails
If we are using SES to receive emails, (rather than a 3rd party) we use the SES console (Oregon region for Australia) and configure “Email receiving” rules.
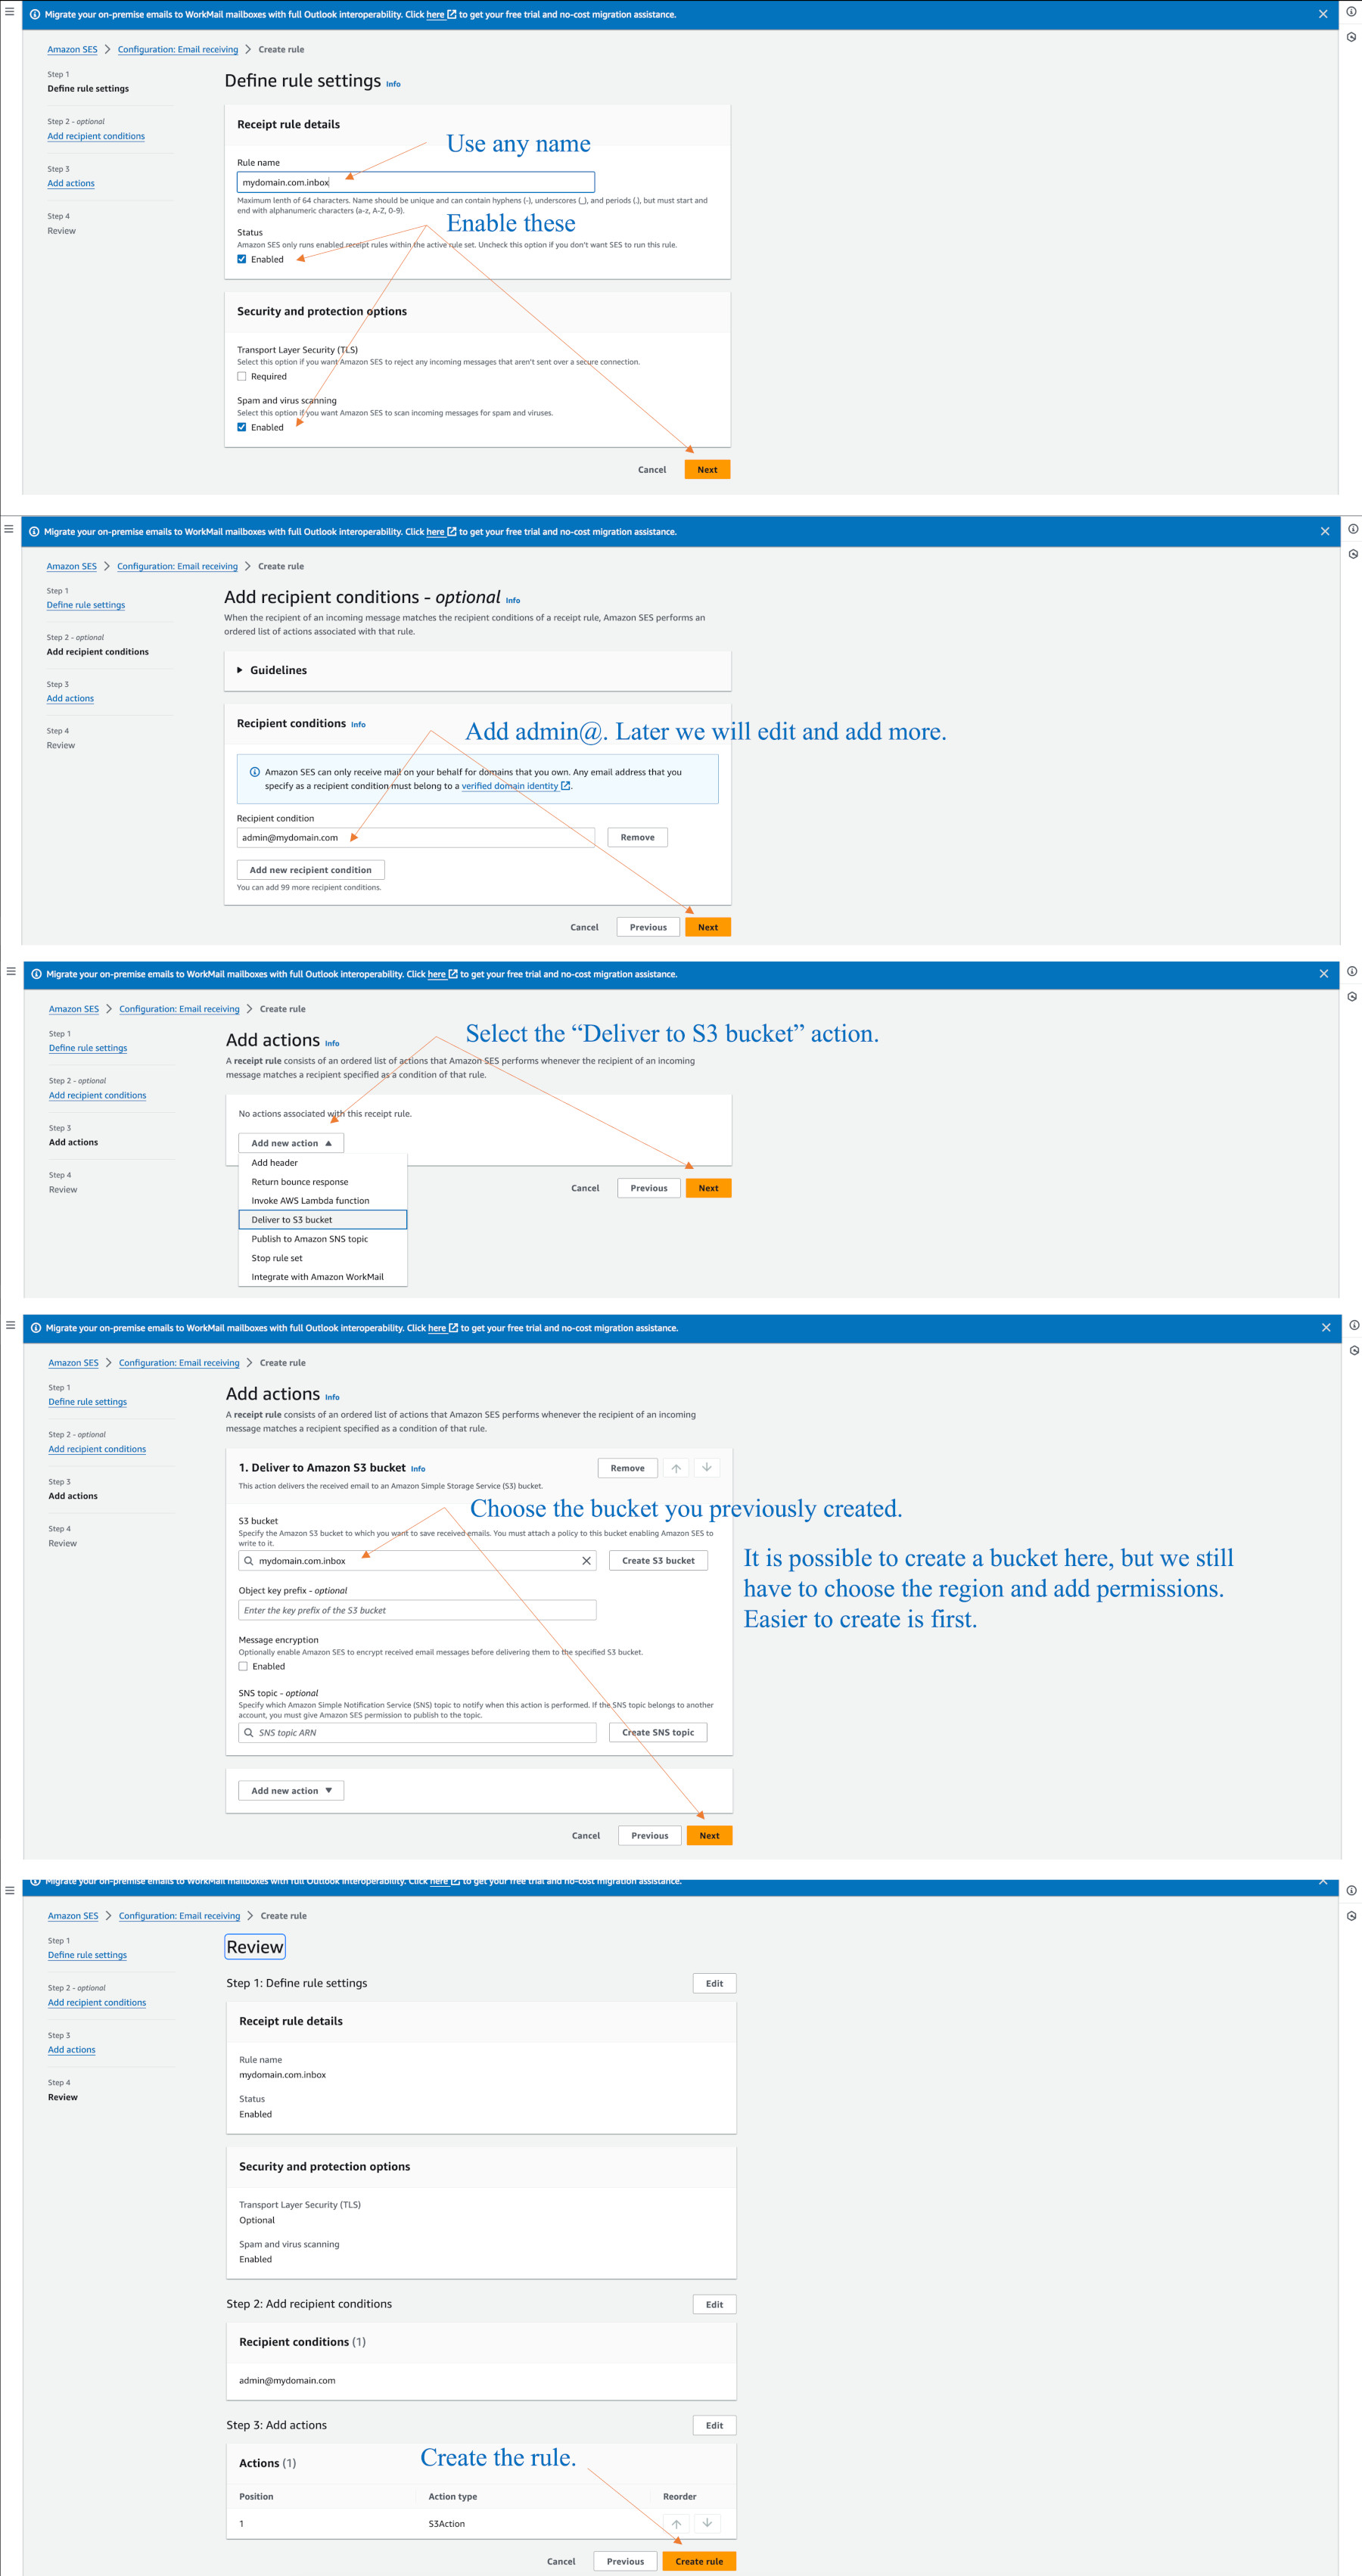
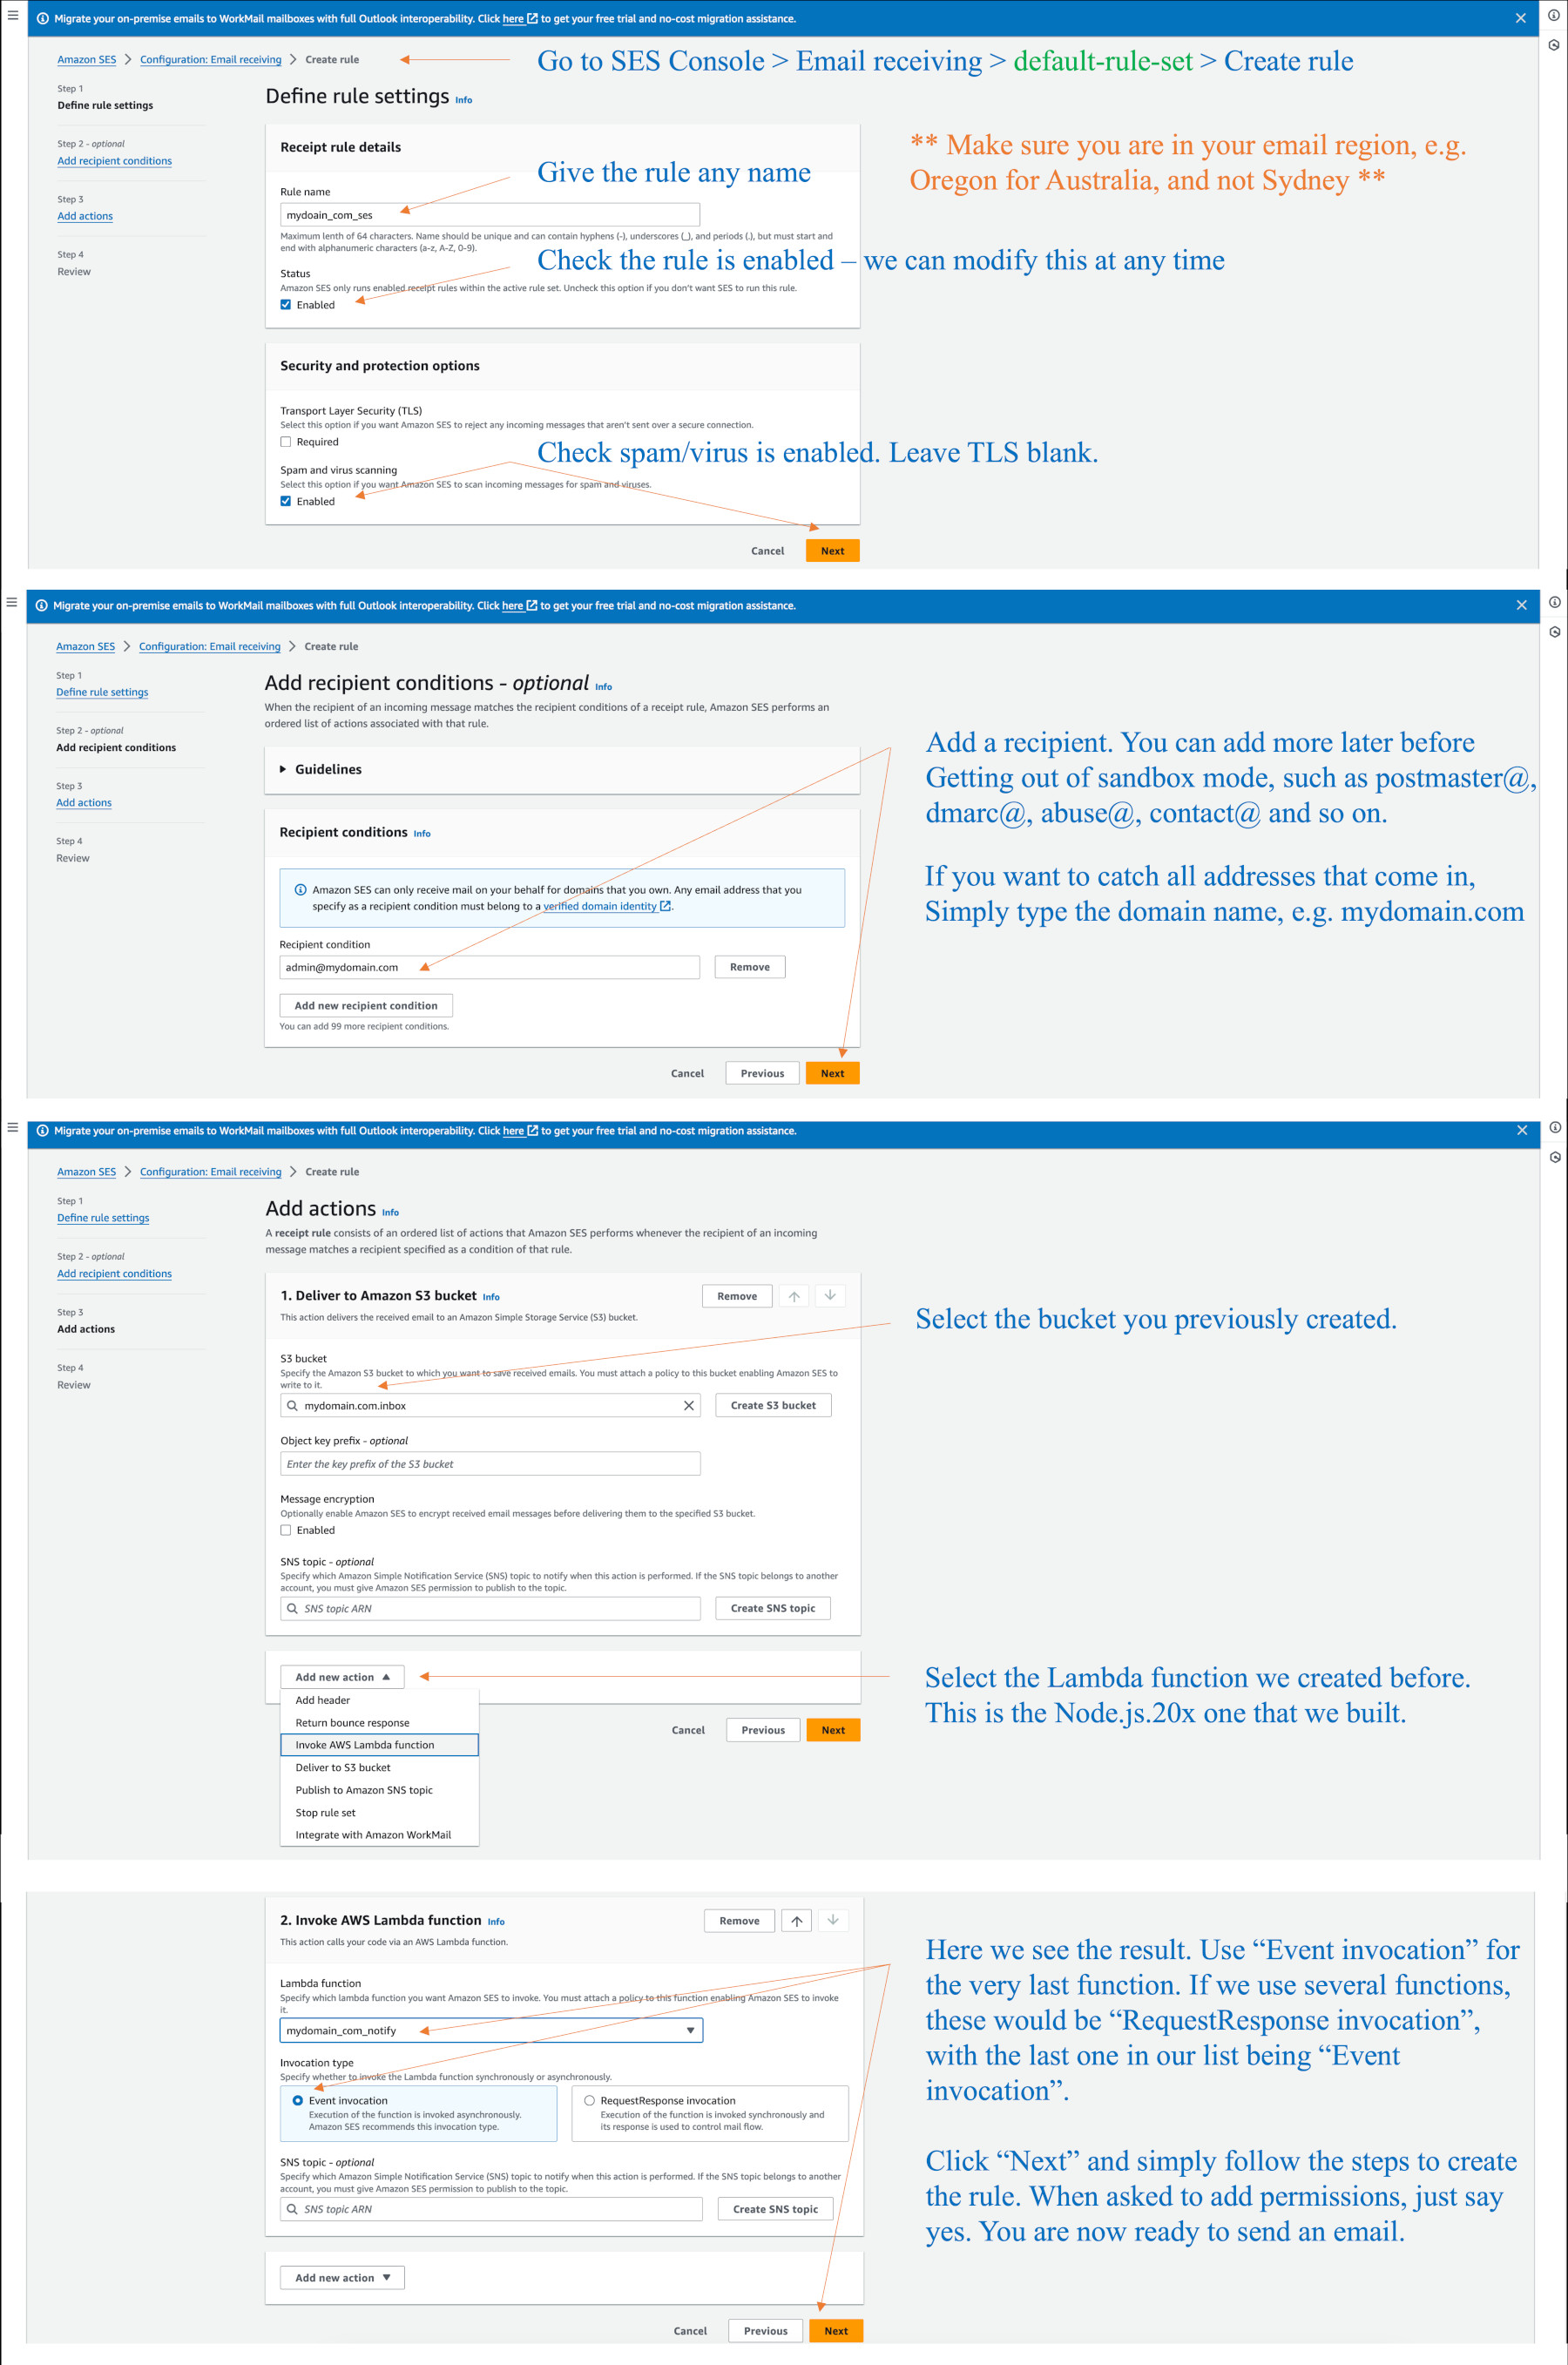
Go to SES > Configuration > Email receiving and click on default-rule-set. Click on “Create rule”.
You can click on the default-rule-set at any time later to edit or disable rules.
The diagram below shows how we make a rule to capture admin@mydomain.com. We can add other addresses as well. Or, we can use the domain name to capture any addresses. The rule is given any name. We use the pop-down menu as shown to choose an existing S3 bucket to put the emails into, or better still, we request the menu to create a new bucket for us, which will choose Oregon, and set the bucket permissions correctly for our account. If you previously created a bucket, as per our prior notes, you would have to have added the permissions manually. As a note, later when we add Lambda functions to the same rule, (to check for spam and do forwarding) it will ask us to grant permissions to those functions, so we say yes.
Here is an example where I chose an existing bucket, but it would have been better to let SES create a bucket.
Add/Verify and test an email
Add and test an email
We now add an email address and test it. It is helpful to add admin@mydomain.com. Our previous example uses this address.
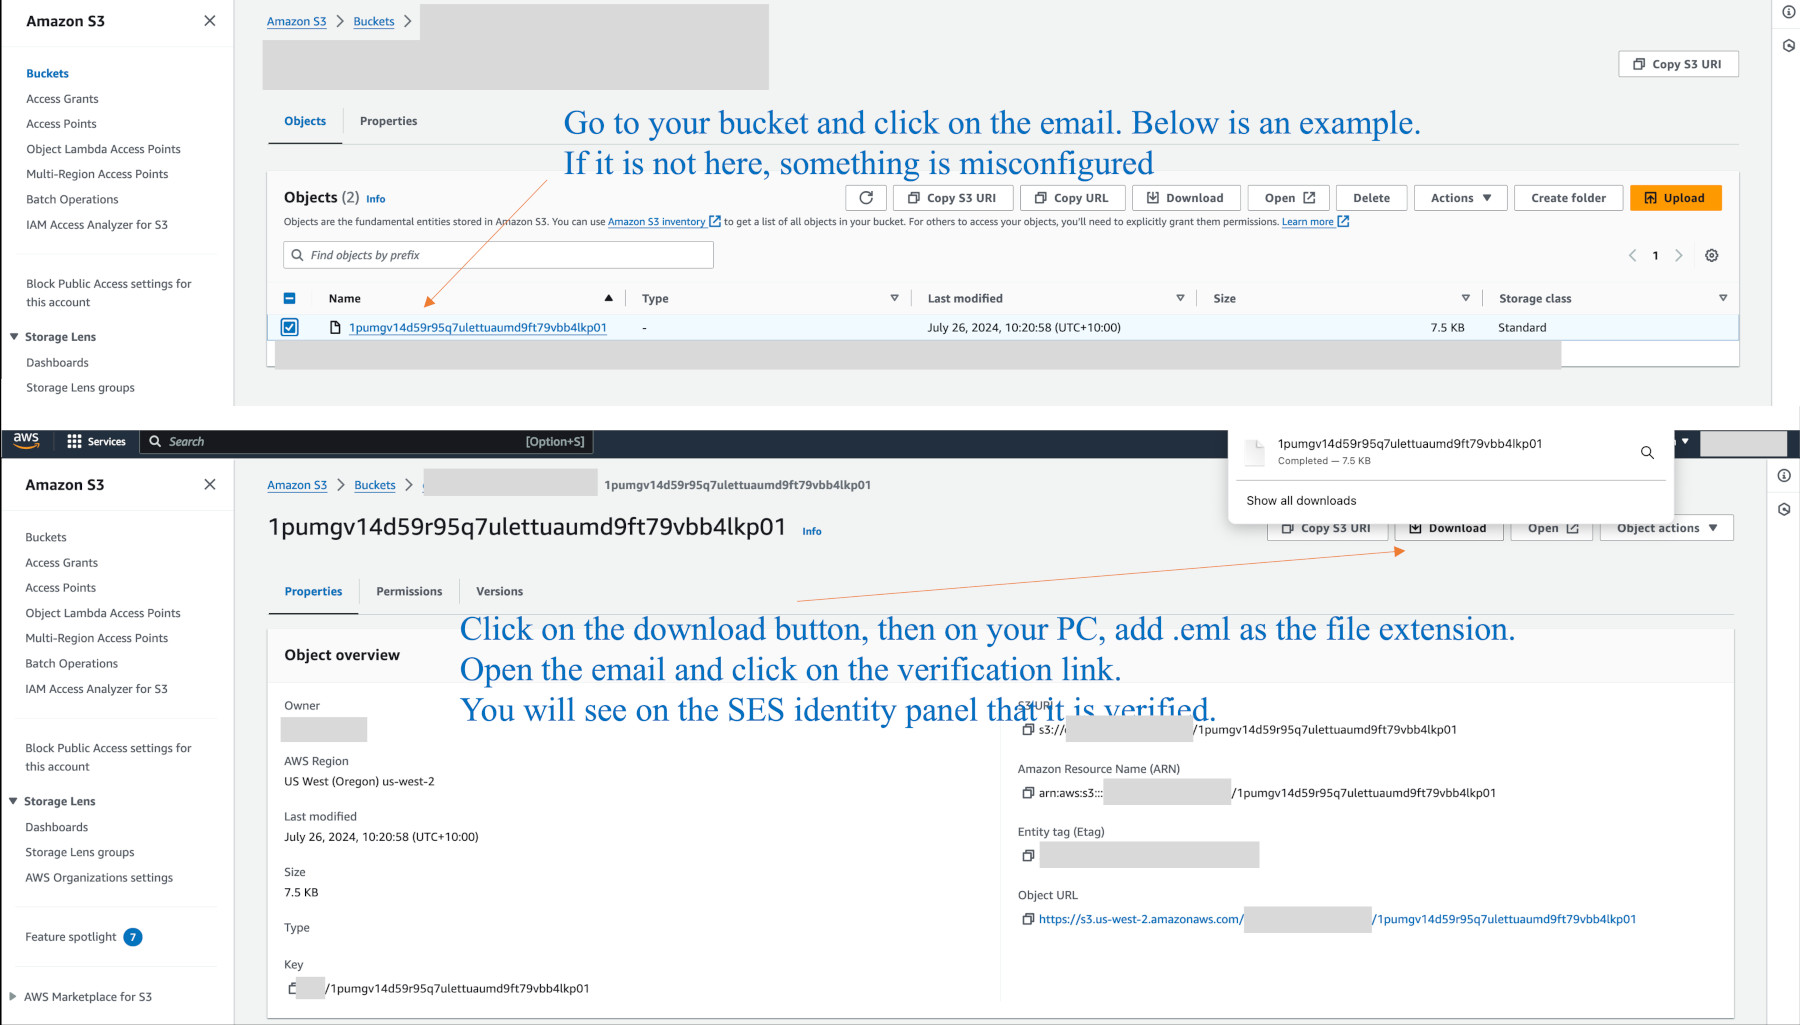
As we are in sandbox mode, create the email address identity, then go to the S3 bucket and see if the email is there (or in the sub-directory nominated).
The domain identity must be verified and not in a pending state. I can’t go into problem solving here, but if an issue, check your spelling and completeness of records in your DNS, and confirm they are seen in the dns checker website. Amazon must also have sent yu an email saying the domain and dmarc is verified. If things get really our of whack (whatever that is) you can delete the domain and re-add it.
Assuming all is ok:
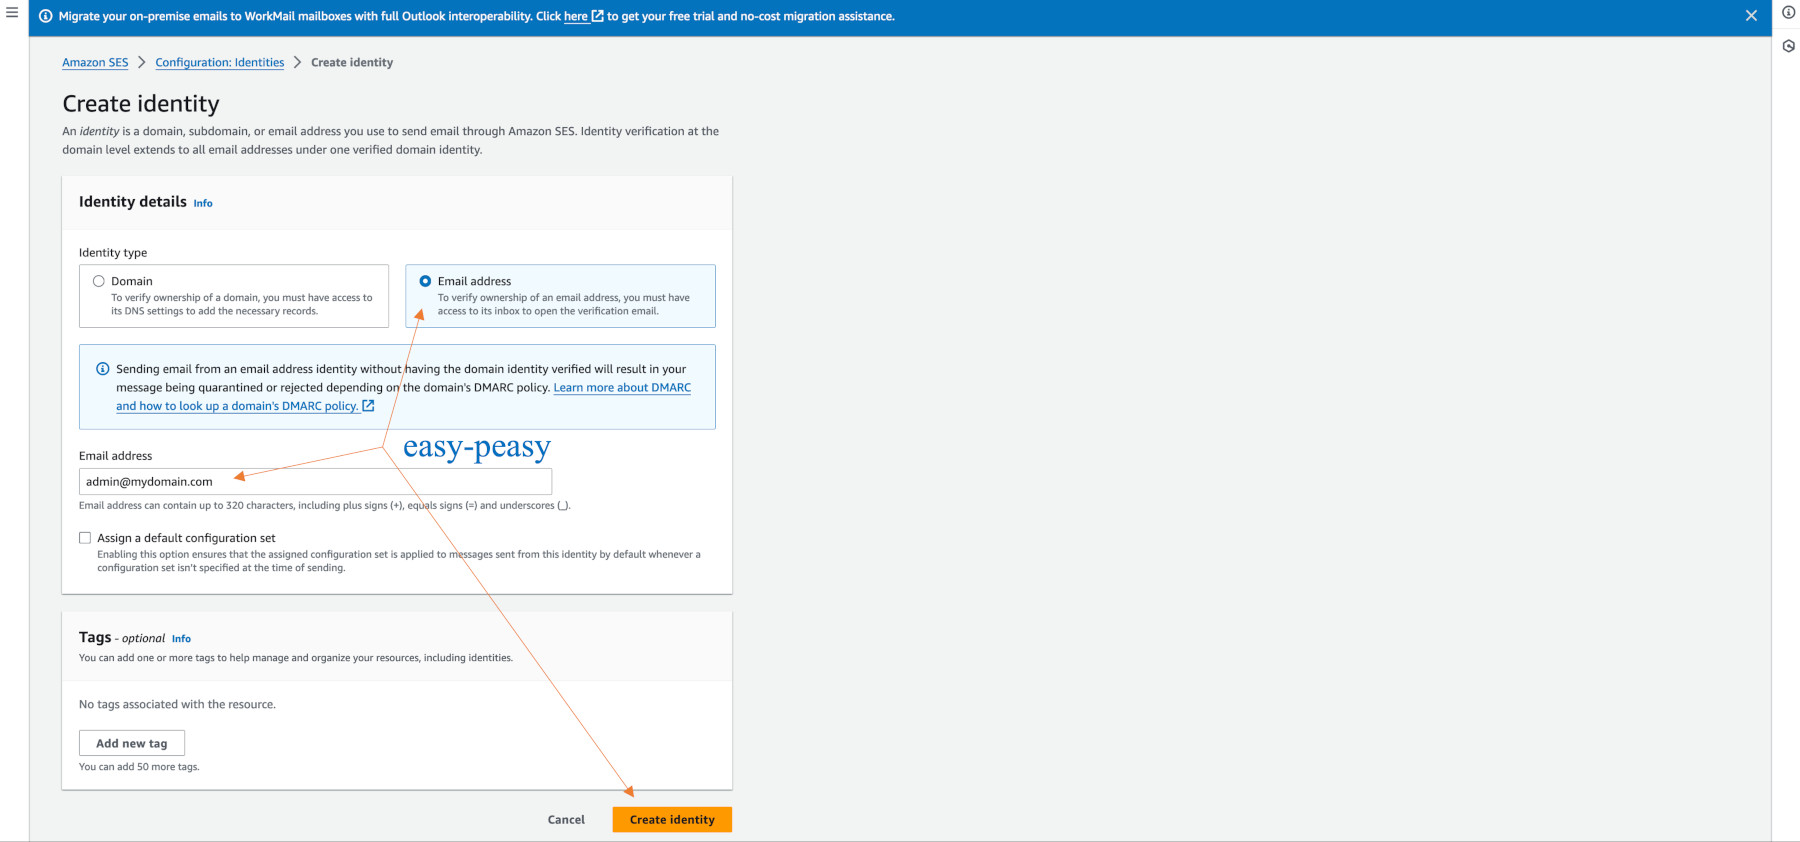
Go to SES (Oregon) > Configuration > Identities > “Create identity” to create an identity.
Click on the email button rather than the domain button.
Do not add a new “Mail From domain” or any other records on the summary screen. Simply add admin@mydomain.com
Add Lambda IAM Role (for SES forwarding rules)
Add IAM Role – Lambda & S3 Bucket
We need to an a Lambda IAM Role so that we can create Lambda functions to access and process emails in the S3 Bucket. These functions will be called from the “SES (Oregon for Australia) > Configuration > Email receiving” rules.
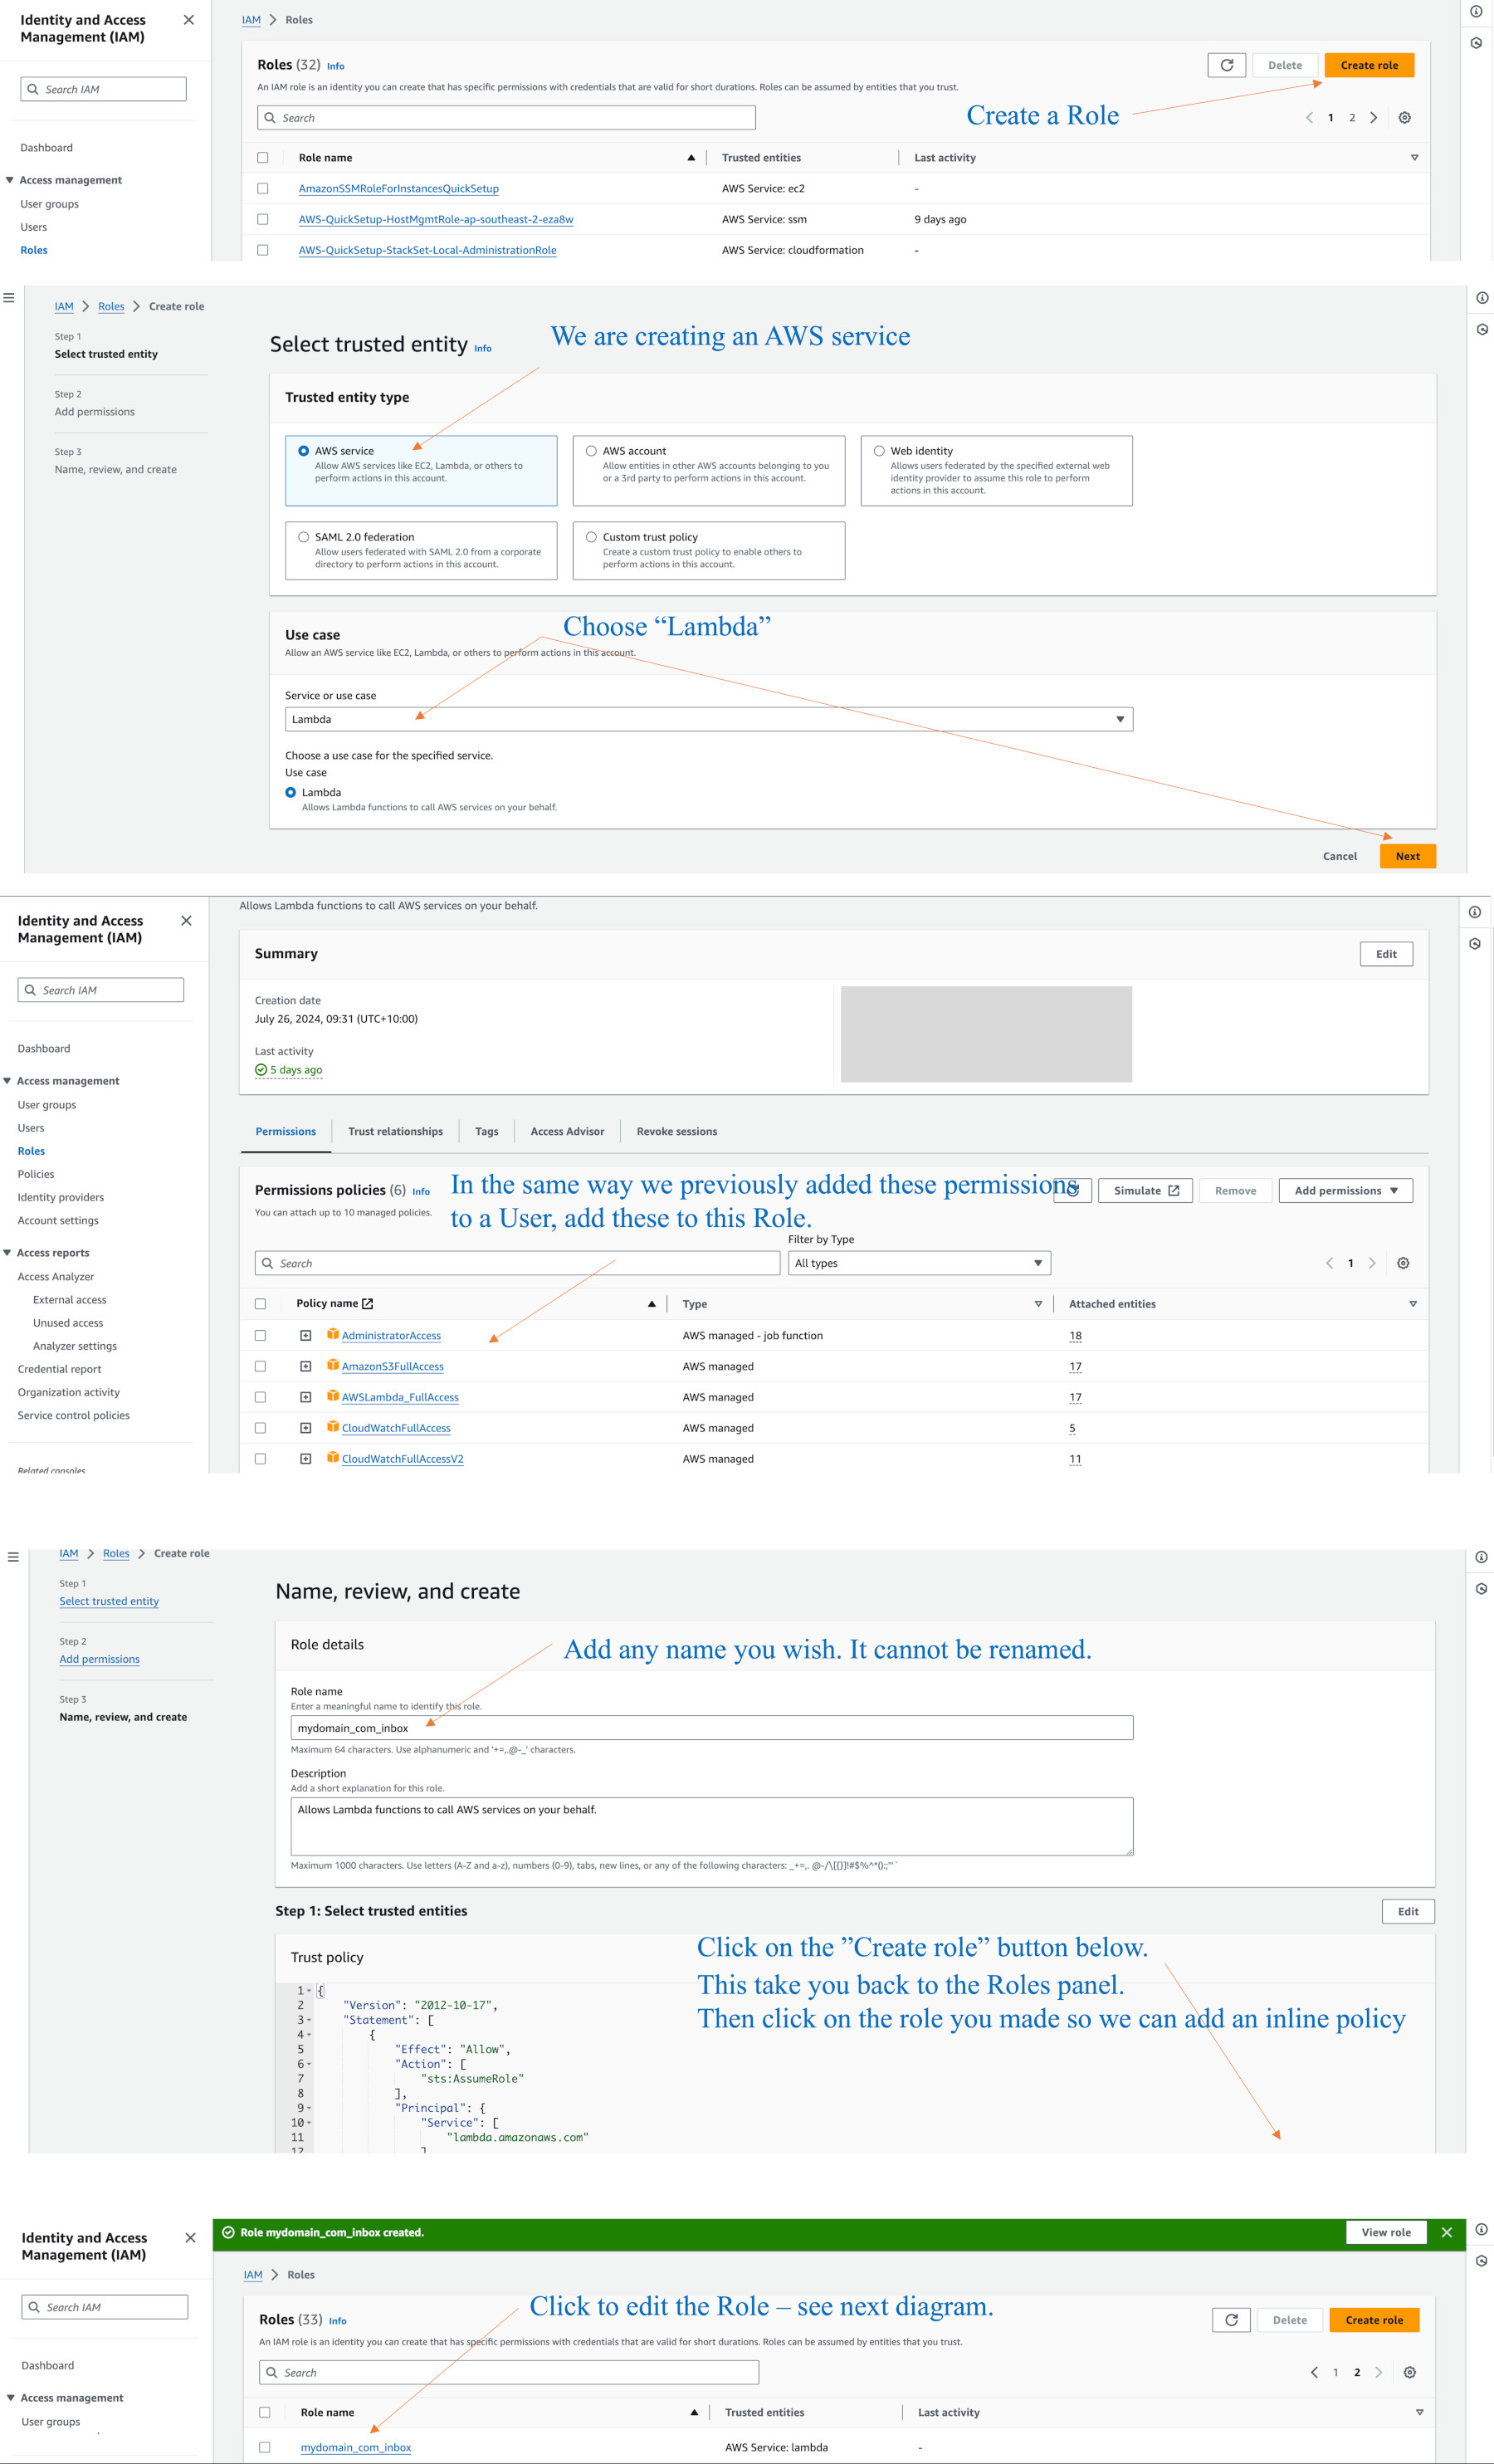
Go to the IAM console > Roles > “Create Role” button. The Trusted entity type is Amazon service. From the Use case menu, select Lambda, then Next.
As in the screenshots below, I add quite a number of permissions. I have not tested reducing these, but they are fine. (You should have previously learnt how to add these sorts of items when adding an IAM User.) While creating this role, give it a name of your choosing.
Add these to the role: AdministratorAccess, AmazonS3FullAccess, AWSLambda_FullAccess, CloudwWatchFullAccess, and V2.
Click “Add Role”. Go back to the main Role panel, find the new role, then click on it so we can add a policy.
On the right you will see a small pop-down menu, “Add permissions”. Click on the sub-menu item called “Create inline policy”.
On the next panel, from the Select a service menu, choose S3. Then you will see more options. Click the checkbox “Manual actions > All S3 actions”. Don’t be concerned about warnings or errors as it is the JSON tab that we really want right.
On the Policy editor at the top, click on the JSON tab.
Using your own bucket name, add the following lines with the bucket name you intend to use (even if the bucket is not created as yet) then click Next.
{
    "Version": "2012-10-17",
    "Statement": [
        {
            "Effect": "Allow",
            "Action": [
                "logs:CreateLogGroup",
                "logs:CreateLogStream",
                "logs:PutLogEvents"
            ],
            "Resource": "arn:aws:logs:*:*:*"
        },
        {
            "Effect": "Allow",
            "Action": "ses:SendRawEmail",
            "Resource": "*"
        },
        {
            "Effect": "Allow",
            "Action": [
                "s3:GetObject",
                "s3:PutObject"
            ],
            "Resource": "arn:aws:s3:::YOUR_EMAIL_BUCKET_NAME/*"
        }
    ]
}
On the next panel you give this a name. You cannot edit names later.
Click on the “Create policy” button. This takes yo back to the policy screen where you see your inline policy has been added. If you made a coding mistake, the editor should tell you, but you can edit the JSON at any time.
The Role will now be used to create a Lambda function in your email region, e.g. Oregon.
Here is a diagram showing the above steps:
Email Lambda functions - A Basic Notification
Add Lambda functions Node.js 22.x (SDK3)
Amazon continually removes older code. At time of writing SDK3 Node.js.22.x works.
When SDK2 was removed, there were no SDK3 replacements for a couple of years. no new clients could use the older code.
An awkward method was to install/configure postfix to use “mutt” to send email as a zip file attachment, or simply to notify an email had gone into the bucket. I still like to send a notification this has happened. Editing Lambda is not in my scope, but I have been able to work through some changes here and there.
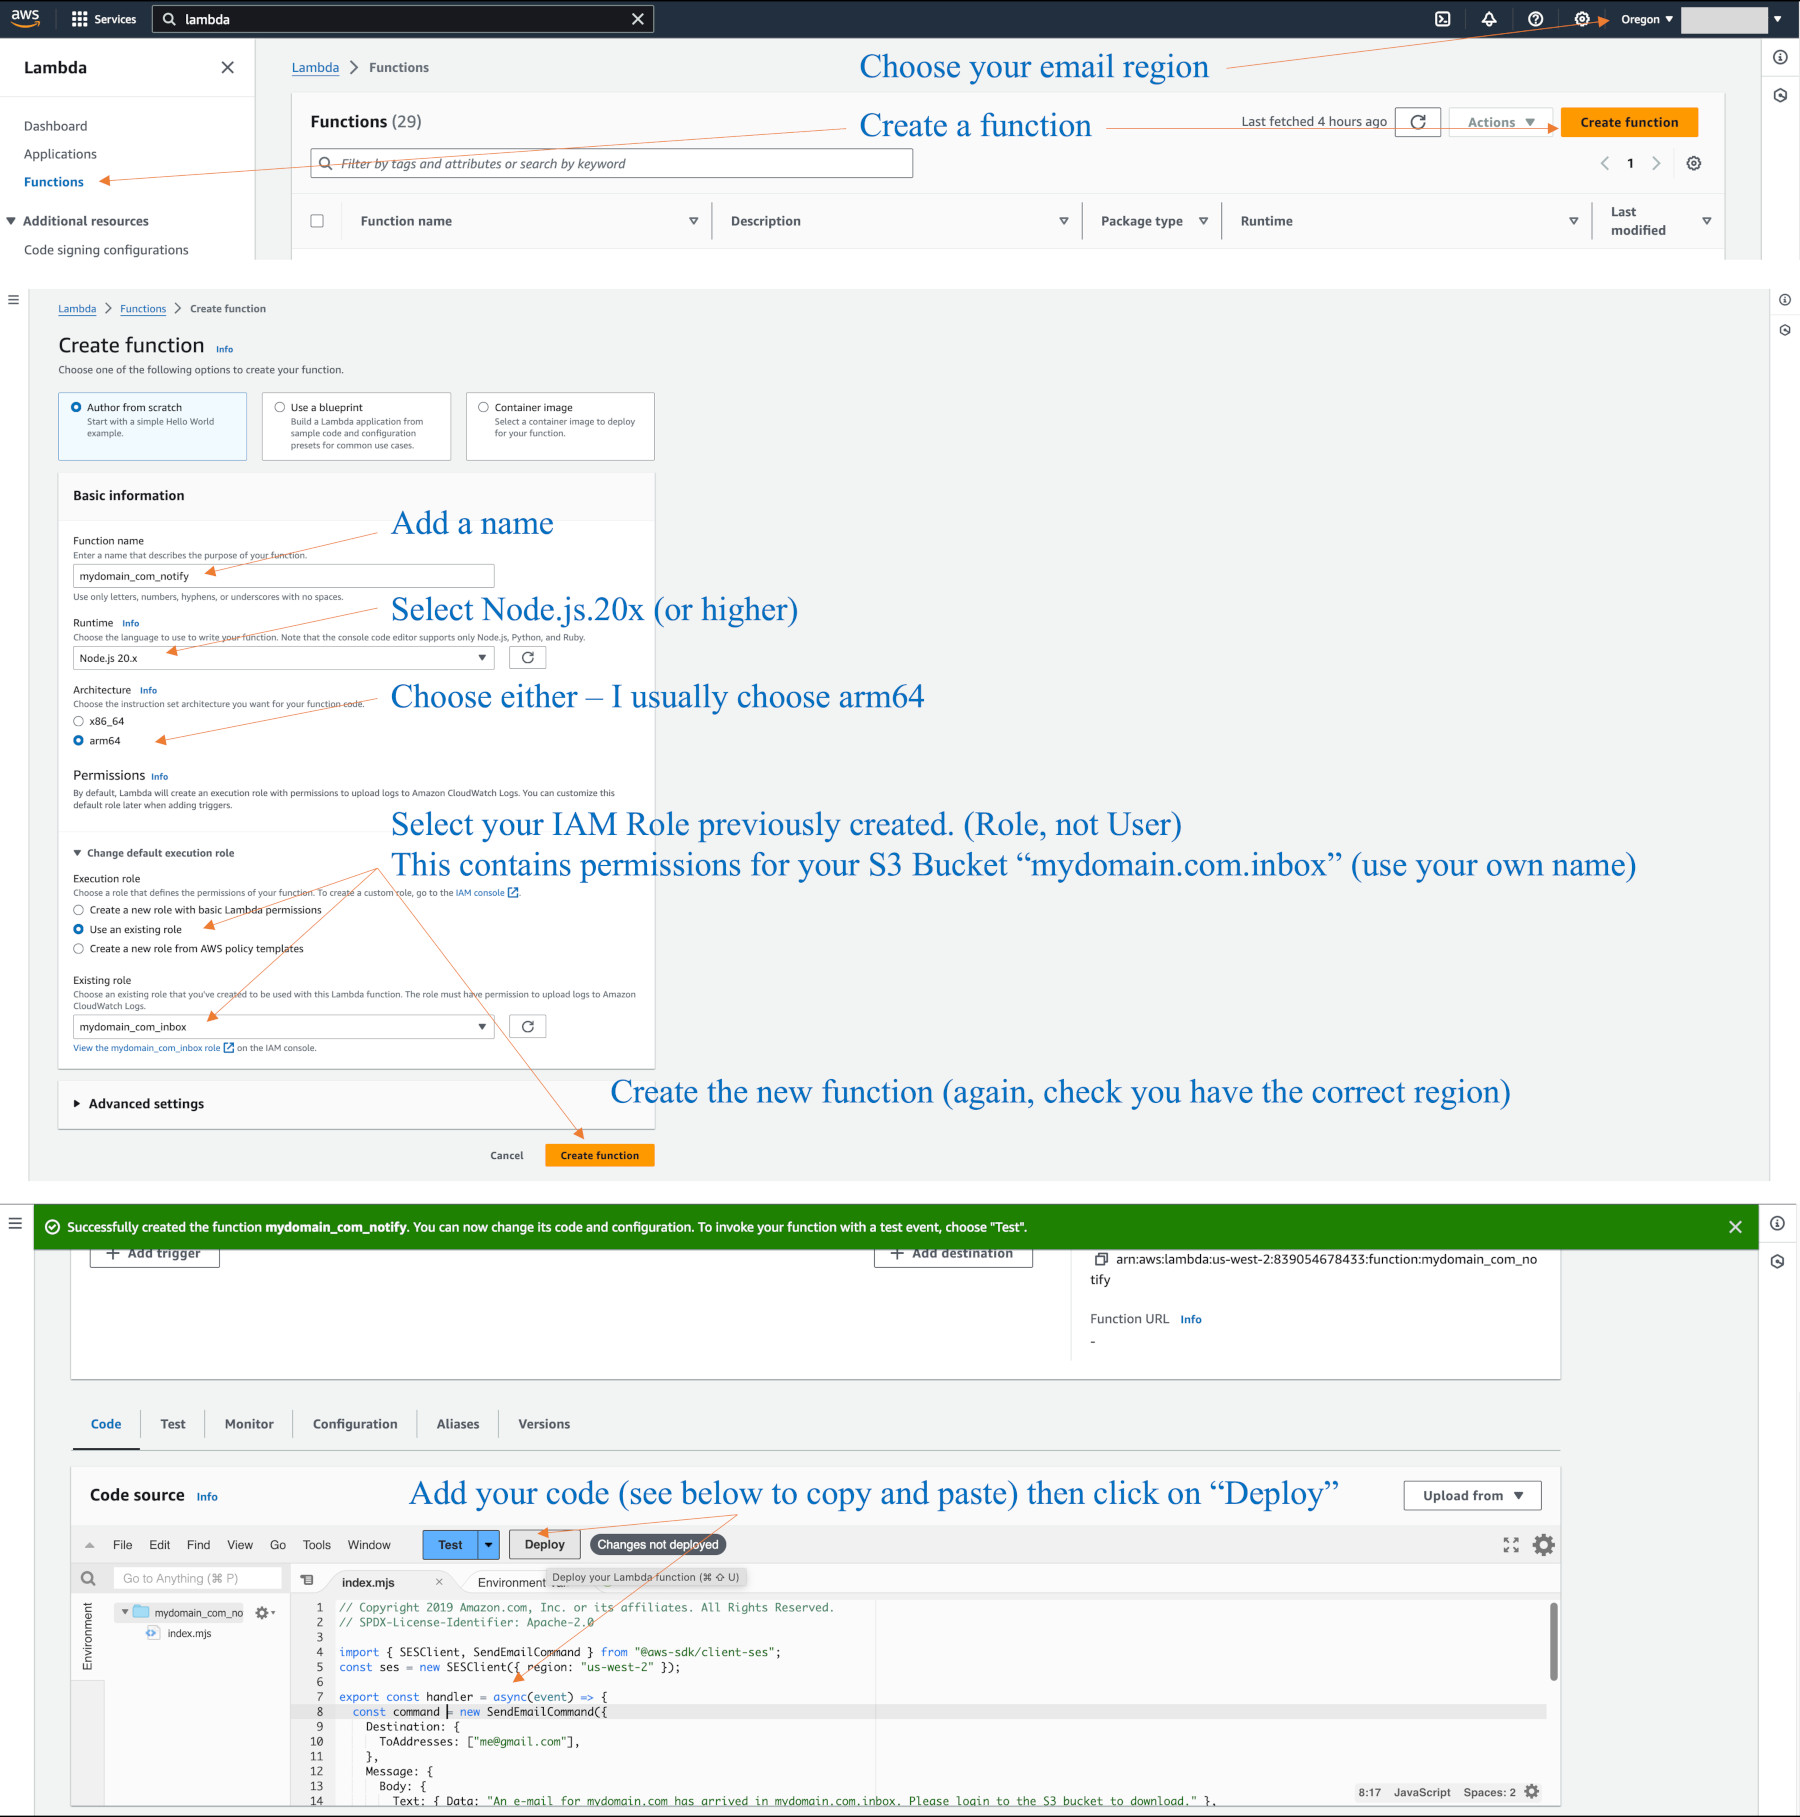
The diagram below shows Node.js.20.x (use current instead). Go to the Lambda console (you can search on it), select your email region (e.g. Oregon), and click on Functions, Create function.
Add our Basic Lambda funtion to SES as an Email receiving rule
Add a Lambda function to SES Email receiving rules
The SES “Receiving rule” below will catch emails for admin@mydomain.com. Have this address identity verified in your sandbox mode. It places the email into your S3 bucket, called mydomain.com.inbox in this example. Below the rule that adds it to the bucket, we choose the Lambda function(s) we want to run. I am showing the basic notification function we previously created. This assumes you have previously created the SES and S3 bucket “bare-bones” configurations.
Move out of Sandbox Mode
Remove sandbox mode so all emails are delivered
(Remember, if using postfix sendmail commands for any reason, you still have to verify the email address in SES)
Amazon changes how it does things from time to time. Removing sandbox mode can be searched in Google – “AWS remove sandbox mode”.
AWS will request some information as you proceed, or clarification requested in emails after you start the process.
There are some things to remember which the following can help you with:
You will apply for the 50,000 emails a day at 14 per second for your configuration. There is no other smaller setting.
Basically, in the forms say you will comply with SES, that it is not for marketing, it will be used for the WordPress website contact form, only using the WordPress emails to reply to clients (e.g. not creating email lists – you could put an option to add to a subscription in your contact form or use of products like MailChimp but do not need to advise of this) and forwarding a small number of emails to your personal address. Say you have configured the required postmaster@, abuse@, admin@ addresses, and you will monitor the statistics for any bounces and correct. That’s it. I also add administrator@, webmaster@, noreply@ and dmarc@. I add dmarc@ as a separate SES rule and don’t need notifications on those. I set a life cycle rule of a few days on the bucket that holds dmarc@ emails.
This should get you approved.
Once you are out of sandbox mode, you can go to town on adding addresses to any Lambda functions and the SES receiving rules.
You can review if you are still in public mode by your region’s SES account dashboard. Other regions will show you are in sandbox mode. Have some care to ensure bounced emails are never excessive, which can be reviewed in your SES statistics.
If you wish to open ports in your local region (e.g. Sydney or Melbourne) for using your own email service on Amazon, you request to open it out of sandbox mode as well, and say why. However, configuring your own email server is no simple matter and has high risks of failures. I found literally after three+ years of testing it was not worth using certain email services.
I also found serious problems for some known 3rd party email services – slowness, emails not downloading which stop other emails being viewed or created, emails with no content in the summary line.
SDK3 Node.js.22x Lambda Functions
These are the functions we can use to filter bad emails and forward to our PC/Mobile client.
- Drop spam
- Drop bad domains or addresses
- Filter for unwanted words in subject line
- Filter spam using bad replyTo addresses
- Forward to your email client
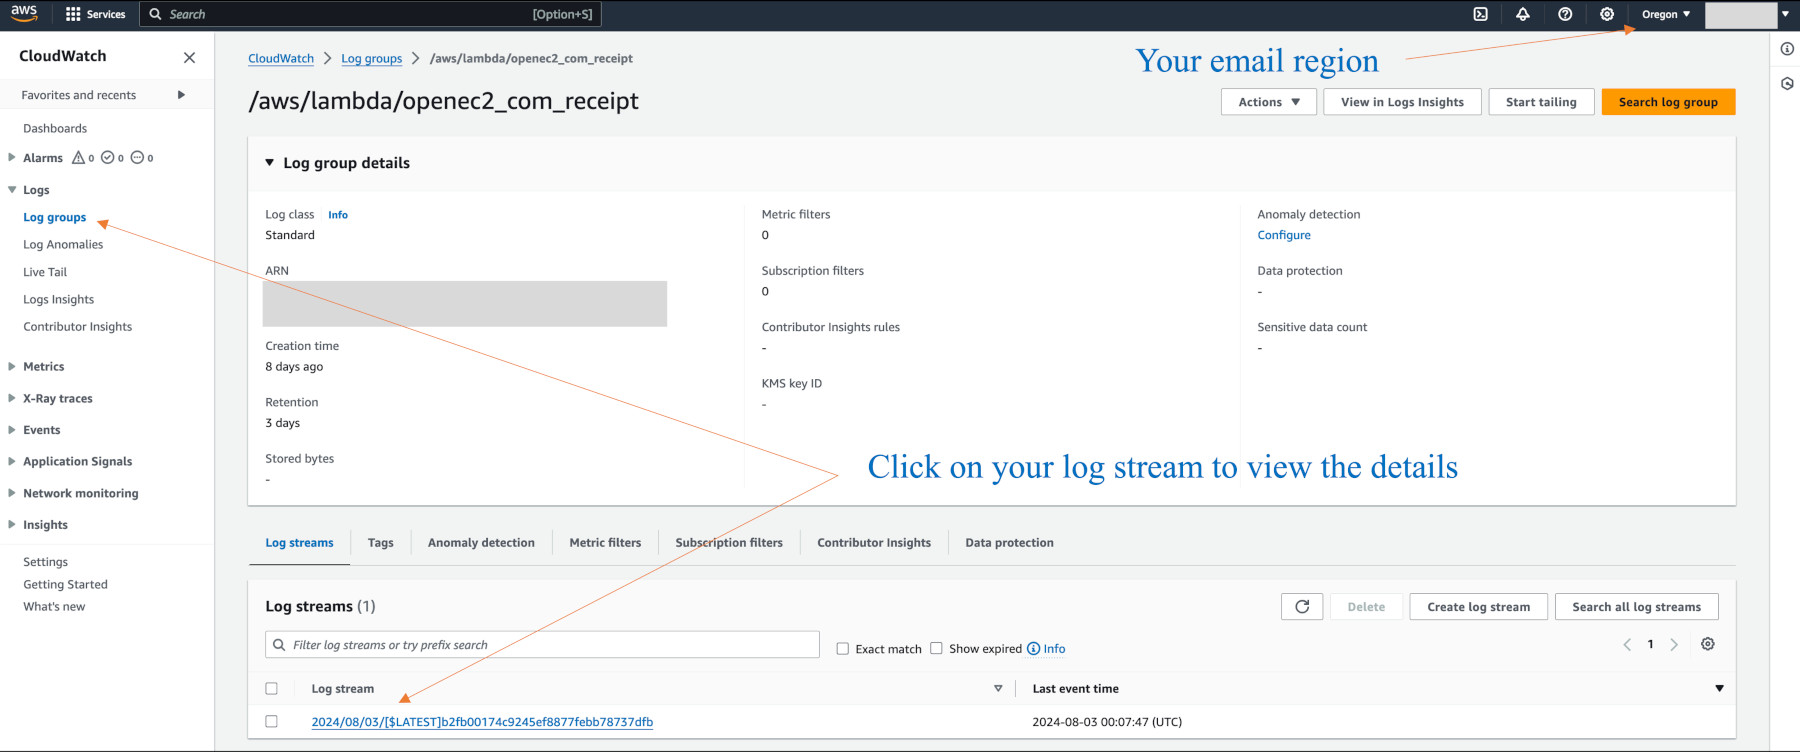
Add these to your SES Email receiving rule as required. First rule is to place into the S3 Bucket. Edit the rule until you get to the page to Add a New Action. From the drop-down select Invoke AWS Lambda function and choose the one you want. I’d suggest the basic function we did earlier if you always want a notification as any subsequent failures will stop more processing. Remember the CloudWatch logs help.
Always check “” for each function, and use “Event invocation” for the last rule.
When you save your rule, AWS will prompt to add permissions – yes.
You can create another rule to the same bucket, using something like .dmarc/ as a sub-directory for dmarc emails, and use a life cyle rule of a few days.
Your lifecycle for other emails could be 365 days.
Drop spam
I show the first basic cut of the code, and then more extended. You have to modify strings shown for yourself.
If email fails, the follow on Lambda functions are not processed. This is why it is best to add these after the basic Lambda notification function we previously made.
We should have a dmarc test or too many spams go through to us, so I added dmarcVerdict.status below.
LAMBDA FUNCTION to Drop Spam - e.g. call it SDK3_mydomain_com_spam

export const handler = async (event, context, callback) => {
  console.log('Spam filter');

  const sesNotification = event.Records[0].ses;
  console.log("SES Notification:\n", JSON.stringify(sesNotification, null, 2));

  // Check if any spam check failed
  if (sesNotification.receipt.spfVerdict.status === 'FAIL'
          || sesNotification.receipt.dkimVerdict.status === 'FAIL'
          || sesNotification.receipt.spamVerdict.status === 'FAIL'
          || sesNotification.receipt.dmarcVerdict.status === 'FAIL'
          || sesNotification.receipt.virusVerdict.status === 'FAIL') {

      console.log('Dropping spam');

      // Stop processing rule set, dropping message
      callback(null, {'disposition':'STOP_RULE_SET'});
  } else {
      callback(null, {'disposition':'CONTINUE'});
  }
};

[save the code]
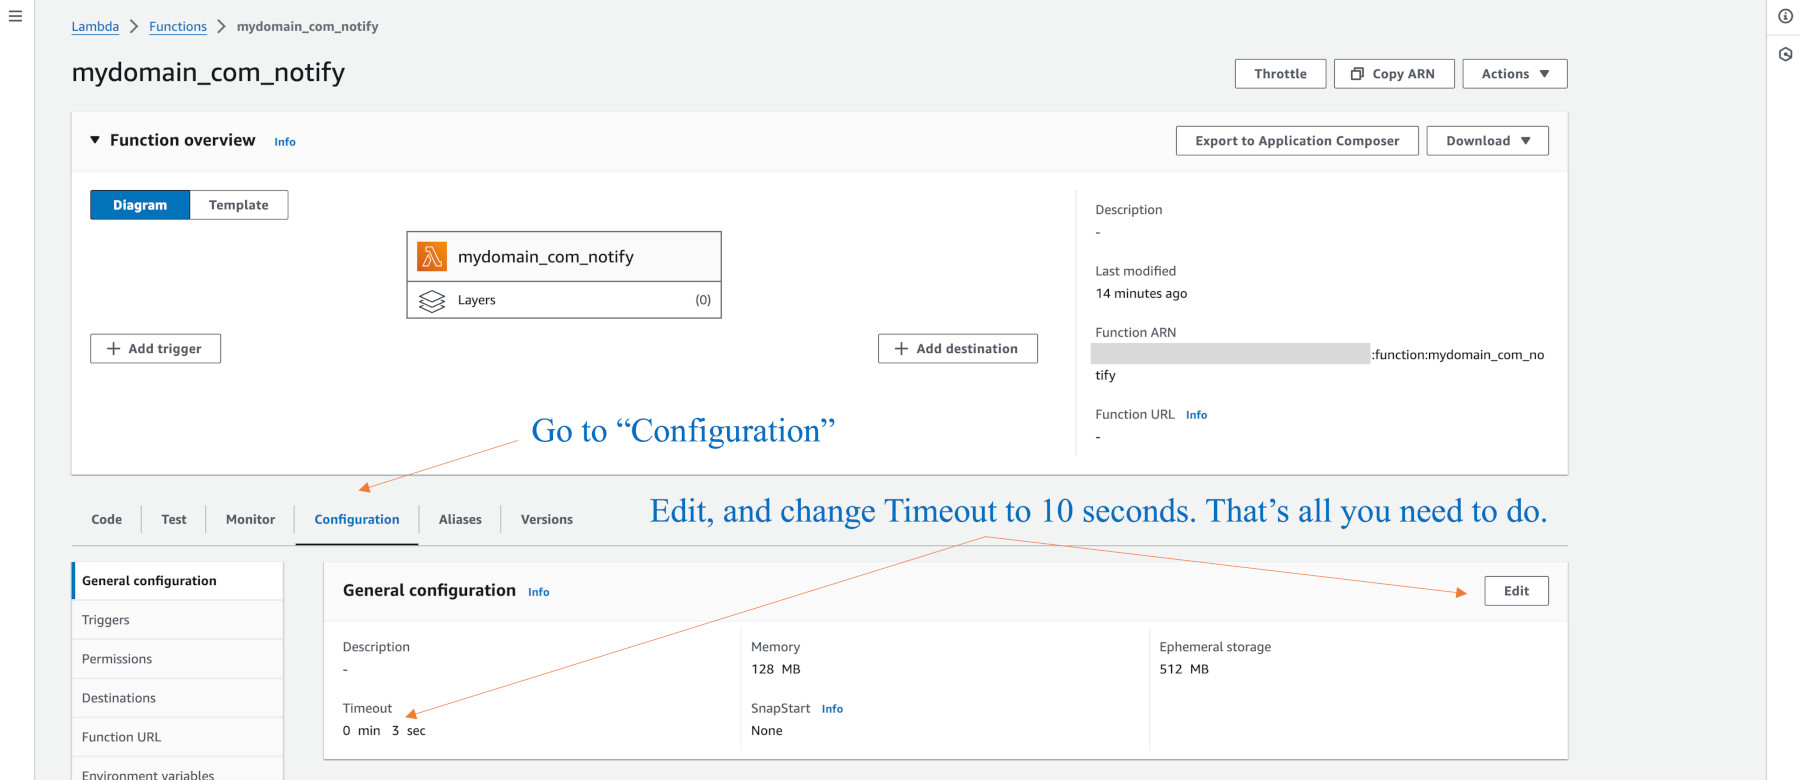
Under configuration change the time from 3s to 5s.
I have now modified to include more tests:
export const handler = async (event, context, callback) => {
  console.log('Spam filter');

  const sesNotification = event.Records[0].ses;
  console.log("SES Notification:\n", JSON.stringify(sesNotification, null, 2));

  // Check if any spam check failed
        if (sesNotification.receipt.spfVerdict.status === 'FAIL'
          || sesNotification.receipt.spfVerdict.status === 'GRAY'
          || sesNotification.receipt.spfVerdict.status === 'PROCESSING_FAILED'
          || sesNotification.receipt.spamVerdict.status === 'FAIL'
          || sesNotification.receipt.spamVerdict.status === 'GRAY'
          || sesNotification.receipt.spamVerdict.status === 'PROCESSING_FAILED'
          || sesNotification.receipt.dkimVerdict.status === 'FAIL'
        //  || sesNotification.receipt.dkimVerdict.status === 'GRAY'
          || sesNotification.receipt.dkimVerdict.status === 'PROCESSING_FAILED'
          || sesNotification.receipt.dmarcVerdict.status === 'FAIL'
          || sesNotification.receipt.dmarcVerdict.status === 'GRAY'
          || sesNotification.receipt.dmarcVerdict.status === 'PROCESSING_FAILED'
          || sesNotification.receipt.virusVerdict.status === 'GRAY'
          || sesNotification.receipt.virusVerdict.status === 'PROCESSING_FAILED'
          || sesNotification.receipt.virusVerdict.status === 'FAIL') {

      console.log('Dropping spam');

      // Stop processing rule set, dropping message
      callback(null, {'disposition':'STOP_RULE_SET'});
  } else {
      callback(null, {'disposition':'CONTINUE'});
  }
};
I had to comment out the GRAY test for dkim as there were too many valid emails being dropped. If you find emails dropped that should not, modify the above.
Drop bad domains or addresses
LAMBDA SDK3 Function to Drop bad domains or email addresses - e.g. call it SDK3_mydomain_com_domains

'use strict';

export const handler = async (event) => {
    console.log('Blocking email filter starting');
    const sesNotification = event.Records[0].ses;
    const messageId = sesNotification.mail.messageId;
    const receipt = sesNotification.receipt;
    const mail = sesNotification.mail;

    // Convert the environment variable into array. Clean spaces from it.
    const blockingListString = process.env.blockingList;
    const blockingListArray = blockingListString.replace(/\s/g, '').split(",");

    // Check if the mail source matches with any of the email addresses or domains defined in the environment variable
    const isListed = () => {
        return blockingListArray.some(item => mail.source.endsWith(item));
    };

    console.log('Processing message:', messageId);

    // Processing the message
    if (isListed()) {
        console.log('Rejecting messageId: ', messageId, ' - Source: ', mail.source, ' - Recipients: ', receipt.recipients, ' - Subject: ', mail.commonHeaders['subject']);
        return { disposition: 'STOP_RULE_SET' };
    } else {
        console.log('Accepting messageId:', messageId, ' - Source: ', mail.source, ' - Recipients: ', receipt.recipients, ' - Subject: ', mail.commonHeaders['subject']);
        return { disposition: 'CONTINUE' };
    }
};


[save the code]

Change the Configuration tab to show 5s instead of 3s.
Create the blocking rules via the Configuration > Environment variables tab:
Call the key: blockingList. (with a capital L)
In the values field use things like this: .io,.info,.biz,.cn,.ru,.tech,.mx, baddomain.com, jo@youareapest.com
Filter unwanted words in Subject line
This function will filter out words included in the subject line
e.g. SEO
Notes:
– this can be changed to equal a word by removing ‘include’ and using ===
– this is case dependent
– if you filtered out a Subject: word like ‘Business’ it would also filter out things like ‘Business ergonomics are our our thing’ so a little care is needed. You will get to know which spam subject words you receive over time.
'use strict';

export const handler = async (event,context,callback) => {
    console.log('Blocking email filter starting');
    const sesNotification = event.Records[0].ses;
    const messageId = sesNotification.mail.messageId;
    const receipt = sesNotification.receipt;
    const mail = sesNotification.mail;

    const searchValuea = "SEO";
    const searchValueb = "Potential";
    const searchValuec = "Failure";
    const searchValued = "Boost";
    const searchValuee = "Brand";
    const searchValuef = "Business";
    const searchValueg = "Proven";
    const searchValueh = "Can I";
    const searchValuei = "Fix";
    const searchValuej = "Social Media";
    const searchValuek = "business";

  if (sesNotification.mail.commonHeaders.subject.includes(searchValuea)
  ||  sesNotification.mail.commonHeaders.subject.includes(searchValueb)
  ||  sesNotification.mail.commonHeaders.subject.includes(searchValuec)
  ||  sesNotification.mail.commonHeaders.subject.includes(searchValued)
  ||  sesNotification.mail.commonHeaders.subject.includes(searchValuee)
  ||  sesNotification.mail.commonHeaders.subject.includes(searchValuef)
  ||  sesNotification.mail.commonHeaders.subject.includes(searchValueg)
  ||  sesNotification.mail.commonHeaders.subject.includes(searchValueh)
  ||  sesNotification.mail.commonHeaders.subject.includes(searchValuei)
  ||  sesNotification.mail.commonHeaders.subject.includes(searchValuej)
  ||  sesNotification.mail.commonHeaders.subject.includes(searchValuek)) {

      console.log('Dropping Subject', sesNotification.mail.commonHeaders.subject);

      // Stop processing rule set, dropping message
      callback(null, {'disposition':'STOP_RULE_SET'});
  } else {
      callback(null, {'disposition':'CONTINUE'});
  }

};
Filter bad replyTo addresses
Suppose the email passed all tests, seemingly valid, but it sneakily inserted a replyTo field to some scam site in Japan.
If the replyTo field is absent, we can’t test for a value, so we first test if there is a replyTo field and then block what we want.
For example:
'use strict';
export const handler = async (event,context,callback) => {
console.log('Blocking email replyTo filtering');
const sesNotification = event.Records[0].ses;
const messageId = sesNotification.mail.messageId;
const receipt = sesNotification.receipt;
const mail = sesNotification.mail;

const searchReplya = ".jp";

if (sesNotification.mail.commonHeaders.replyTo)

{

if (sesNotification.mail.commonHeaders.replyTo.includes(searchReplya)) {

console.log('Dropping replyTo', sesNotification.mail.commonHeaders.replyTo);
// Stop processing rule set, dropping message
callback(null, {'disposition':'STOP_RULE_SET'});
} else {
callback(null, {'disposition':'CONTINUE'});
}

}

};
This searches for Japan .jp email domains. Alter the standard configuration of 3s to 5s (seconds)
We then add the rule to SES Email rules, perhaps below the spam and filter tests. I will show an example in a moment.
Forward to your email client
This is the ultimate function we want to have – forward the email. You can configure to forward to multiple people, and catch various addresses, so long as those addresses are in the SES Email receiving configuration, and you are out of sandbox mode.
You need to edit the fields near the top for your own Oregon (assumed) bucket name where it says MY_BUCKET. My example uses the sub-directory .ses/
The example code lists one email primary domain with some aliases and multiple forwarding – so change to suite your addresses.
"use strict";

import { S3Client, GetObjectCommand } from "@aws-sdk/client-s3";
import { SESClient, SendRawEmailCommand } from "@aws-sdk/client-ses";

console.log("AWS Lambda SES Forwarder // @arithmetric // Version 5.0.0");

// Configure the S3 bucket and key prefix for stored raw emails, and the
// mapping of email addresses to forward from and to.
//
// Expected keys/values:
//
// - fromEmail: Forwarded emails will come from this verified address
//
// - subjectPrefix: Forwarded emails subject will contain this prefix
//
// - emailBucket: S3 bucket name where SES stores emails.
//
// - emailKeyPrefix: S3 key name prefix where SES stores email. Include the
//   trailing slash.
//
// - allowPlusSign: Enables support for plus sign suffixes on email addresses.
//   If set to `true`, the username/mailbox part of an email address is parsed
//   to remove anything after a plus sign. For example, an email sent to
//   `example+test@example.com` would be treated as if it was sent to
//   `example@example.com`.
//
// - forwardMapping: Object where the key is the lowercase email address from
//   which to forward and the value is an array of email addresses to which to
//   send the message.
//
//   To match all email addresses on a domain, use a key without the name part
//   of an email address before the "at" symbol (i.e. `@example.com`).
//
//   To match a mailbox name on all domains, use a key without the "at" symbol
//   and domain part of an email address (i.e. `info`).
//
//   To match all email addresses matching no other mapping, use "@" as a key.
var defaultConfig = {
  fromEmail: "contact@mydomain.com",
  subjectPrefix: "",
  emailBucket: "MY_BUCKET",
  emailKeyPrefix: ".ses/",
  allowPlusSign: true,
  forwardMapping: {
    "admin@mydomain.com": [
      "me@pm.me"
     ],
    "john@mydomain.com": [
      "john@gmail.com"
    ],
    "contact@mydomain.com": [
      "me@pm.me",
      "you@gmail.com"
    ],
    "noreply@mydomain.com": [
      "me@gmail.com"
    ],
    "postmaster@mydomain.com": [
      "me@gmail.com"
    ],
    "webmaster@mydomain.com": [
      "me@gmail.com"
    ],
    "administrator@mydomain.com": [
      "bob@outlook.com"
    ],
    "abuse@mydomain.com": [
      "me@gmail.com",
      "you@gmail.com"
    ]
  }
};

/**
 * Parses the SES event record provided for the `mail` and `receipients` data.
 *
 * @param {object} data - Data bundle with context, email, etc.
 *
 * @return {object} - Promise resolved with data.
 */
async function parseEvent(data) {
  // Validate characteristics of a SES event record.
  if (!data.event ||
      !data.event.hasOwnProperty('Records') ||
      data.event.Records.length !== 1 ||
      !data.event.Records[0].hasOwnProperty('eventSource') ||
      data.event.Records[0].eventSource !== 'aws:ses' ||
      data.event.Records[0].eventVersion !== '1.0') {
    return Promise.reject(new Error('Error: Received invalid SES message.'));
  }

  data.email = data.event.Records[0].ses.mail;
  data.recipients = data.event.Records[0].ses.receipt.recipients;
  return Promise.resolve(data);
}

/**
 * Transforms the original recipients to the desired forwarded destinations.
 *
 * @param {object} data - Data bundle with context, email, etc.
 *
 * @return {object} - Promise resolved with data.
 */

async function transformRecipients(data) {
  const newRecipients = new Set(); // Use a Set for efficient uniqueness checks
  data.originalRecipients = data.recipients;

  for (const origEmail of data.originalRecipients) {
    const origEmailKey = data.config.allowPlusSign
      ? origEmail.toLowerCase().split('+')[0]
      : origEmail.toLowerCase();

    // Check for direct email mappings
    if (data.config.forwardMapping[origEmailKey]) {
      data.config.forwardMapping[origEmailKey].forEach(email => newRecipients.add(email));
      continue; // Skip further checks if a direct mapping is found
    }

    // Check for domain and username mappings
    const [origEmailUser, origEmailDomain] = origEmailKey.split('@');
    if (origEmailDomain && data.config.forwardMapping[`@${origEmailDomain}`]) {
      data.config.forwardMapping[`@${origEmailDomain}`].forEach(email => newRecipients.add(email));
    } else if (origEmailUser && data.config.forwardMapping[origEmailUser]) {
      data.config.forwardMapping[origEmailUser].forEach(email => newRecipients.add(email));
    } else if (data.config.forwardMapping['@']) {
      data.config.forwardMapping['@'].forEach(email => newRecipients.add(email));
    }
  }

  data.recipients = Array.from(newRecipients); // Convert Set back to Array
  return data;
}


/**
 * Fetches the message data from S3.
 *
 * @param {object} data - Data bundle with context, email, etc.
 *
 * @return {object} - Promise resolved with data.
 */
async function fetchMessage(data) {
    // Copying email object to ensure read permission
    const s3Params = {
        Bucket: data.config.emailBucket,
        Key: data.config.emailKeyPrefix + data.email.messageId,
    };

    try {
        const s3Response = await data.s3.send(new GetObjectCommand(s3Params));
        // Stream the S3 object contents
        const stream = s3Response.Body;
        const chunks = [];
        for await (const chunk of stream) {
            chunks.push(chunk);
        }
        data.emailData = Buffer.concat(chunks).toString('utf-8');
        return data;
    } catch (error) {
        console.error("Error fetching message from S3:", error);
        throw new Error('Error: Failed to load message body from S3.');
    }
}

/**
 * Processes the message data, making updates to recipients and other headers
 * before forwarding message.
 *
 * @param {object} data - Data bundle with context, email, etc.
 *
 * @return {object} - Promise resolved with data.
 */
async function processMessage(data) {
  var match = data.emailData.match(/^((?:.+\r?\n)*)(\r?\n(?:.*\s+)*)/m);
  var header = match && match[1] ? match[1] : data.emailData;
  var body = match && match[2] ? match[2] : '';

  // Add "Reply-To:" with the "From" address if it doesn't already exists
  if (!/^reply-to:[\t ]?/mi.test(header)) {
    match = header.match(/^from:[\t ]?(.*(?:\r?\n\s+.*)*\r?\n)/mi);
    var from = match && match[1] ? match[1] : '';
    if (from) {
      header = header + 'Reply-To: ' + from;
    }
  }

  // SES does not allow sending messages from an unverified address,
  // so replace the message's "From:" header with the original
  // recipient (which is a verified domain)
  header = header.replace(
    /^from:[\t ]?(.*(?:\r?\n\s+.*)*)/mgi,
    function(match, from) {
      var fromText;
      if (data.config.fromEmail) {
        fromText = 'From: ' + from.replace(/<(.*)>/, '').trim() +
        ' <' + data.config.fromEmail + '>';
      } else {
        fromText = 'From: ' + from.replace('<', 'at ').replace('>', '') +
        ' <' + data.originalRecipient + '>';
      }
      return fromText;
    });

  // Add a prefix to the Subject
  if (data.config.subjectPrefix) {
    header = header.replace(
      /^subject:[\t ]?(.*)/mgi,
      function(match, subject) {
        return 'Subject: ' + data.config.subjectPrefix + subject;
      });
  }

  // Replace original 'To' header with a manually defined one
  if (data.config.toEmail) {
    header = header.replace(/^to:[\t ]?(.*)/mgi, () => 'To: ' + data.config.toEmail);
  }

  // Remove the Return-Path header.
  header = header.replace(/^return-path:[\t ]?(.*)\r?\n/mgi, '');

  // Remove Sender header.
  header = header.replace(/^sender:[\t ]?(.*)\r?\n/mgi, '');

  // Remove Message-ID header.
  header = header.replace(/^message-id:[\t ]?(.*)\r?\n/mgi, '');

  // Remove all DKIM-Signature headers to prevent triggering an
  // "InvalidParameterValue: Duplicate header 'DKIM-Signature'" error.
  // These signatures will likely be invalid anyways, since the From
  // header was modified.
  header = header.replace(/^dkim-signature:[\t ]?.*\r?\n(\s+.*\r?\n)*/mgi, '');

  data.emailData = header + body;
  return Promise.resolve(data);
}

/**
 * Send email using the SES sendRawEmail command.
 *
 * @param {object} data - Data bundle with context, email, etc.
 *
 * @return {object} - Promise resolved with data.
 */
async function sendMessage(data) {
  var params = {
    Destinations: data.recipients,
    Source: data.originalRecipient,
    RawMessage: {
      Data: Buffer.from(data.emailData)
    }
  };
  return new Promise(function(resolve, reject) {
    data.ses.send(new SendRawEmailCommand(params), function(err, result) {
      if (err) {
        return reject(new Error('Error: Email sending failed.'));
      }
      resolve(data);
    });
  });
}

/**
 * Handler function to be invoked by AWS Lambda with an inbound SES email as
 * the event.
 *
 * @param {object} event - Lambda event from inbound email received by AWS SES.
 * @param {object} context - Lambda context object.
 * @param {object} callback - Lambda callback object.
 * @param {object} overrides - Overrides for the default data, including the
 * configuration, SES object, and S3 object.
 */
export const handler = async (event, context, callback, overrides) => {
  try {
    let steps = overrides?.steps || [
      parseEvent,
      transformRecipients,
      fetchMessage,
      processMessage,
      sendMessage
    ];

    let data = {
      event,
      context,
      config: overrides?.config || defaultConfig,
      ses: overrides?.ses || new SESClient(),
      s3: overrides?.s3 || new S3Client({ signatureVersion: 'v4' })
    };

    for (const step of steps) {
      data = await step(data);
    }

    console.log("Process finished successfully.");
    callback(null, 'Success');
  } catch (error) {
    console.error("Error in processing:", error);
    callback(error);
  }
};
On review, I think it helpful to create a “.all” directory under the inbound email bucket with a life cycle of perhaps 30 days.
The best order of the lambda functions is:
Store all incoming emails in .all/
Run the notify Lambda function if you want to know about anything that arrives – the email’s subject line will let you know if it was a dodgy email anyway.
Run the Lambda functions: spam, domains, subject line (filter), replyTo.
At this point a “good” email will now be processed…
Store the email in .ses/
Run the Lambda forward function.
Familiarity with all the previous content is a major milestone that most web services will not cover or therefore be able to offer. It is quite a learning curve and an achievement.
mail.sh shell script – Process the Bucket emails
MAIL.SH shell script – Process the Bucket emails
OPTION 1 – Manage Bucket Emails
We can run a shell script in crontab to examine the emails in .ses/ and move to a .archive/ folder or .other/ folder for everything else.
We would have an SES rule to receive and process the incoming emails and a separate rule to put DMARC emails in to a .dmarc/ folder with a small life cycle.
For example, if you have domain.net as a WordPress site, with SES designed to manage emails for that domain, the above SES configurations will forward you an email. But we still need to manage the emails in the bucket folders. For this we run a shell script via crontab.
For the purposes of the shell script, we create /data/ses/BUCKET_NAME. E.g. /data/ses/domain.net.
Under this we create a blank .register.csv and a register_block.csv file with this header:
Date, Time, Size, Email, Client IP, From, To, Subject
Then create three directories: workdir, archivedir, outdir
Fix the permissions as follows:
cd /data
ls -l
drwxrwsrwx 19 root ec2-user 16384 Jul 1 15:13 ses
cd ses
ls -l
drwxrwsrwx 3 root ec2-user 19 Feb 13 11:24 domain.net
(Use your own bucket name. e.g. it could by mydomain.net.email if you previously created this in SES under Oregon for Australia)
cd domain.net
ls -l
drwxrwsrwx 2 root ec2-user archivedir
drwxrwsrwx 2 root ec2-user outdir
-rwxrwxrwx 1 root ec2-user register.csv
-rwxrwxrwx 1 root ec2-user register_block.csv
drwxrwsrwx 2 root ec2-user workdir
Here is an example crontab entry:
# once a day at 4am
0 4 * * * /home/ec2-user/email.sh domain.net.email >/dev/null 2>&1
The script loops through emails in .ses/. We append entries to register.csv and register_block.csv as a record. The “other” emails are based on the shell script so it is not 100% fool proof for sorting archive emails from junk emails. An email provider like MS Exchange or Axigen will do a better job. THis is fine, because we simply want to sort the emails in the .ses/ incoming bucket, and by using the Lambda notify function we should spot if a junk email is likely not.
Remember, all this is because we are doing free email forwarding from a low use of the contact form on a WordPress site.
OPTION 2 – Archive Copies of Primary Emails from a Provider Such as MS Exchange
However, we can use the same process for our primary email account to forward a copy of each inbound email to Amazon bucket SES, thus keeping emails for perhaps a year in case we accidentally delete an email permanently. We can hunt for the email in the register.csv files, obtain the Amazon ID code, and manually download it from the ./archive bucket.
This option needs another domain name not used by your primary email provider. I have not tested subdomains, but that should be fine. In MS Exchange you would add another domain as a remote domain – we assume you have the skills to know what to do here. The DNS records would not be created from MS Exchange, but created in Amazon SES. There is a bit involved in MS Exchange to allow forwarding, and to then do the forwarding rule. It is easier in Axigen, as you simply say to forward any inbound email as a copy to your Amazon SES/email domain.
I would advise it is easier not to delete your trash can. You have the disk space so manually delete old emails way down the track.
It is also possible to configure MS Exchange to capture sent emails, and send those to another S3 Bucket via another SES rule.
For now, lets focus on the mail.sh shell script.
When you download this script, do not edit it on your PC. Upload it to your EC2 instance. e.g. to /home/ec2-user or in Debian, /home/admin.
Then you can edit with the vi editor as needed.
The problem is that there are some ^M single characters in a few of the sed commands. If you see something like this:
cat $work/$efile | sed '0,/Subject: /{s//Subject: [archive] /}' | sed 's/
//g' > $adir/$efile.tmp

then the ^M characters have been removed. You would need to change to:

cat $work/$efile | sed '0,/Subject: /{s//Subject: [archive] /}' | sed 's/^M//g' > $adir/$efile.tmp in order for the script to work.
You cannot copy the characters from this extract here. You have to use the CONTROL V M sequence to create it.

The permissions are:
-rwxrwxrwx 1 root ec2-user   mail.sh
mail.sh shell script – Option 2 MS Exxchange Forwarding
Option 2 – MS Exchange Forwarding Copies
Do we provide MS Exchange configurations for forwarding copies? I am not sure it is of value to do so, but I will show the configs in case.
Forwarding of Inbound Emails
(1) Add a remote domain
MS 365 Admin Center > Mail Flow > Remote domains – Add the domain or subdomain you will use in Amazon S3 and SES for email copies. We assume the DNS records are already done, and SES has verified. The domain name may not be a duplicate of the existing MS Exchange domain. Either another domain, or you can try a subdomain such as email.domain.net if MS Exchange is using domain.net.
(2a) Add a forwarding rule to the domain in step 1 above and (2b) enable it.
MS 365 Admin Center > Users > Active Users – click on the exchange account user > Mailbox tab > Email Forwarding
Add the forwarding address and check to keep a copy of the original. Then back a step to the menu that says Email Forwarding and enable it.
(As a reminder, you must have previously set up your MS Exchange primary email with DMARC/DKIM/SPF via MS Defender Policies & Rules, Threat Policies, Email Authentication Policies, DKIM.)
Now go to Microsoft Defender (Security) > Policies and Rules > Threat Policies > Anti Spam
Add a new rule, calling it “Custom Inbound Mail Forward”
The rules should have the following:
Description
Forwarding Copies of Emails to AWS S3 Bucket
With your own primary exchange account (I am using domain.net as an example)
Included users
bob@domain.net
Included recipient
domainsdomain.net
I have other settings like Bulk email/Javascript/SPF Hard fail/Backscatter/ spam ON.
Actions:
(Defaults, I think. Move spam to junk folder)
This is the key one, Allowed and Blocked senders:
Add your primary, e.g. bob@domain.com, any major alias you use, e.g. admin@domain.net
Add the Amazon SES domain you will use to forward to. e.g. bob@email.domain.net. This domain you previously put in the allowed remote domains list.
Under the Allowed Domains put your domain.net and email.domain.net entries (use your own of course)
Then enable the status of the rule. MS is a bit tricky, so check you did save the above entries. Sometimes you have to tick the check boxes you created.
Forward Sent Email Copies
You can either combine the sent emails into the same S3 bucket using the same SES rules, or create another bucket and email address such as:
domain.net.sent and sent@email.domain.com. It is up to you.
Go to Exchange Admin center > Mail flow > Rules.
Add a rule:
Forward Sent Emails to AWS S3 Bucket
The Sender is this person: bob@domain.net
Modify the message property: Set the spam confidence level (SCL) to ‘-1’
Add recipients to the Bcc box: Blind carbon copy (bcc) the message to ‘sent@email.domain.net’
Rule settings:
priority 1
enforce
Match sender address in header: Header
Then enable the status.
You can test with your SES rules and S3 buckets.
This does work, so you may nee to understand the interactions and configuration further as you test.
It is very hard to find these configurations on the Internet.
